
How to Repair Travel Trailer Roof in Utah | DIY Guide

You're at a Utah campground, ready to head toward Jordanelle or Bear Lake, when you notice a brown ceiling mark inside your travel trailer. Outside, the roof may show nothing more than a cracked bead of sealant. That small defect can still hide wet insulation, soft decking, damaged framing, or wiring affected by moisture.
Learning how to repair a travel trailer roof starts with more than applying caulk. You need to identify the roof material, locate the actual entry point, inspect the substrate, and choose products that can tolerate Utah's sun, snow, dust, freeze-thaw cycles, and road vibration. A clean patch can work for a localized puncture. It won't solve a roof that has already begun to delaminate or rot.
This guide follows the approach we use when helping Utah RV owners make that decision. You'll learn where DIY repairs make sense, which shortcuts create expensive problems, and when a roof inspection by Motor Sportsland's service team is the safer choice.
Why Roof Repairs Start With Diagnosis, Not Sealant
A brown ceiling mark after a Utah storm can look like a simple caulk failure. Water may have entered at a vent, skylight, antenna, air-conditioner seal, or perimeter joint, then traveled through the roof assembly before staining the interior. The visible mark may be several feet from the actual opening.
That makes how to repair a travel trailer roof a structural and electrical diagnosis problem. Before applying sealant, check whether insulation is damp, the roof deck is soft, framing has swollen, or wiring and fixtures show signs of moisture. A patch can stop a localized puncture. It cannot restore deteriorated material hidden below the membrane.
The EPA moisture and water-damage guidance advises prompt correction of moisture problems and recommends drying wet materials, ideally within 24 to 48 hours. Materials that cannot be cleaned and dried adequately may require removal and replacement. EPA building data is not RV-specific, but the same principle applies: delayed drying gives moisture more time to damage insulation, wood, finishes, and electrical components.
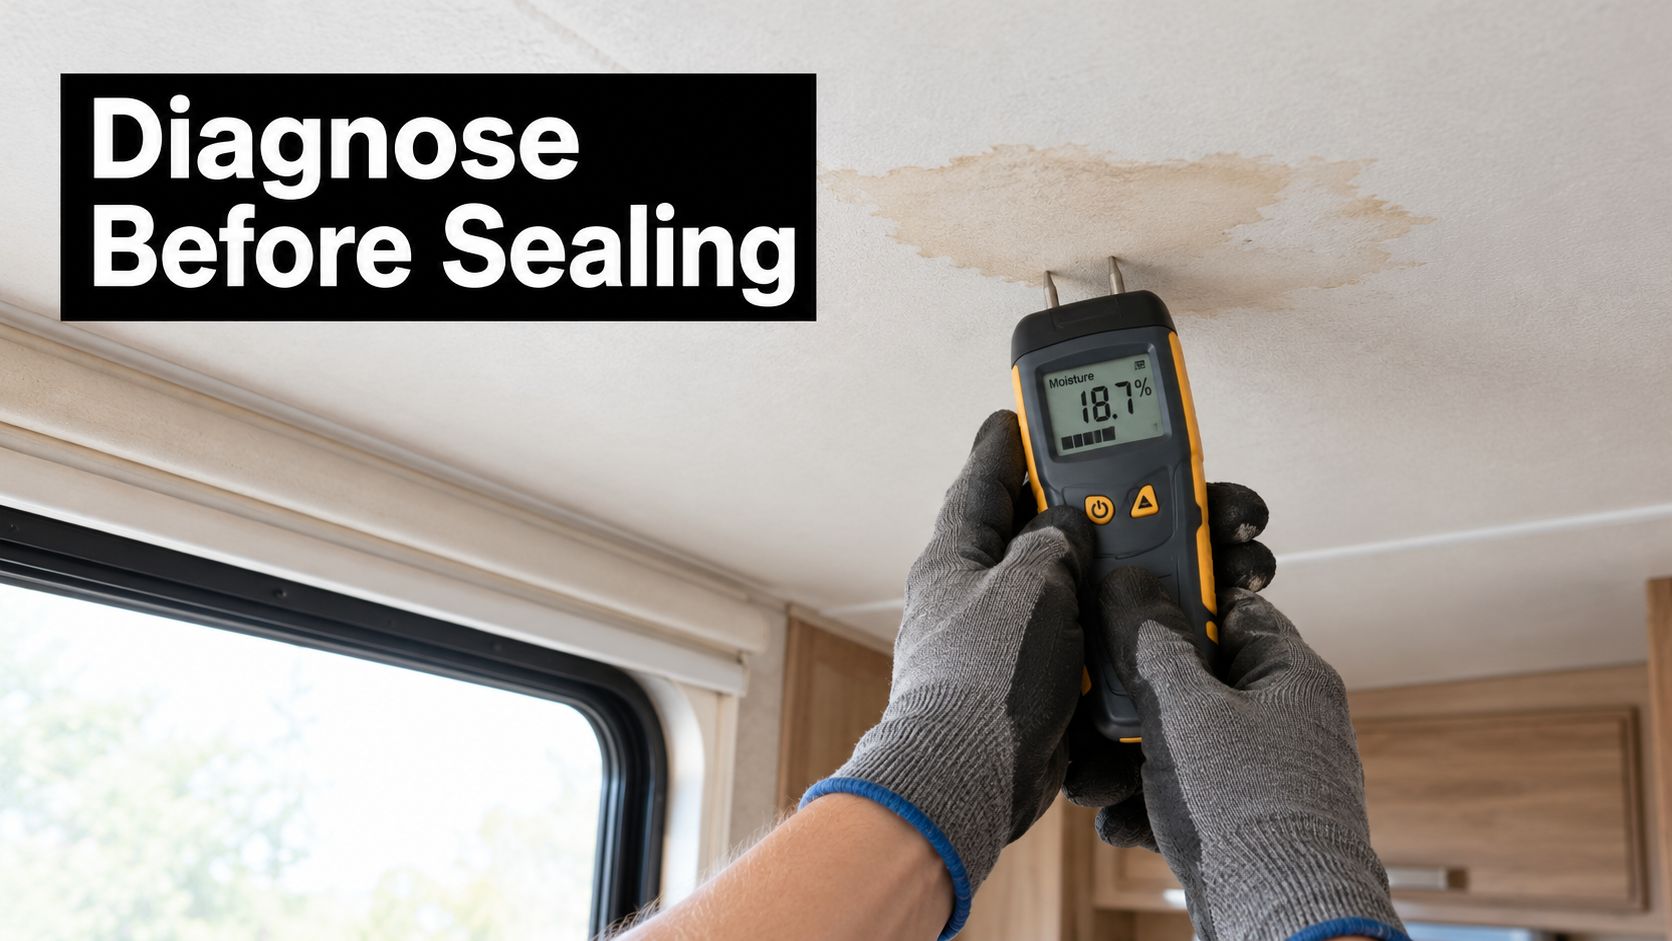
Map the leak before touching the roof
Begin inside the trailer. Photograph stains, soft ceiling sections, swollen trim, bubbling wall panels, delamination, and musty odors. Press gently around the affected area, and stop if the material feels weak or wiring may be concealed behind it.
Then inspect above the damage and work uphill toward roof penetrations. Check:
- Roof seams and perimeter joints for cracked, lifted, or separated sealant.
- Vent caps and skylights, including corners and fasteners.
- Antennas, plumbing boots, and air-conditioner curbs as separate entry zones.
- Interior wiring and fixtures near lights, outlets, and powered equipment.
- The roof deck with careful probing or a moisture meter where appropriate.
Practical rule: Sealant over wet insulation or soft plywood hides the symptom while the underlying damage continues.
Use these seasonal roofing care steps to organize checks before storage and long towing trips. In Utah's sun, snow, dust, freeze-thaw cycles, and road vibration, diagnosis should guide the repair product and the DIY decision. Call Motor Sportsland's service team when moisture reaches framing, electrical areas, or a weakened deck.
Identifying Your Roof Material Before Any Repair
The correct answer to “what sealant should I use?” depends on the membrane. Travel trailers commonly use EPDM rubber, TPO, fiberglass, or coated metal, and those surfaces don't share the same cleaner, primer, adhesive, patch, or coating requirements.
Begin with the owner's documentation, a roof label, or the trailer manufacturer's specifications. If the paperwork is missing, inspect the surface carefully rather than guessing from color alone. EPDM often presents as a flexible rubber membrane with visible seams. TPO is commonly a light, heat-reflective single-ply membrane. Fiberglass feels rigid and usually forms a molded shell, while coated metal shows panel lines and may reveal coating wear or corrosion.
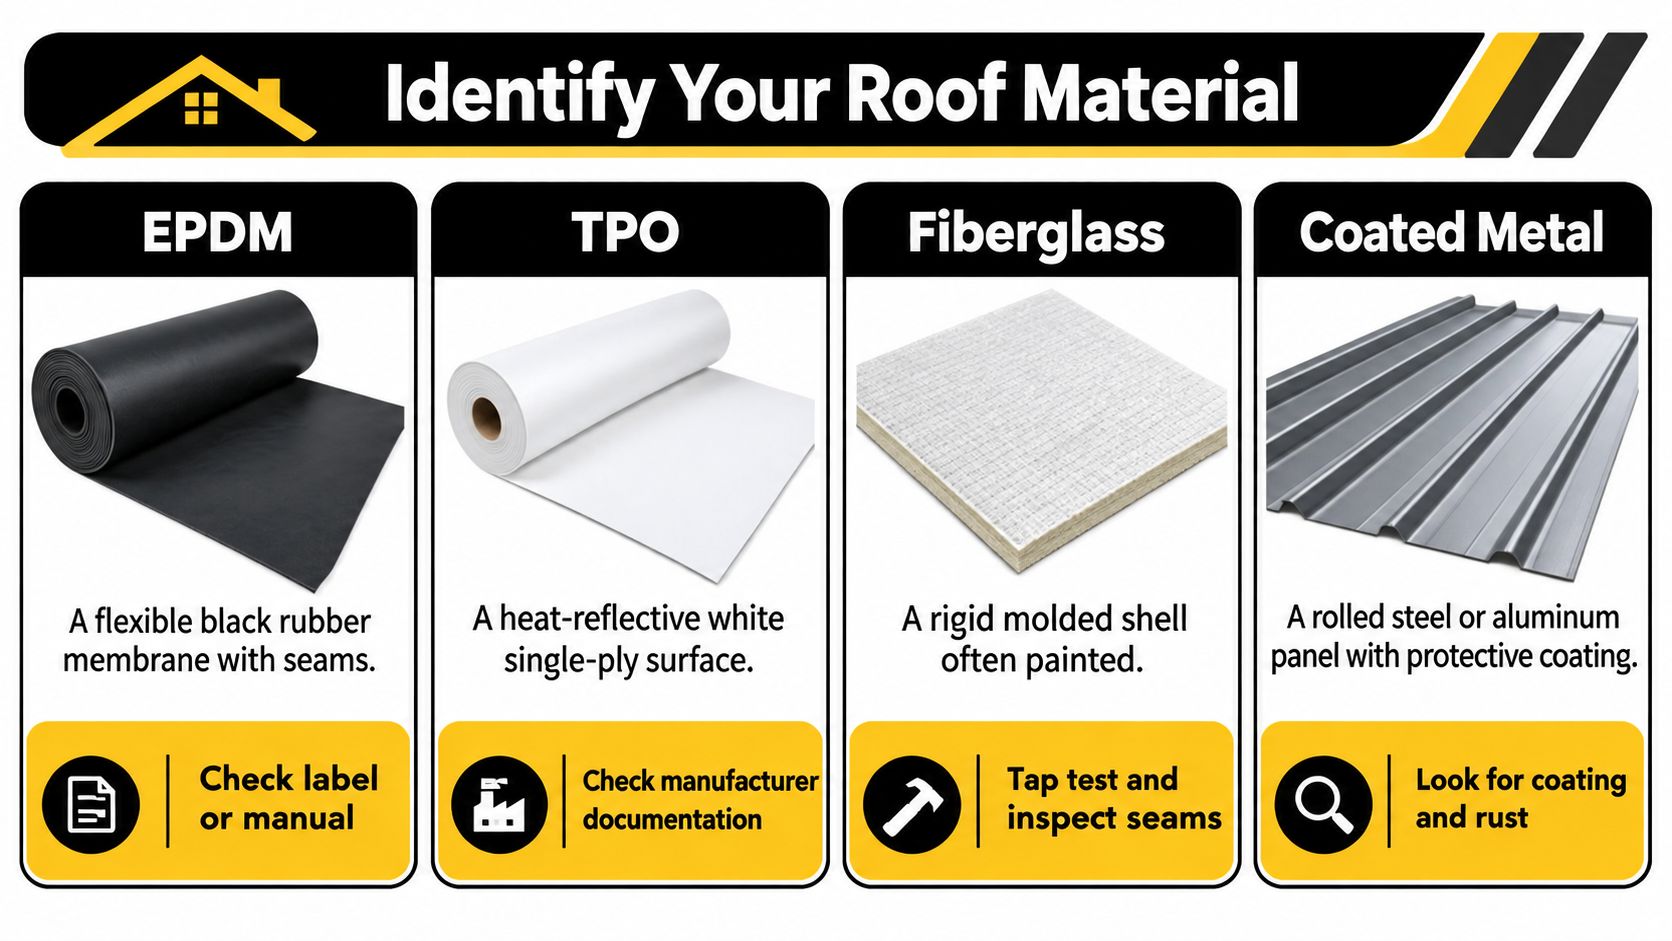
Match every product to the surface
EPDM and TPO aren't interchangeable. EPDM requires products specifically rated for EPDM. TPO needs a sealant or coating whose compatibility listing explicitly includes TPO. Standard silicone is generally unsuitable for EPDM because it can leave residue that interferes with future adhesion. (RV sealant compatibility guidance)
Petroleum cleaners and aggressive solvents can weaken some rubber and thermoplastic membranes. Use the cleaner recommended by the roof and sealant manufacturer, and test an inconspicuous area if the instructions permit it. A product can resist water and still fail because it won't bond correctly, blisters, or damages the membrane.
Coating work requires more preparation than a small patch. The roof should be clean, dry, and watertight first, and you should perform an adhesion test before committing to the full surface. One published roofing specification requires minimum adhesion of 2.0 pounds per linear inch before coating. It also calls for application at approximately 4°C, or 40°F, and rising, with no rain, dew, fog, or freezing conditions expected for eight hours. (EPDM coating specification)
Waterproof isn't the same as compatible. Read the product's compatibility chart before opening the tube.
Safe Roof Inspection and Leak Mapping Steps
Inspect the roof from a stable ladder and use a roof surface only if the trailer manufacturer permits it. Wear footwear that won't damage the membrane, avoid kneeling on vulnerable areas, and never treat a wet or dusty roof as a safe work platform. After a long tow, hailstorm, heavy snow, or storage period, look for new punctures, lifted edges, loose fasteners, and crushed sealant.
Work in zones rather than chasing the interior stain. Start with the nearest roof penetration, then inspect the surrounding membrane and seams. Water can move along framing or insulation, so each vent, skylight, antenna, plumbing boot, and air-conditioner seal deserves its own inspection.
Exterior inspection sequence
- Photograph the roof first. Record the condition before removing anything, including failed sealant and damaged edges.
- Check for movement and soft areas. A spongy section may indicate wet decking or insulation rather than a membrane defect.
- Remove only loose sealant. Use a plastic scraper. Metal tools can gouge the membrane and create a new entry path.
- Clean and dry the surface. Mild soap and water may be appropriate for initial cleaning, but the final cleaner must suit the roof material and sealant system.
- Inspect every penetration. Don't cover only the ceiling stain from inside. Trace the likely path back to the roof.
- Probe carefully around suspected damage. If the substrate feels soft, stop treating the job as a simple reseal.
Interior evidence changes the repair scope
Water stains, soft ceiling panels, swollen trim, musty smells, and separating wall panels all deserve documentation. Delamination can signal prolonged moisture migration, not merely a cosmetic bubble. If water is near electrical components, turn off appropriate power sources and arrange professional evaluation rather than probing blindly.
The practical inspection principles in this guide for Willamette Valley homeowners also illustrate why tracing moisture and documenting affected materials matters. The climate differs from Utah, but the diagnostic discipline applies.
DIY Repair Options Versus Professional Service Costs
A clean-looking patch can hide a wet roof deck, damaged insulation, or compromised wiring. Cost depends less on the visible crack than on how far moisture has traveled and whether the trailer still has a sound structural assembly.
Current repair-industry estimates place minor sectional roof repairs at approximately $300 to $2,000. Extensive rot requiring complete roof replacement can range from $3,000 to $15,000, depending on trailer size and roof construction. (RV roof repair cost estimates)
Another published guide places ordinary RV water-damage projects between $1,500 and $15,000. Severe reconstruction may involve roughly 60 to 120 labor hours and total costs of $15,000 to $30,000. These figures are planning ranges, not government averages.
| Repair scope | Typical cost range |
|---|---|
| Minor sectional roof repair | $300 to $2,000 |
| Extensive rot and complete roof replacement | $3,000 to $15,000 |
| Ordinary RV water-damage project | $1,500 to $15,000 |
| Severe reconstruction | $15,000 to $30,000 |
Where DIY is reasonable
DIY makes sense when the defect is localized, the membrane remains firmly bonded, the deck feels solid, and failed sealant can be removed without exposing broader damage. A small puncture or short open seam has a different risk profile from bubbling, widespread cracking, several leaking penetrations, or spongy areas.
The practical savings come from handling a contained repair with safe roof access, compatible materials, and enough time for proper drying and curing. Utah's sun, freeze-thaw cycles, and road vibration punish shortcuts. An unsuitable cleaner, trapped moisture, weak overlap, or missed penetration can turn a small repair into concealed structural damage.
Stop the DIY job if probing reveals soft decking, if interior panels have swollen, or if water has reached electrical components. Those findings call for diagnosis before more sealant is applied.
When professional service earns its cost
Professional evaluation is the safer choice when the roof deck, wall framing, insulation, or ceiling has absorbed water. Sealing over rotten plywood can stop the visible drip while leaving the trailer structurally compromised. Damp materials should be removed or dried rather than covered, particularly where mold growth or electrical damage may be involved.
For Utah-specific planning context, compare the RV roof leak repair cost guide for Utah owners. The decision is not just whether you can buy sealant. It is whether you can confirm that the assembly is dry, sound, and compatible with the repair after the work is complete.
Step-by-Step Patching and Resealing a Travel Trailer Roof
A durable patch depends on preparation, compatibility, overlap, rolling pressure, and cure time. For EPDM, inspect at least 150 mm, or 6 inches, beyond the visible damage. Remove loose membrane and failed sealant, clean and dry the substrate, apply EPDM primer where specified, install compatible seam adhesive or pressure-sensitive repair tape, and finish exposed edges with lap sealant.
For a membrane patch, use like material with at least 100 mm, or 4 inches, of perimeter coverage beyond the damaged area. Round sharp corners so they're less likely to lift during towing and temperature changes.
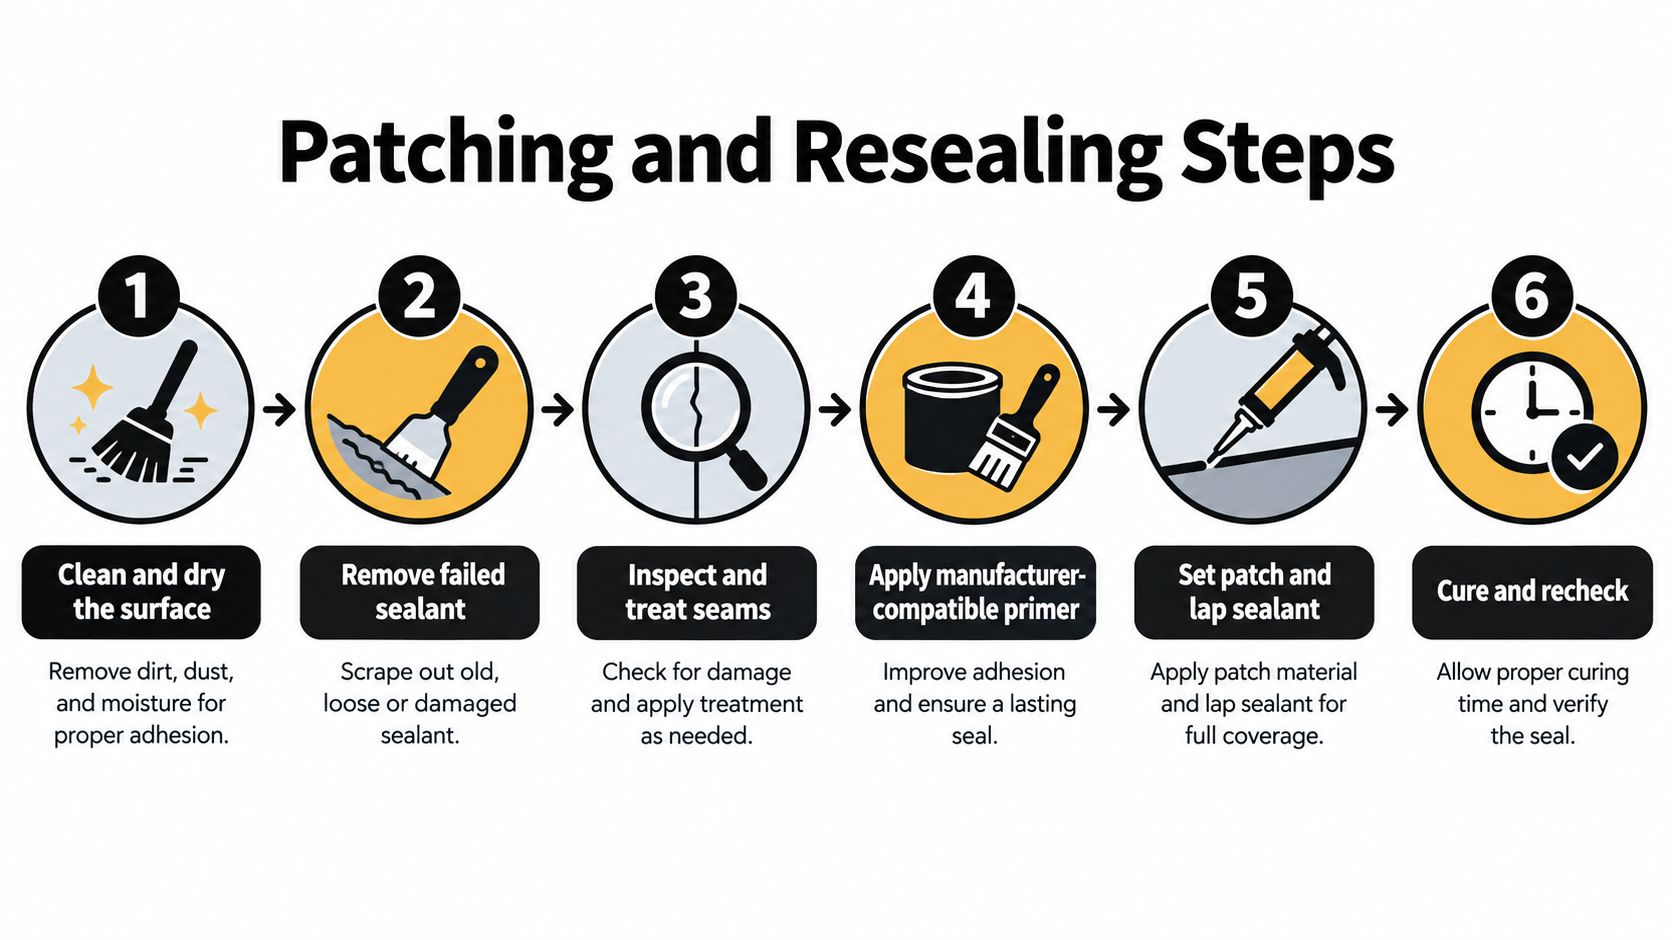
A controlled repair sequence
- Clean and dry. Remove dust, residue, and moisture. Never trap water beneath tape or adhesive.
- Remove failed material. Lift cracked or peeling sealant with a plastic scraper, not a metal blade.
- Prepare the seam. Cut away unstable membrane, clean the bonding area, and apply the specified primer.
- Set the patch or tape. Center it over the damage and maintain the required overlap.
- Roll firmly. Work from the center outward to eliminate voids, then apply compatible lap sealant to exposed edges.
- Inspect before cure. Look for fishmouths, edge lift, bubbles, and open T-joints. Water-test only after the adhesive and sealant have cured.
For open seams, mate the prepared surfaces carefully and roll from the center outward. For penetrations, treat each vent, skylight, antenna, or air-conditioner curb as a separate repair zone. A seam patch won't correct a failed penetration seal several inches away.
This Dicor self-leveling sealant guide for Utah RV owners can help you compare the intended use of a common RV roof product with your roof material and repair location.
A useful demonstration can supplement written instructions, but follow your trailer and product documentation first.
Some general roofing techniques, including the preparation principles discussed in these South Florida roof leak solutions, transfer well to RV work. The materials and climate don't transfer automatically, so don't substitute household roofing products for an RV-compatible system.
Utah Climate and Road-Vibration Roof Care Tips
Utah roofs face a demanding combination of freeze-thaw cycles, high UV exposure, snow loading, dust, hail, and long-distance towing. A repair that survives a mild driveway climate may crack or lift after a tow through the Wasatch Mountains, followed by winter storage and spring temperature swings.
Inspect the roof every three to six months and after major storms, paying attention to seams, fasteners, vents, flashing, skylights, air-conditioner openings, and pooling areas. (Travel-trailer roof inspection guidance) Reseal when cracking or separation appears, following the product instructions and the membrane manufacturer's maintenance schedule.
Temporary versus seasonal repairs
A roadside patch should get you out of immediate trouble, not become a permanent plan. A seasonal repair requires a clean, dry roof, compatible materials, full cure, and a follow-up inspection before towing.
Use this cold-weather checklist before storage:
- Dry the assembly: Don't seal over damp insulation or decking.
- Check the forecast: Avoid application during freezing conditions or when moisture is expected during cure.
- Clear drainage paths: Remove dust and debris that hold water near seams.
- Recheck after snow or hail: Look for punctures, compression, lifted edges, and new bubbles.
- Question coatings and tape: Widespread cracking, multiple leaking penetrations, bubbling, or soft decking may require reconstruction or replacement.
For a Utah-focused maintenance routine, use this RV roof maintenance guide for Utah owners alongside your trailer manufacturer's instructions.
When to Call a Professional and How to Prepare
One owner may discover a short seam opening with a dry, firm deck. Another may see the same interior stain and find bubbling membrane, soft plywood, and damp wiring. The outside symptom looks similar, but the repair decision isn't.
Stop patching and arrange professional service when:
- The substrate feels soft: Spongy decking or wall framing suggests moisture has moved below the membrane.
- The membrane is broadly delaminated: A localized patch won't restore a surface that's separating across a larger area.
- Damage extends beyond one puncture: Multiple penetrations, widespread cracking, or recurring leaks point to a broader failure.
- Water is near electrical components: Power should be handled cautiously, and concealed wiring needs proper evaluation.
- Previous patches keep failing: Repeated sealant layers may be masking contamination, movement, or structural damage.
Before contacting a service department, gather photographs of the roof, interior stains, penetration locations, and every previous repair. Note when the problem appeared, whether it followed rain, snow, hail, or towing, and whether the ceiling or walls feel soft. That record helps a technician separate a failed seal from a roof-deck or framing problem.
Motor Sportsland's service operation handles RV maintenance, repairs, installations, plumbing and electrical work, upgrades, parts, and collision repair, including travel-trailer service. A roof inspection can establish whether you need a localized reseal, substrate repair, or a larger restoration plan.
Our team at Motor Sportsland can inspect travel-trailer roofs, evaluate moisture and penetration damage, and discuss compatible repair options for Utah conditions. Visit our Salt Lake City area locations or contact us to schedule service before a small roof defect becomes a structural or electrical repair.
