
RV Fresh Water Pump: How It Works and How to Fix It

You're dry camping for the first night. The fresh tank reads full, but the kitchen tap gives you nothing, or the pump buzzes under the dinette and sputters weakly. Before pricing a replacement RV fresh water pump, check the water path, air leaks, and power supply. A quick strainer inspection and bucket test can help isolate a flow problem; use a multimeter to check for electrical trouble.
Run the cheapest checks first. Inspect the inlet strainer for debris, then confirm the pump can draw water from the tank into a container. If it still will not run properly, check voltage at the pump before assuming the motor has failed. After winter storage, a loose connection, clogged strainer, or air leak can mimic a bad pump. Note what each test shows. That gives you a practical next step, whether it is a simple fix at the trailer or a service visit.
How an RV Fresh Water Pump Works
You're parked near Jordanelle with no city water hose connected, yet the kitchen tap runs with steady pressure. Your RV fresh water pump is doing that work. It turns the onboard tank into pressurized plumbing for sinks, showers, and the toilet.
Think of a toilet tank float. The system fills until it reaches a set point, then it stops and waits. Your pump works the same way, except pressure, not water level, tells it when to quit.
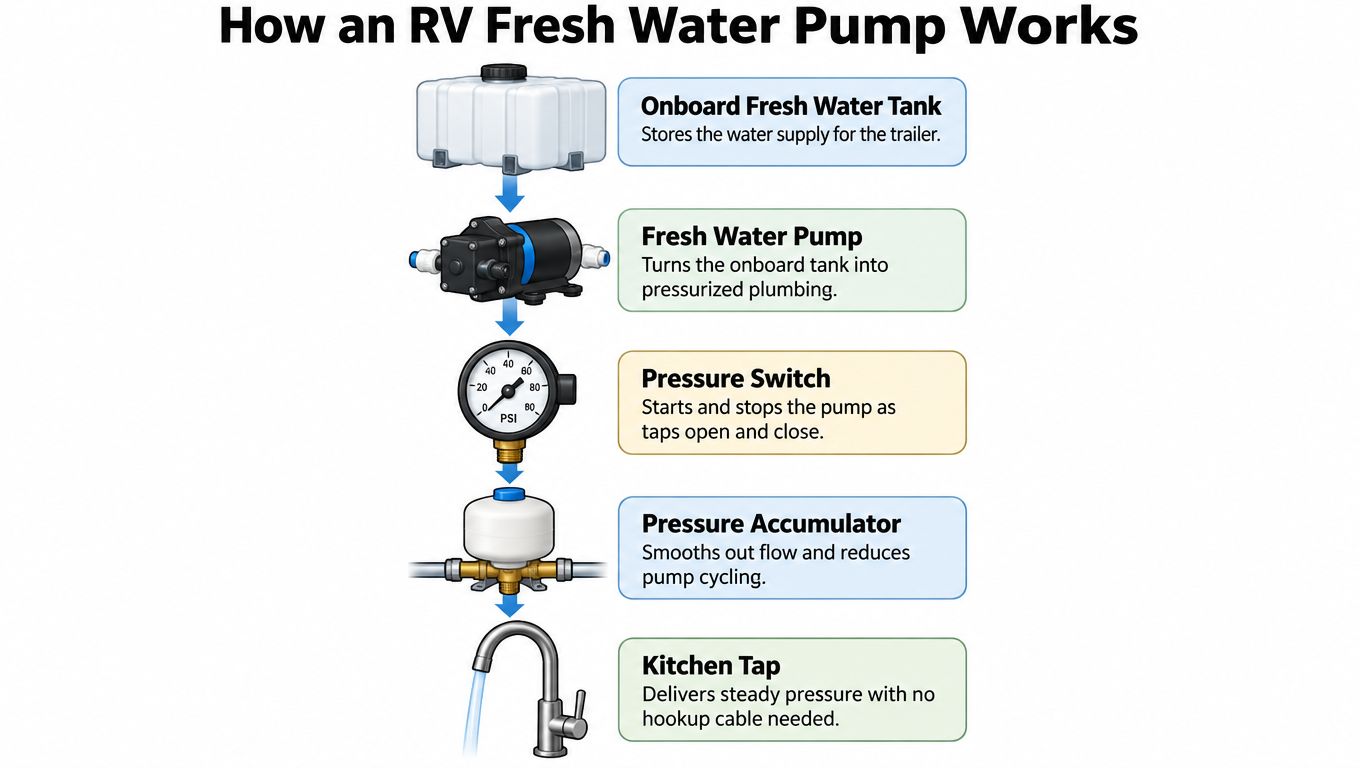
The demand cycle in five moves
- A faucet opens: Plumbing pressure drops as water leaves the line.
- The pressure switch closes: That drop closes the 12-volt circuit and sends battery power to the motor.
- The diaphragm moves water: The motor drives the pump head, pulling from the tank and pushing toward the fixtures.
- Pressure climbs back up: You close the tap and pressure builds toward the shut-off point.
- The switch opens: Power cuts, the pump goes quiet, and the lines stay pressurized for the next use.
That automatic start and stop is the whole idea behind a demand pump. It's also why a small leak matters so much. Any drip lets pressure fall, so the switch keeps calling the motor back to work.
Parts you'll actually see
Open the access panel and you'll find the pump head, 12-volt motor, pressure switch, inlet strainer, check valves, and outlet fitting. Some rigs also have an accumulator, a small pressure tank that smooths pulses and reduces short bursts of cycling. The strainer sits on the inlet side for a reason. It catches tank debris before that debris reaches the valves.
Demand pumps became standard by the late 1970s, which is why this is a core self-contained component rather than an accessory, as the history of RV water pumps and pressure-switch demand systems explains. Once you can name each part, you can predict failures. A chattering pump suggests pressure control trouble, a motor that runs with no flow points to suction, and silence points to power.
If you'd like the bigger picture first, our Utah RV water system guide for owners maps how the tank, pump, and fixtures connect. The Motor Sportsland service team also checks pumps at our Millcreek and Spanish Fork locations when an owner wants a hands-on walkthrough.
Pump Specs That Matter Before You Buy or Replace
At the trailer, start with fit and power before comparing pump prices. Flow, pressure, amp draw, and physical size determine whether a replacement RV fresh water pump suits the plumbing and the electrical circuit.
Common 12V RV fresh water pump ratings
| Pump | Flow (gpm) | Pressure (psi) | Max draw (amps) | Notes |
|---|---|---|---|---|
| Shurflo Revolution 4008 | 3.0 | 55 shut-off | 7.5 | Internal bypass, compact footprint |
| Shurflo 4048 high-flow | 4.0 | 55 shut-off | 10 | High-flow model for larger rigs |
| Kohree 12V diaphragm | 5.5 | 55 cutoff | 8 | Diaphragm design |
| Remco Power RV 3200 | 3.2 | 45 on-demand | Check label | 12V on-demand operation |
| Remco Aquajet variable speed | 5.3 | 65 on-demand | Check label | Variable speed, up to four faucets |
| Representative 12V demand pump | 3.0 | 50 | 9.5 | Requires a 15-amp circuit |
What each column really means
Flow in gallons per minute is a pump rating, not a guarantee of faucet flow. The strainer, hoses, fittings, elevation, and other open fixtures all reduce what reaches the tap. The Lippert Flow Max representative pump is rated at 3.0 gpm, 50 psi, and 9.5 amps maximum. At a high-elevation campsite such as Bear Lake, flow may feel softer than the rating suggests.
Pressure in psi is the shut-off or on-demand point at which the switch stops the motor. The Pentair Shurflo Revolution 4008 is rated at 3.0 gpm, 12 VDC, up to 7.5 amps, and 55 psi shut-off. The same specification page gives its dimensions as 8.1 by 4.9 by 4.3 inches. Measure the mounting area before ordering, including room for fittings and service access.
Amp draw determines the circuit, fuse, and wire gauge the pump needs. Size for startup and maximum load, not average draw. A pump that cannot get adequate voltage may run weakly or cycle poorly, even if the pump itself is in good condition.
Higher flow can suit a larger rig, but check electrical capacity before upgrading. Pentair lists the Shurflo 4048 at 4.0 gpm, 10 amps maximum, and 55 psi shut-off, while Kohree lists a diaphragm model at 5.5 gpm, 55 psi cutoff, and 8 amps maximum. The Remco Aquajet listing shows 5.3 gpm, 65 psi, variable-speed operation, and capacity for up to four faucets. For a lower-flow option, the Remco Power RV 3200 listing shows 3.2 gpm and 45 psi on-demand pressure.
Bypass, variable speed, and sizing
The Shurflo 4008 has an internal bypass. Its installation manual explains that the pump operates normally up to approximately 40 psi, then a spring-loaded valve redirects some flow toward the inlet. That action helps reduce rapid cycling when a faucet is barely open. A variable-speed Aquajet manages low demand differently by slowing its motor rather than repeatedly switching on and off.
Sizing rule: A couple using a kitchen tap and shower will usually do fine with a pump around 3 gpm. A larger rig running several fixtures may benefit from higher flow, provided the wiring can handle the pump's draw.
Before buying, count the fixtures you expect to run together, check the fuse and wiring capacity, measure the mounting space, and consider how much pump noise you can tolerate at night. A higher rating is not an upgrade if the existing circuit cannot supply it.
Failure Symptoms and What Usually Causes Them
At a Utah campsite, the pump may run after you close the kitchen faucet, or hum while the sink stays dry. Start by sorting the symptom into a plumbing, air, or electrical check. The table points to the least involved test first.
Pump symptoms, likely causes and first checks
| Symptom | Likely cause | First check |
|---|---|---|
| Pump runs but produces no water | Closed bypass valve, suction air leak, clogged strainer | Confirm bypass and tank level, inspect strainer |
| Rapid cycling after faucets close | Plumbing leak, trapped air, faulty pressure switch | Close all faucets and look for drips |
| Pump will not start | Blown fuse, loose ground, failed switch, empty tank | Check fuse and tank, test voltage at pump |
| Weak flow at every faucet | Restricted strainer, kinked hose, low voltage | Measure voltage under load, clean strainer |
| Motor hums but no pressure builds | Suction air leak or failed check valve | Inspect suction hose and fittings |
| Runs continuously, never shuts off | Switch not reaching cutoff, leak, debris in valves | Close faucets and test switch with a meter |
| Taste or odor after storage | Residual sanitizer or antifreeze, biofilm | Flush thoroughly before drinking |
| Intermittent operation | Loose connection, switch fault, low voltage | Measure voltage on both sides of switch |
Why the pairings make sense
Rapid cycling after faucets close points to a leak, trapped air, a clogged inlet strainer, a kinked hose, inadequate water supply, or a faulty pressure switch. The motor is reacting to pressure it cannot maintain. These are listed among the guidance on continuous running and rapid cycling causes. Check for drips first, then consider whether air is entering the suction line or the switch is failing to read pressure correctly.
A pump that hums without building pressure directs attention to the suction side. The pump needs a steady water supply to build pressure, and a loose inlet fitting can draw air into the line. If every faucet has weak flow, look for a shared restriction or low voltage, since either can affect the whole system.
Taste or odor after storage calls for a check of the tank and plumbing. Residual sanitizer or antifreeze, sediment, and biofilm can remain in the water system. Flush and sanitize it before drinking, then reassess whether the pump itself shows any mechanical symptoms.
Before calling a technician, write down what happens, when it happens, and which faucets are open. That record can help distinguish a pressure problem from an air leak or an electrical fault. A symptom that changes when one faucet opens, for example, gives the technician a useful clue about where to begin.
How to Troubleshoot Your Pump in Eight Steps
At the trailer, start with the cheapest checks: water supply, air leaks, restrictions, then electrical readings. Work in order. Each step narrows the fault before you consider replacing the pump.
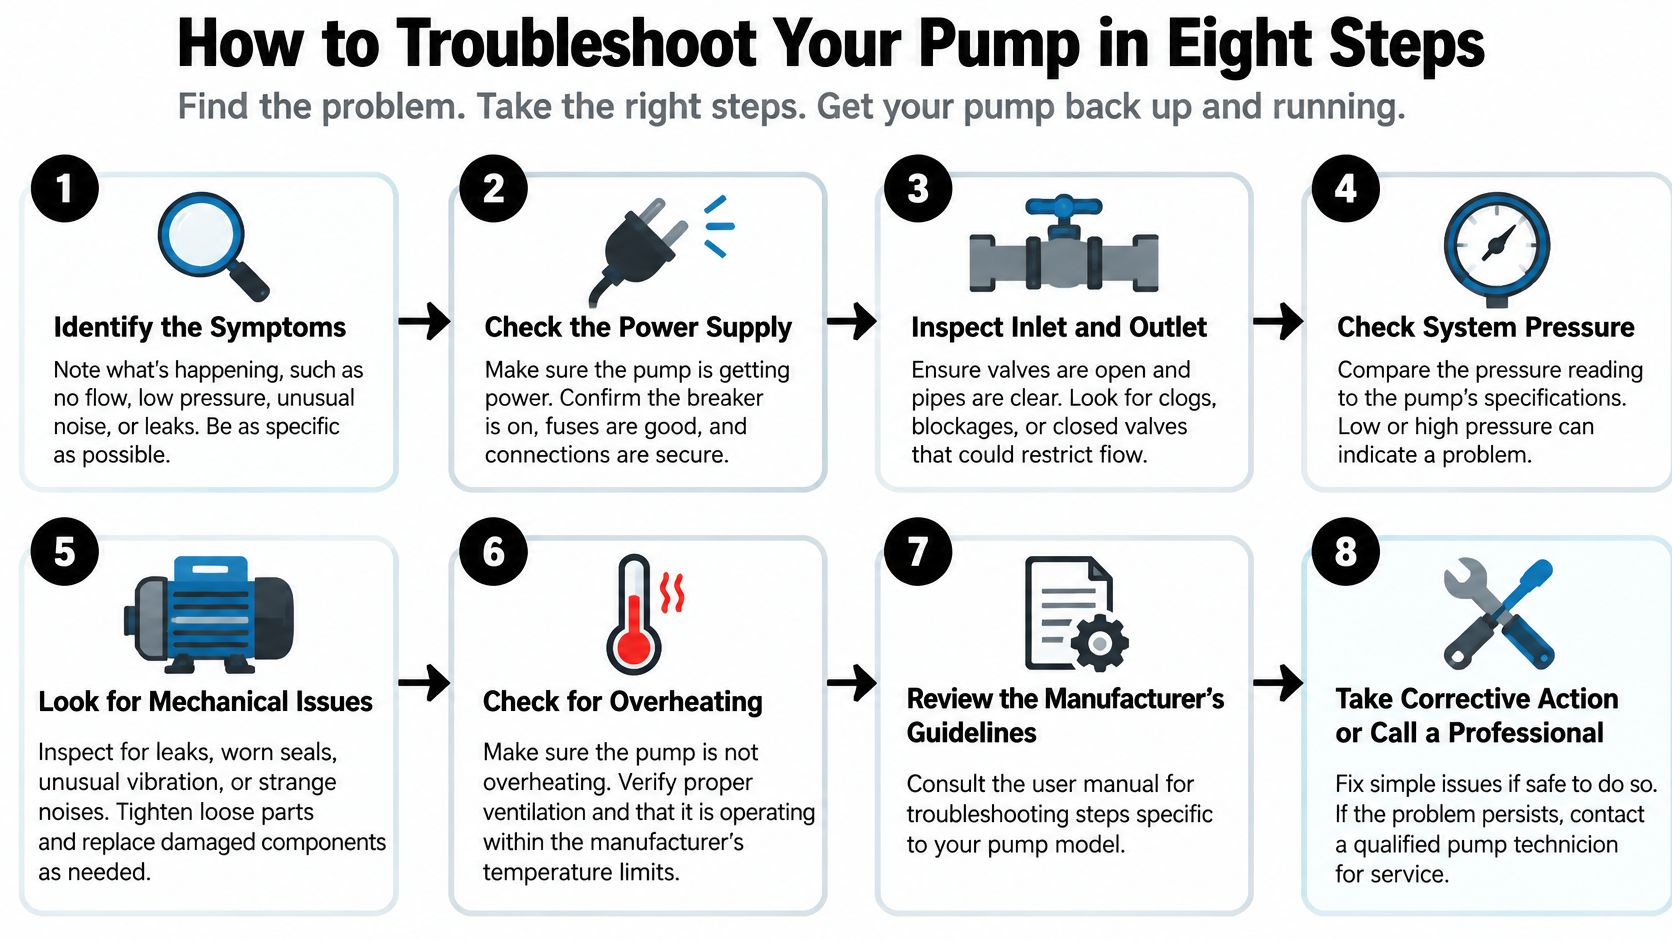
Steps one through four
- Close every faucet and confirm the basics: Check that the fresh tank has water, the water heater is filled, and winterization bypass valves are set for normal operation. A closed bypass can make a working pump seem faulty.
- Check the fuse and measure voltage under load: With the pump running, measure voltage at its terminals. A reading that drops well below normal battery voltage points to the battery, cable, or ground. For scale, 9.5 amps × 12 volts equals 114 watts. Treat this as arithmetic, not a universal pump rating; check the label on your model before judging its electrical demand. A weak connection or undersized wire can limit power to the motor.
- Test both sides of the pressure switch: Check voltage on each side while the pump is called to run. Voltage on only one side points to an open or failed switch. Fluctuating voltage suggests a fuse, battery, ground, or connection issue. If voltage stays steady but the pump still misbehaves, check the motor or pump assembly. Follow the field diagnostic sequence for pressure-switch voltage testing to separate an electrical fault from a plumbing problem.
- Inspect visible fittings and hoses: Look for drips at fixtures, the pump head, and low points under cabinets. A leak can bleed off pressure and keep the switch calling for more run time.
Steps five through eight
- Clean the inlet strainer and check for kinks: Turn off pump power and relieve pressure at a faucet before removing the strainer. Rinse it, then trace the suction hose and straighten sharp bends.
- Bleed trapped air: Open a faucet and let the pump run until the flow steadies and stops spitting. Air in the lines can disrupt pressure behavior, especially after draining the system.
- Measure actual flow: Time how long the pump takes to fill a container with a known volume, then compare the result with the model's rated flow. Actual flow is usually lower than the label's maximum because the plumbing adds restriction.
- Record readings before replacing parts: Note battery voltage under load, pressure behavior with faucets closed, measured flow, and the strainer's condition. If the motor runs but little water arrives, note whether there is suction at the intake. Suction without delivery points toward a restriction or an air leak between the tank and pump.
If meter readings are unclear, use this Utah guide to RV electrical system repair for safe testing guidance. Bring your step-eight notes to a service visit. They give the technician a useful starting point and can reduce time spent repeating basic checks.
Installing and Maintaining Your Pump
At the trailer, start with placement, wiring, and plumbing. A pump mounted where you can reach its strainer and switch is easier to maintain, and correct wiring helps prevent a new unit from acting like a worn one.
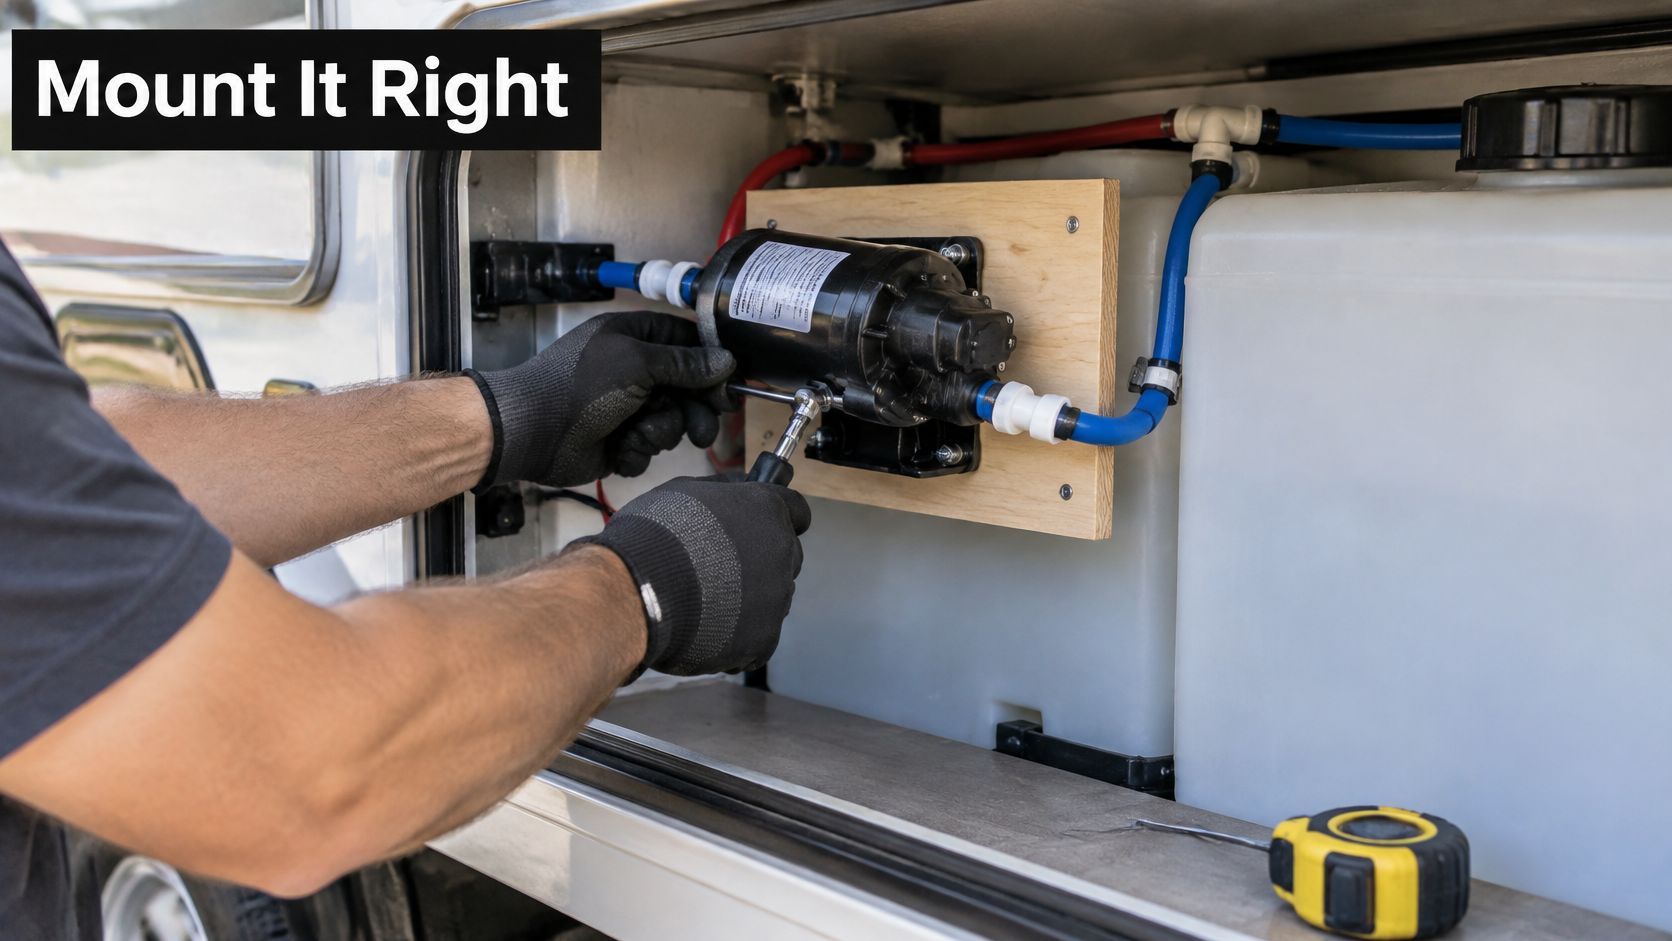
Mounting and wiring
Choose a dry, accessible location near the tank, away from heat and road spray. Leave room to remove and clean the strainer without moving other equipment. Check the footprint against the dimensions listed for your pump model before drilling.
Size the fuse and wire for the pump's maximum draw and startup current, not its average draw. Follow the circuit requirement printed on the pump. A loose ground or undersized wire can cause poor performance even with a new unit.
Safety rule: Disconnect the battery before working on wiring, verify connections with a multimeter, and never energize the water heater with an empty tank.
Plumbing and routine care
Use potable-water-rated hose and fittings, keep runs short, and avoid kinks. Install the inlet strainer where you can reach it easily. Do not run the pump dry: without water, the diaphragm can be damaged.
This walkthrough shows the physical work, including access and fitting connections.
Keep routine checks tied to use:
- Every trip: Check the inlet strainer and clear debris that could restrict flow.
- After storage and at least once a season: Flush and sanitize the full system.
- Monthly during use: Look for drips at fittings, especially around the pump head.
- Each spring: Check the fuse, terminals, and ground connection before the first trip.
A like-for-like pump replacement is manageable for many owners. Relocating the pump or changing its circuit adds plumbing or electrical work, so a technician can be the sensible choice for those jobs. The Motor Sportsland Service Center handles installations and plumbing or electrical upgrades when a replacement becomes a larger project.
Winterizing and Restarting Your Pump in Utah Storage
A trailer in a Wasatch-area driveway can freeze in November, then head out for an early spring weekend while nights still drop below freezing. Utah's freeze-thaw cycles can expose trapped water in pump and valve assemblies: a fitting may look dry in storage, then seep when the system is first filled. Treat winterizing as a pump-specific job and follow the manufacturer's procedure for your valves.
Pick your approach first
Choose compressed air, non-toxic RV antifreeze, or both. Air alone can work for a simple layout you can drain and verify. Antifreeze is a better fit when the rig will sit below freezing and you cannot confidently clear every low point. A hybrid approach suits complex plumbing with branches that drain differently. For step-by-step Utah RV winterizing guidance, see the full-rig procedure.
Then work this sequence:
- Identify your pump configuration: Check whether the pump has a winterizing suction port for drawing antifreeze directly.
- Isolate the water heater and filters: Bypass and drain the heater separately so antifreeze does not fill it.
- Drain by gravity: Empty the fresh tank, open faucets, and open low-point drains.
- Purge at low pressure: Clear remaining water gently to protect fittings.
- Use antifreeze where required: Follow the manufacturer's procedure for your pump and valves.
Check the easy-to-miss locations, too. Bypass valves, check valves, filters, and the exterior shower can trap water that freezes inside valve assemblies. Pump-specific winterizing guidance for Utah storage conditions covers these storage risks.
Restarting in spring
Reconnect filters, then sanitize the system before your first trip. At first fill, inspect valve assemblies and nearby fittings while the pump pressurizes the lines. Freeze damage may show as a drip or seep only under pressure.
- Fill and dose: Fill the tank with fresh water and add chlorine sanitizer at the strength specified by the manufacturer.
- Run every outlet: Open each faucet until chlorine is detectable at every fixture.
- Hold for contact time: Allow a four-hour contact time, then flush repeatedly, following RVDA water pump maintenance and sanitization guidance.
- Flush and inspect: Drain and flush until the chlorine smell is gone, then check the pump and fittings for leaks.
If the pump runs without delivering water after storage, start with the water path and the parts disturbed during winterizing. Confirm the system is filled and the valves are set for use, then inspect for leaks as pressure builds. A motor replacement will not repair a valve that seeps after a freeze.
Deciding Between a DIY Fix and a Service Visit
At the trailer, start by matching the repair to the risk. A strainer or accessible fuse is usually manageable with basic tools. Wiring faults, hidden leaks, and changes to the pump circuit call for more caution. Use the table to find the lowest-cost sensible check before deciding on parts or service.
DIY or service center by repair type
| Repair | DIY friendly? | Call a technician when |
|---|---|---|
| Clean or replace inlet strainer | Yes, with basic tools | Threads are damaged or it keeps clogging |
| Replace a fuse or tighten a ground | Yes | The fuse blows again, suggesting a wiring fault |
| Test pressure switch with a multimeter | Yes, if comfortable with a meter | Switch fails or wiring shows heat damage |
| Replace the complete pump assembly | Possible for experienced owners | Fittings, circuit, or mounting need changes |
| Winterize a rig with several low points | Possible | Lines are hard to reach or antifreeze is required |
| Leaks inside walls or cabinets | No | Any leak you cannot see or access safely |
| Upgrade to a higher-flow pump | Possible | Wiring, fuse, or fittings must change |
What the Repair Table Means for Your Rig
A strainer cleaning or fuse replacement is a short task for owners comfortable with basic tools. A leak inside a wall can damage materials before you see it, and electrical work can overheat a connector if the fault is misdiagnosed. Choose the repair based on access and your ability to test the circuit, not just on whether the part looks simple.
A fuse that blows repeatedly signals a wiring fault that needs diagnosis. Installing a larger fuse can hide the problem and increase the risk of damage. For a higher-flow RV fresh water pump, verify the electrical circuit, fittings, and mounting together. The pump may fit physically while still exceeding what the existing wiring can support.
For an accessible repair, gather the right replacement parts and follow the pump maker's instructions. If testing shows heat damage, an unresolved switch problem, or a leak you cannot reach, stop before removing fittings or altering wiring. That is a better point to call a technician than after a small fault becomes water damage or a more involved repair.
Spring often brings service calls when winter storage problems appear at first fill. Scheduling early can help avoid the seasonal rush. Bring your notes from the eight-step troubleshooting guide, including what you checked and what the pump did. That record gives the technician a clear starting point and can prevent repeated tests.
The Motor Sportsland Service Center handles pump repairs, installations, and plumbing or electrical work at its Millcreek and Spanish Fork locations. A technician can check whether a replacement fits the existing mounting and wiring before you purchase it.
Fresh Water Pump Questions Utah Owners Ask
Why does my pump keep running after I close the faucet
A pump that keeps cycling may be responding to a pressure drop. Check that every faucet is fully closed, then look for water at visible fittings; even a small leak can keep the pressure switch calling for water.
Can I run the pump when the tank is empty
Avoid running it dry. The diaphragm needs water to stay lubricated, so refill the tank before testing the pump.
Do I need to sanitize before the first trip after storage
Yes. Use the sanitizing mix and contact time specified in your RV manual, then flush the lines until the chlorine smell is gone before drinking.
Can I upgrade to a higher-flow pump on existing wiring
Compare the replacement pump's current draw with the fuse rating and wire gauge already installed. A higher-flow model may need a circuit or fitting change, so confirm compatibility before buying.
Does a Utah winter require antifreeze
Antifreeze is needed if the rig may sit below freezing and the pump and lines have not been fully drained. If you're unsure, bring your winterizing plan to our service team.
If the pump has power and a clean strainer but still will not build pressure, our Millcreek and Spanish Fork service teams can test its switch, valves, and suction side before you buy a replacement. Browse parts, schedule service, or ask our service team to check your water system at Motor Sportsland. Bring your troubleshooting notes so the team can see what you have already tested.
