
RV Sink Installation Made Simple for Utah Owners

You're halfway to Jordanelle when the faucet starts dripping into the cabinet. By the time you pull over, the sink is still usable, but the cabinet floor is wet, a drain fitting has shifted, and the replacement project no longer feels like the simple Saturday upgrade you planned.
That situation is avoidable. RV sink installation isn't household sink installation with a smaller basin. Your RV moves over rough pavement, cabinets flex, supply lines expand and contract, and Utah's freeze cycles can expose weak seals long after the first leak test. A good installation accounts for those forces before the counter is cut.
This guide walks through sink selection, compatible plumbing, tools, installation, leak diagnosis, and the point where a service technician should take over. At Motor Sportsland, our team sees the results of both careful retrofits and rushed swaps, so the advice below focuses on what holds up between Salt Lake City, the Wasatch Mountains, and your next campground.
Why RV Sink Installation Trips Up Even Experienced Owners
A customer once brought a travel trailer into our service bay after replacing the galley sink over a weekend. The basin looked clean, the faucet worked, and the new seal appeared intact. The problem showed up after the first drive. Water had collected under the cabinet, but the sink flange wasn't the source. A supply connection had loosened, and the drain assembly was putting sideways pressure on the trap whenever the cabinet moved.
That's the pattern owners miss. The basin can be perfectly sealed while the plumbing below it fails. An RV sink installation has to manage movement at the cabinet, counter, faucet, P-trap, and supply connections as one system.
Movement changes the repair
Stationary household plumbing usually stays aligned. RV plumbing doesn't. Road vibration can work threaded fittings loose, while a flexible cabinet base can shift slightly against a rigid drain connection. A fitting that survives a sink full of water in the driveway may still leak after a long haul.
Utah adds another concern. A rig stored near Park City, Heber, or Salt Lake City can face freeze-thaw conditions that stress water trapped in traps, valves, and low sections of supply tubing. ABS components that looked sound during installation can crack when freezing water expands inside them.
Practical rule: Don't ask only whether the new sink holds water. Ask whether the whole assembly can move without transferring stress to a seal or fitting.
The installation needs a systems view
A proper RV sink installation delivers more than a flush rim and a working faucet. It should also provide:
- Accessible shutoffs: Valves remain reachable after the sink and cabinet contents are back in place.
- Supported supply lines: PEX doesn't hang from the faucet or pull against a crimped connection.
- A correctly aligned drain: The tailpiece enters the trap without forcing the ABS branch line sideways.
- Effective venting: A trap needs downstream venting to prevent siphoning and keep sewer gases out of the living area. RV waste-system guidance explains why the vent belongs immediately downstream of the trap.
The basin is the visible part of the job. The failure prevention happens underneath it.
Choosing the Right RV Sink Before You Cut Anything
Start with the opening, not the sink catalog. Measure the existing cutout, cabinet depth, counter thickness, faucet holes, and the location of the drain center. A replacement that looks close in a product photo can still interfere with a drawer, collide with a water heater, or force the drain into an awkward angle.
Many modern RV kitchen sinks use a 2 1/8-inch drain hole, while RV sink and shower drains commonly connect to 1 1/2-inch ABS components. RV freshwater supply lines often use 1/2-inch PEX. Those dimensions make compatibility a plumbing question as much as a styling decision. RV sink sizing guidance shows how standardized dimensions influence the replacement process.
Compare the practical trade-offs
| Sink Type | Material | Weight | Mounting | Price Range |
|---|---|---|---|---|
| Galley RV sink | Stainless steel or lightweight composite | Varies by construction, generally selected for RV use | Commonly top-mounted | Varies by model and material |
| Bar or wet-bath sink | Stainless steel, acrylic, or composite | Usually compact and light | Top-mounted or integrated | Varies by size and finish |
| Household-style stainless sink | Stainless steel | Can be heavier than an RV-specific basin | Drop-in or under-mounted | Varies widely by brand and construction |
Stainless drop-ins are usually the forgiving retrofit. The rim covers minor cutout variation, the mounting method is familiar, and replacement faucets are easier to match. The trade-off is that a deeper or heavier basin can reduce cabinet clearance and place more load on a lightweight counter.
Acrylic and composite sinks can reduce weight and road noise, but they demand a cleaner opening and closer attention to flange dimensions. They're a good fit when the counter is sound and the replacement matches the existing footprint closely.
Bar sinks make sense in narrow wet baths or compact galley layouts. Their smaller footprint can preserve workspace, but faucet options and drain alignment may be less flexible.
Before purchasing, compare material, mounting style, depth, faucet configuration, and the surrounding counter support. For a broader look at how the sink connects to the rest of the coach, use our RV plumbing system basics guide for Utah owners.
Tools and Materials Worth Staging First
A clean RV sink installation starts with a complete work surface. Put every fitting, seal, and tool on the bench before cutting the counter. The most frustrating delays usually come from one missing adapter, the wrong trap connection, or a faucet fitting that can't be reached once the basin is mounted.
Build the tool layout
Keep these tools ready:
- Cutting tools: A jigsaw with a suitable blade, or a hole saw where the design calls for one. Use the supplied template rather than guessing from the sink's outside dimensions.
- Hand tools: Adjustable wrench, basin wrench, screwdrivers, nut driver, measuring tape, pencil, and a deburring tool.
- PEX equipment: A PEX crimp tool with rings suited to the tubing and fittings you're using. Have spare 1/2-inch PEX available for freshwater connections.
- Drain tools: Slip-joint pliers, a small hacksaw or tubing cutter, ABS primer and cement where required, and a new strainer assembly.
For materials, stage 1 1/2-inch ABS pipe and compatible fittings, PTFE tape for threaded water connections where appropriate, hose clamps for approved flexible connections, and a replacement drain gasket. Keep RV-rated silicone or another sealant specified for the sink and counter material nearby.
Butyl tape can work well where the sink manufacturer allows it, particularly when the joint needs to tolerate movement. Silicone or RV-specific sealant is also common, and many installation guides call for allowing the sealant to cure before water use. Follow the product instructions rather than adding more sealant to compensate for a poor fit.
Dry-fit the trap and tailpiece before applying adhesive or sealant. Pre-cut PEX only after you've confirmed the faucet and shutoff positions. That small preparation step prevents a trip back to the parts counter and helps you spot an alignment problem while every connection is still adjustable.
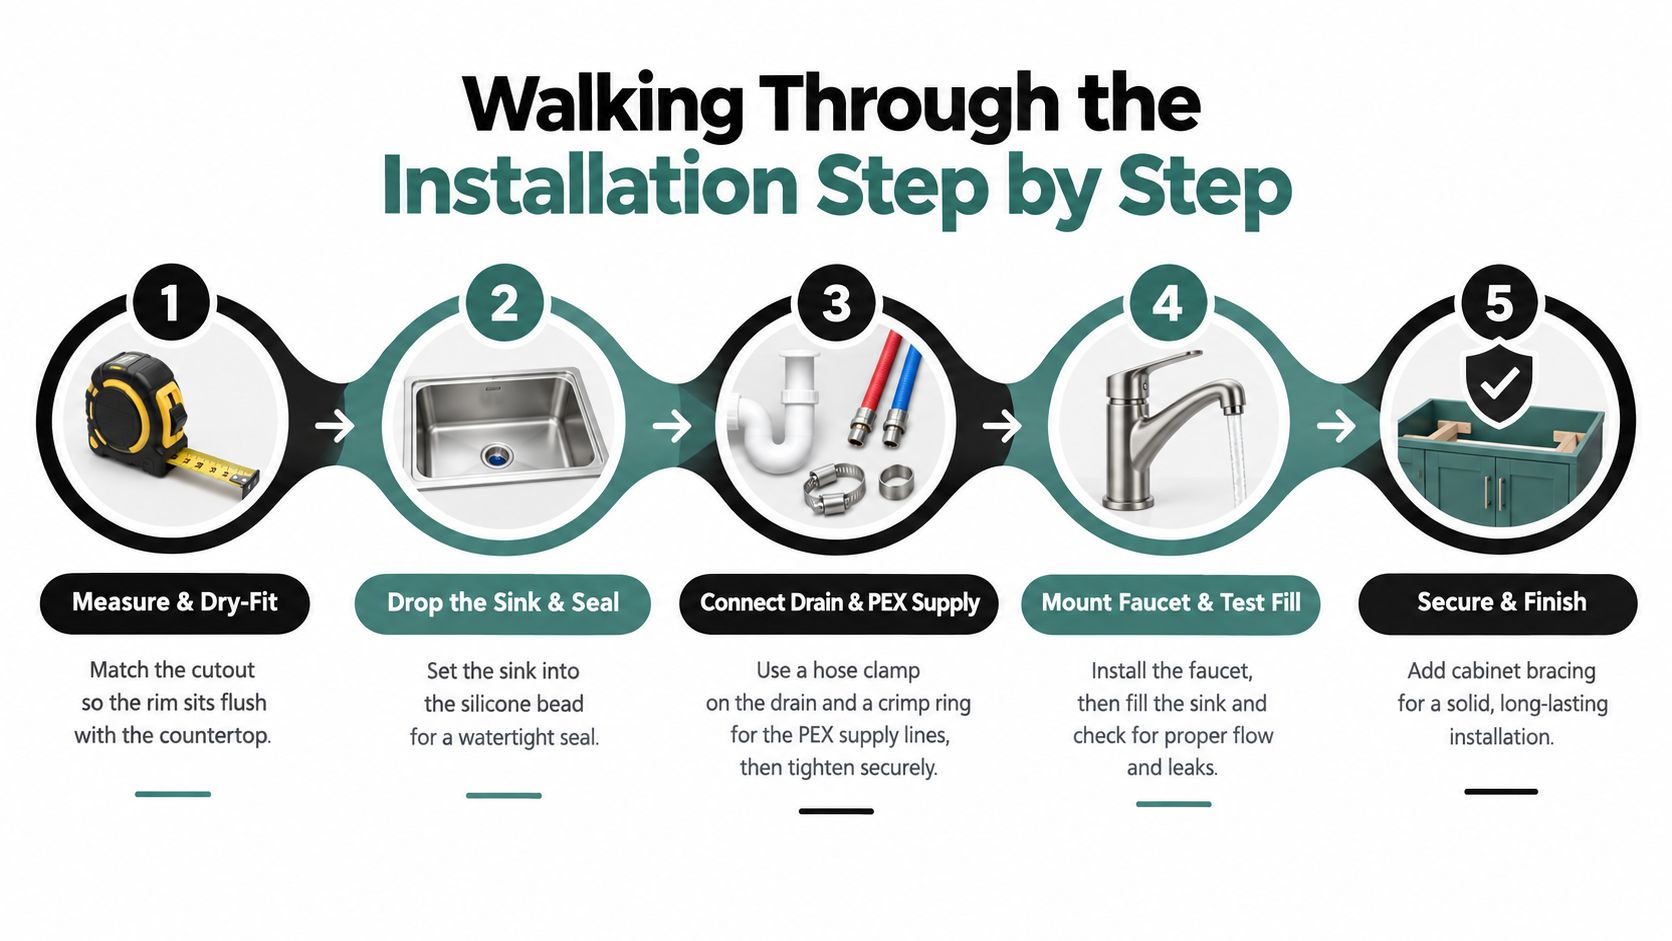
Walking Through the Installation Step by Step
Shut off the RV water pump and disconnect city water before opening the supply lines. Drain pressure from the faucet, protect the cabinet with towels, and photograph the existing plumbing before removing it. Those photos help when the original drain path uses an offset or an unusual support bracket.
Fit the basin before making the opening permanent
Measure the existing cutout, then place the new sink in position without sealant. The rim should sit evenly on the counter, the faucet holes should clear the backsplash, and the cabinet below should leave room for the drain and supply connections. If the template calls for a new opening, mark it carefully and cut in stages rather than removing more material than necessary.
Set the sink into the sealant bead or gasket system recommended for the basin. Install the supplied mounting clips or brackets and tighten them evenly. The goal is a stable, continuous seal, not a crushed flange. Excessive tightening can distort a lightweight counter or squeeze sealant out of the joint.
Keep the plumbing relaxed
Connect the faucet supply lines to the RV's 1/2-inch PEX supply using compatible fittings. Orient elbows and shutoffs so you can reach them later, and support the lines so the faucet isn't carrying their weight. Leave enough gentle movement for the cabinet and faucet to flex without creating a sharp bend or pulling on a crimp ring.
Next, connect the drain tailpiece to the P-trap and then to the existing 1 1/2-inch ABS drain path. The trap should sit naturally. If you have to push the drain sideways to make it line up, adjust the pipe or fitting instead of relying on the slip joint to absorb that force.
An air admittance valve may be installed inside the cabinet near the P-trap where the RV design uses one. RV waste-management guidance places this type of valve at least 6 inches above the P-trap's horizontal arm. If the system uses a roof or sidewall vent, preserve that path when rerouting the drain.
A sink kit may include a folding faucet, cutout template, mounting hardware, drain pipe, and strainer. That bundled approach reduces mismatched parts, but inspect every component before installation. A sink installation manual follows the same general flow, verify the kit, fit the opening, mount the sink, connect the faucet and drain, and test for leaks.
For work outside your comfort level, a local plumber for sink installation can provide another professional reference. RV plumbing still requires attention to movement, fittings, and access that ordinary residential work may not address.
Once everything is connected, open the faucet slowly, restore pump or city-water pressure, and inspect every joint with a dry paper towel. Our RV water pump replacement guide covers related pump-side considerations that can affect pressure and connection checks.
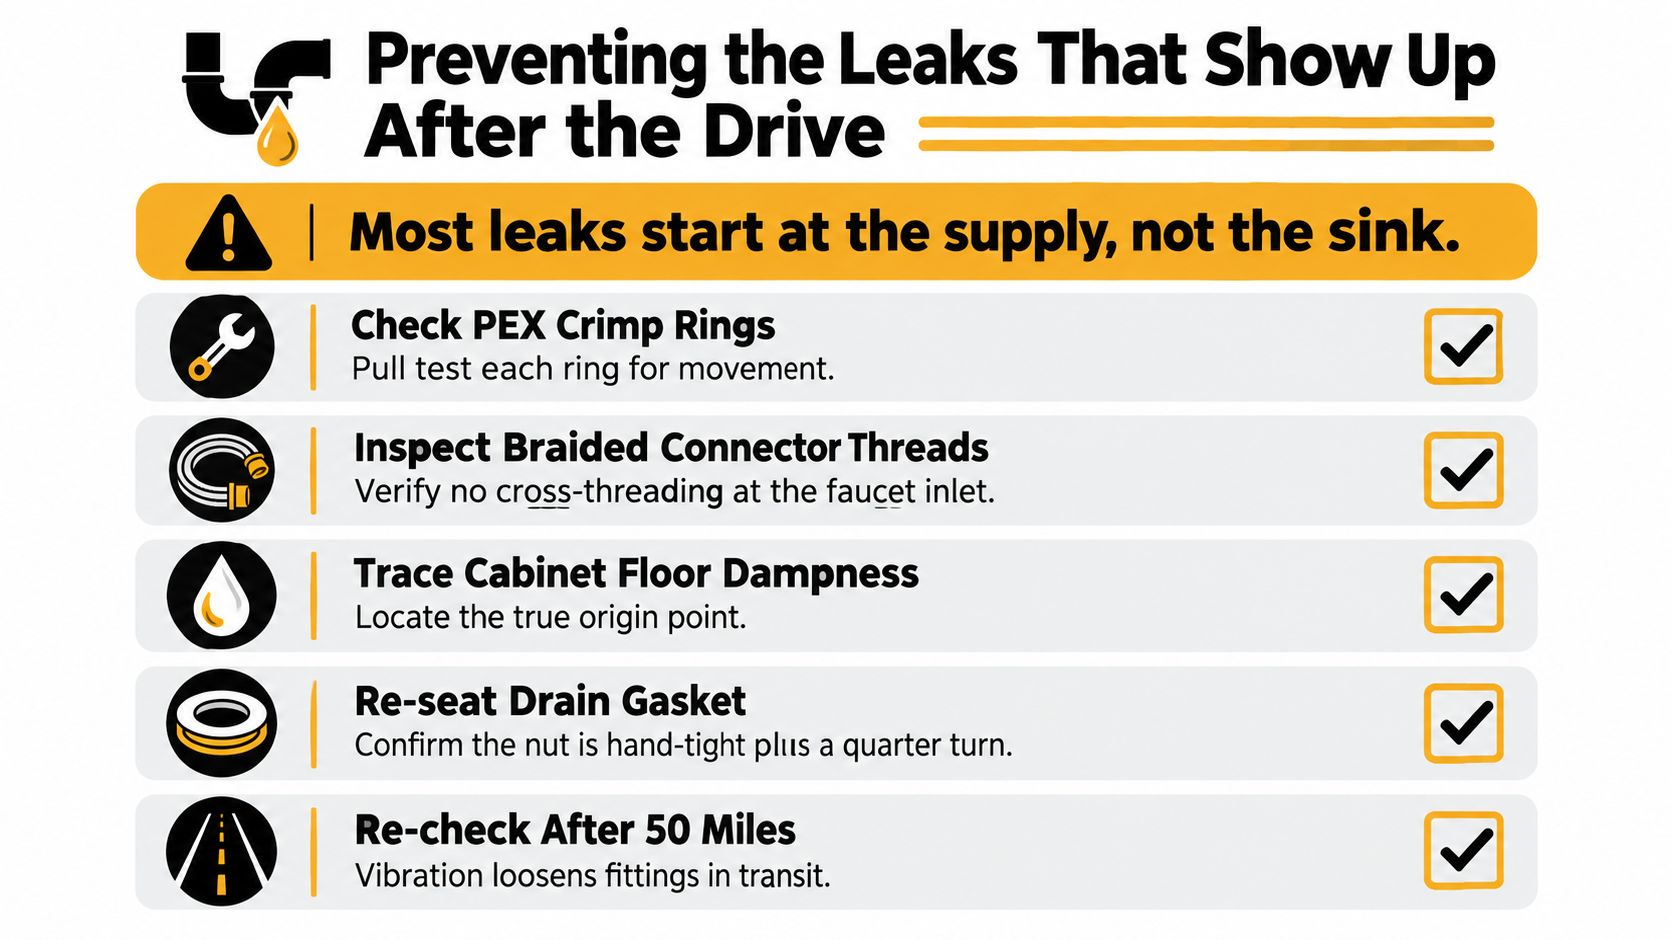
Preventing the Leaks That Show Up After the Drive
The leak usually isn't coming from the place where you first see water. Cabinet floors slope, plumbing carries moisture, and a faucet hose can drip behind the basin before the water reaches the front edge. Start at the supply side and trace upward or downward until you find the origin.
Diagnose before resealing
Use a dry towel or tissue at each connection while someone runs the faucet. Look for the first damp point, not the largest wet area.
- Supply connection: Check each PEX crimp ring and fitting. A ring that moves or shows uneven compression needs correction, not extra caulk.
- Faucet connector: Inspect the braided hose where it threads into the faucet or supply fitting. Cross-threading can leak even when the nut feels tight.
- Trap and slip joint: Run water into the basin and watch the P-trap while the cabinet experiences normal movement. A misaligned trap often leaks at the slip joint.
- Drain flange: Moisture around the strainer or flange points to a failed gasket or seal. Remove and reseat the joint if tightening doesn't correct it.
- Faucet hoses: Check the underside of the faucet and the hose connection inside the cabinet. A loose hose can imitate a drain leak.
- Vent path: An unvented or poorly vented drain can siphon the trap dry during travel, allowing odors into the living area.
Don't solve every leak by adding sealant. Fit tolerance, thread engagement, gasket placement, and alignment matter more than a thick bead. For basic drain symptoms, an unclog a kitchen sink guide can help separate a blockage from a leaking connection.
Run water through both basins if the sink is divided, fill the bowl, drain it, and inspect again. Then repeat the towel test after the next drive. Our RV water pump troubleshooting guide can help when pressure behavior makes a supply leak harder to isolate.
A final water-flow test belongs in the installation, not as an optional cleanup task. Check the cabinet floor, the back of the faucet, every threaded supply joint, the trap, and the drain connection before storing anything underneath.
Time and Cost Estimates From the Service Bay
The honest answer is that RV sink installation costs depend more on access and compatibility than on the basin alone. A like-for-like drop-in replacement with an intact counter and reachable plumbing is a different job from a deeper sink that requires counter modification, cabinet bracing, or drain relocation.
I won't attach invented dollar figures to a job that hasn't been inspected. Sink, faucet, fitting, sealant, and labor prices vary by product and by the condition of the coach. The useful comparison is where the work expands and where DIY stops saving time.
| Job Type | DIY Parts Cost | DIY Time | Service Cost | Service Time |
|---|---|---|---|---|
| Like-for-like drop-in sink with accessible plumbing | Sink, sealant, compatible fittings, and replacement drain parts | A focused project if the opening and connections match | Inspection and labor based on the actual repair | Depends on access and testing |
| Sink and faucet replacement with minor plumbing adjustment | Sink, faucet, PEX and ABS fittings, sealant, and mounting hardware | Longer project because dry-fitting and alignment take more time | Labor plus parts selected after inspection | Depends on connection condition |
| Deep retrofit requiring counter or drain modification | Sink, structural materials, plumbing components, sealant, and finishing supplies | May extend beyond a single afternoon and require a helper | Diagnostic, fabrication, plumbing, and testing labor | Scheduled around the scope of work |
Where DIY usually makes sense
DIY works well when the new basin matches the original footprint, the cabinet is dry and rigid, shutoffs are accessible, and the drain remains aligned. You save most when you can reuse the existing layout without forcing connections.
The savings disappear when a deep basin hits a drawer, a flange lands on a damaged counter, or the drain has to move. A failed cutout can turn a replacement into a counter repair. A hidden water leak can also damage the cabinet substrate before the sink looks wrong from above.
For owners who want an integrated inspection, Motor Sportsland's service operation handles RV plumbing, installations, maintenance checks, repairs, upgrades, and related work. The right choice is the one that prevents repeated access to the same cabinet, not just the one with the lowest first invoice.
When to Hand the Job to Our Service Team
A straightforward drop-in replacement is reasonable for a careful owner. The job changes category when the sink is only the visible symptom of a larger plumbing or structural problem.
Stop and inspect the cabinet before disconnecting anything. Soft flooring, swollen particleboard, a warped counter, or fasteners that no longer hold indicate that water has already changed the structure. A new bead of sealant won't restore a flange that no longer has a firm surface.
Watch for these warning signs
- The cabinet floor feels soft: Remove stored items and find the moisture source before installing a replacement.
- The counter is warped or delaminated: The sink may not maintain an even seal during travel.
- PEX or fittings are corroded: Reconnecting compromised tubing can produce a supply leak under pressure.
- The drain path must be rerouted: Preserve the trap and vent arrangement rather than improvising a route that siphons or carries odors.
- Sewer odor persists: A trap, vent, or air admittance valve may be incorrectly placed. An air admittance valve inside a cabinet should follow the manufacturer's placement requirements, including the 6-inch clearance above the P-trap horizontal arm described earlier.
- The rig was winterized: Pressure-test the supply lines before the first hard freeze, especially in Park City, Heber, and other cold Utah storage areas.
Black-tank venting issues deserve extra caution. A sink drain that shares or approaches a waste system can't be treated as an isolated household drain. If the reroute affects venting, the service team should verify the complete path.
A sink replacement is the wrong place to hide previous water damage.
Bring the rig in when a prior leak ran longer than a weekend, when the substrate is soft, or when the plumbing no longer matches the original layout. At our Salt Lake City shop, we can inspect the cabinet, identify the actual leak source, confirm drain and supply compatibility, and test the repaired system before you head toward Bear Lake or the Wasatch Mountains.
Motor Sportsland can help with RV plumbing inspections, sink installations, repairs, parts, and related upgrades when the cabinet or plumbing needs more than a simple swap. Visit Motor Sportsland to explore service options or speak with our Utah team about scheduling a diagnostic visit.
RV Sink Installation FAQs
Can a regular household sink be installed in an RV?
Sometimes, but compatibility goes beyond the opening. Check the sink's weight, cabinet support, counter thickness, faucet configuration, depth, and drain alignment. A household sink that fits the hole can still stress the cabinet or force the plumbing into a poor position during travel.
What drain size is common for an RV sink?
RV sink and shower drains commonly use 1 1/2-inch ABS drain components, while many modern RV kitchen sinks use a 2 1/8-inch drain hole. Confirm the basin, strainer, tailpiece, trap, and branch fittings as one assembly before buying parts. RV plumbing sizing information provides the relevant component context.
Should I use silicone or plumber's putty?
Use the sealant specified for the sink, strainer, and counter materials. Guidance for modern RV sink installations commonly uses silicone or RV-specific sealant, while drain work may use plumber's putty where the component manufacturer permits it. The sealant can't correct a misaligned drain or damaged counter.
How do I test an RV sink installation?
Restore water pressure slowly, run the faucet, fill the basin, drain it, and inspect every supply, faucet, trap, and drain connection with a dry towel. Repeat the inspection after the RV has traveled because vibration can reveal problems that don't appear while parked.
Does an RV sink need a vent?
The drain system needs proper venting downstream of the trap to prevent siphoning and keep sewer gases out of the living area. Depending on the RV, that may involve a roof or sidewall vent or an air admittance valve installed in the cabinet.
When should I call an RV service center?
Call when the counter or cabinet is soft, the plumbing is damaged, the drain must be relocated, odors persist, or a winterized rig needs pressure testing before freezing weather. Those conditions point to underlying system problems rather than a simple basin replacement.
