
10 RV Interior Remodeling Ideas to Refresh Your Rig
You pull into camp after a long drive through Parley's Canyon, step inside, and the coach still works fine, but it doesn't feel like yours. The lights are harsh, the storage fights you, the finishes show their age, and every weekend trip reminds you the factory layout was built for broad appeal, not for the way you travel.
That's the point where a remodel starts to make sense.
At Motor Sportsland, we usually steer owners toward a plan before a purchase list. In an RV, good remodeling is less about chasing house-style trends and more about solving daily friction without adding too much weight, creating new failure points, or spending money in the wrong places. Utah roads, mountain grades, dry air, and big temperature swings reward practical choices.
The best projects improve how the coach lives on the road. Cabinet hardware that stays tight. Flooring that handles tracked-in grit and snow. Lighting that draws less power when you are camping off-grid. Bedding and seating that hold up after a cold night in the Uintas or a hot afternoon near Moab.
Start with the areas you touch every day, then decide what belongs in your own toolbox and what should come into our shop. Cosmetic work such as paint, peel-and-stick accents, soft goods, and basic organizers is often a solid DIY play. Jobs involving plumbing, electrical loads, slide clearance, subfloor damage, fixture mounting into thin RV walls, or anything that can affect weight distribution are usually better handled by a service team that works on coaches every day.
A useful remodel plan is simple. Pick your top three pain points, set a real budget range, and rank projects by payoff, not by Pinterest appeal. If your galley is cramped, study small kitchen remodel ideas for space-saving concepts, then adapt them to RV materials and weight limits instead of copying a residential build outright.
The ideas below focus on that kind of road-tested improvement. We'll cover what changes are worth the money, where DIY makes sense, rough cost expectations, and where calling our Motor Sportsland service team can save you from expensive rework.
1. Kitchen and Galley Upgrades
You pull into camp after a windy run through Parley's Canyon, open the fridge for dinner, and the first thing you notice is not the view. It is the galley that still feels cramped, dated, and harder to use than it should. That is usually where an RV remodel starts paying you back every single day.
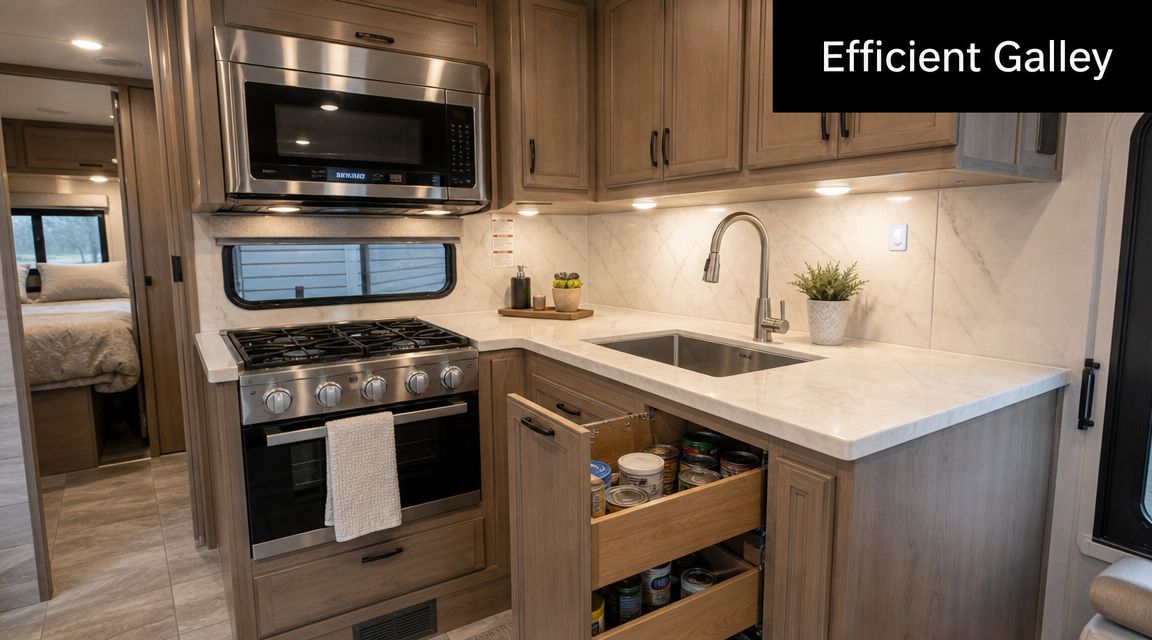
A good RV kitchen upgrade is less about copying a house kitchen and more about improving flow, weight, and durability. In our shop, the best results usually come from fixing the small frustrations first. Cabinet doors that swing too far. Drawers with wasted space. A backsplash that is easy to wipe down after a weekend of dust near Moab or grease from cooking at a higher elevation campground.
What works in a real RV kitchen
Start with how you use the space. If you make coffee every morning, that station needs a stable spot and nearby outlet access. If you cook full meals, prep room and trash placement matter more than decorative upgrades. If the rig is mostly for weekend trips, simple storage improvements often give you more benefit than a full tear-out.
Here is where we see the best return.
Best DIY win: New cabinet pulls, drawer liners, shelf risers, tension bars, and pull-out bins.
Typical cost: About $50 to $250.
Difficulty: Easy.
DIY or call us: DIY makes sense if you are only fastening into existing cabinet faces and shelves.Best visual upgrade: Cabinet paint, updated latch hardware, and a lightweight peel-and-stick backsplash rated for heat and moisture.
Typical cost: About $150 to $600.
Difficulty: Moderate.
DIY or call us: DIY if you have the patience for prep work. Call our Motor Sportsland service team if cabinet doors are damaged, laminate is peeling, or you want a cleaner sprayed finish.Best functional upgrade: Reworking storage so daily-use items sit at arm's reach instead of buried in deep lower cabinets.
Typical cost: About $100 to $500, depending on organizers and minor carpentry.
Difficulty: Moderate.
DIY or call us: DIY for bins and organizers. Call us if you want shelves rebuilt, drawer boxes modified, or new latches installed for travel security.
One trade-off matters more than many owners expect. Open shelving and heavy residential materials may look good online, but they often create rattle, weight, and durability problems on rougher Utah roads. We usually steer people toward lighter finishes, positive-latch hardware, and storage that stays put when the coach leans or bounces.
Practical rule: If a kitchen upgrade affects propane, venting, electrical load, water lines, or cabinet structure, treat it like a service job, not a décor project.
Appliance swaps are where DIY projects often go sideways. A new microwave or cooktop is not just a size match. Clearances, amp draw, fastening points, and vent routing all have to work inside a much tighter envelope than a house kitchen. The same goes for replacing sinks and faucets if access is poor or the plumbing is already stressed from freezing and thawing cycles.
For layout inspiration, these small kitchen remodel ideas can help you spot smarter ways to use a tiny footprint. Then adapt those ideas to RV-safe materials, lower weight, and hardware that can handle travel.
If the goal is a fresher look on a modest budget, most owners should stop at paint, hardware, backsplash, and organization. If the goal is new appliances, cabinet changes, added outlets, or anything that needs precise fitment, our Motor Sportsland service team can usually save you from buying parts twice.
2. Flooring Replacements and Upgrades
Old RV flooring can make the entire coach feel tired, even when everything else is clean. Carpet traps dust. Sheet vinyl tears. Floating edges near slides become obvious fast.
In Utah, flooring takes a beating. Muddy spring campgrounds, dusty desert stops, snowmelt at the door, and boots after a hike all land on the same small square footage. That's why this is one of the RV interior remodeling ideas that almost always feels worth it.
What to install and what to avoid
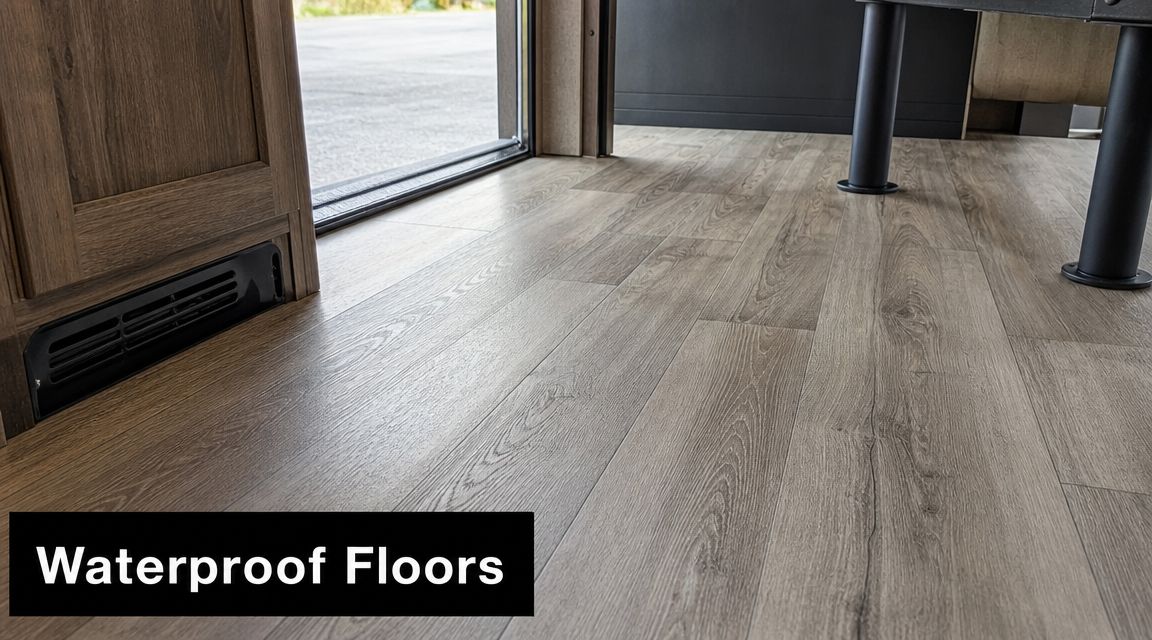
Luxury vinyl plank is popular for a reason. It handles moisture better than many alternatives, cleans easily, and gives older interiors a more current look. But installation matters more in an RV than in a house.
A few trade-offs matter:
- Click-lock vinyl: Looks great, but some rigs don't give you much forgiveness around slide rooms and tight transitions.
- Glue-down vinyl: Often better for odd layouts and movement, but surface prep has to be right.
- Laminate: Usually not our first recommendation for RVs that see wet entry traffic or temperature swings.
Floors fail at the edges first. Doorways, slide paths, toilet bases, and under-dinette corners tell you whether the install was done right.
DIY makes sense if you're patient with trim removal and template work. Call our service team if your flooring runs under slide mechanisms, needs furniture removal, or crosses into bathroom areas where clearances get tight. We've seen solid-looking installs turn into squeaks, binding, or broken trim because the owner treated the RV like a condo instead of a moving vehicle.
3. Bathroom Renovations and Wet Room Updates
Bathrooms are small, but they carry a lot of comfort value. If the shower feels dingy or the vanity wastes space, the whole RV starts feeling less livable on longer trips.
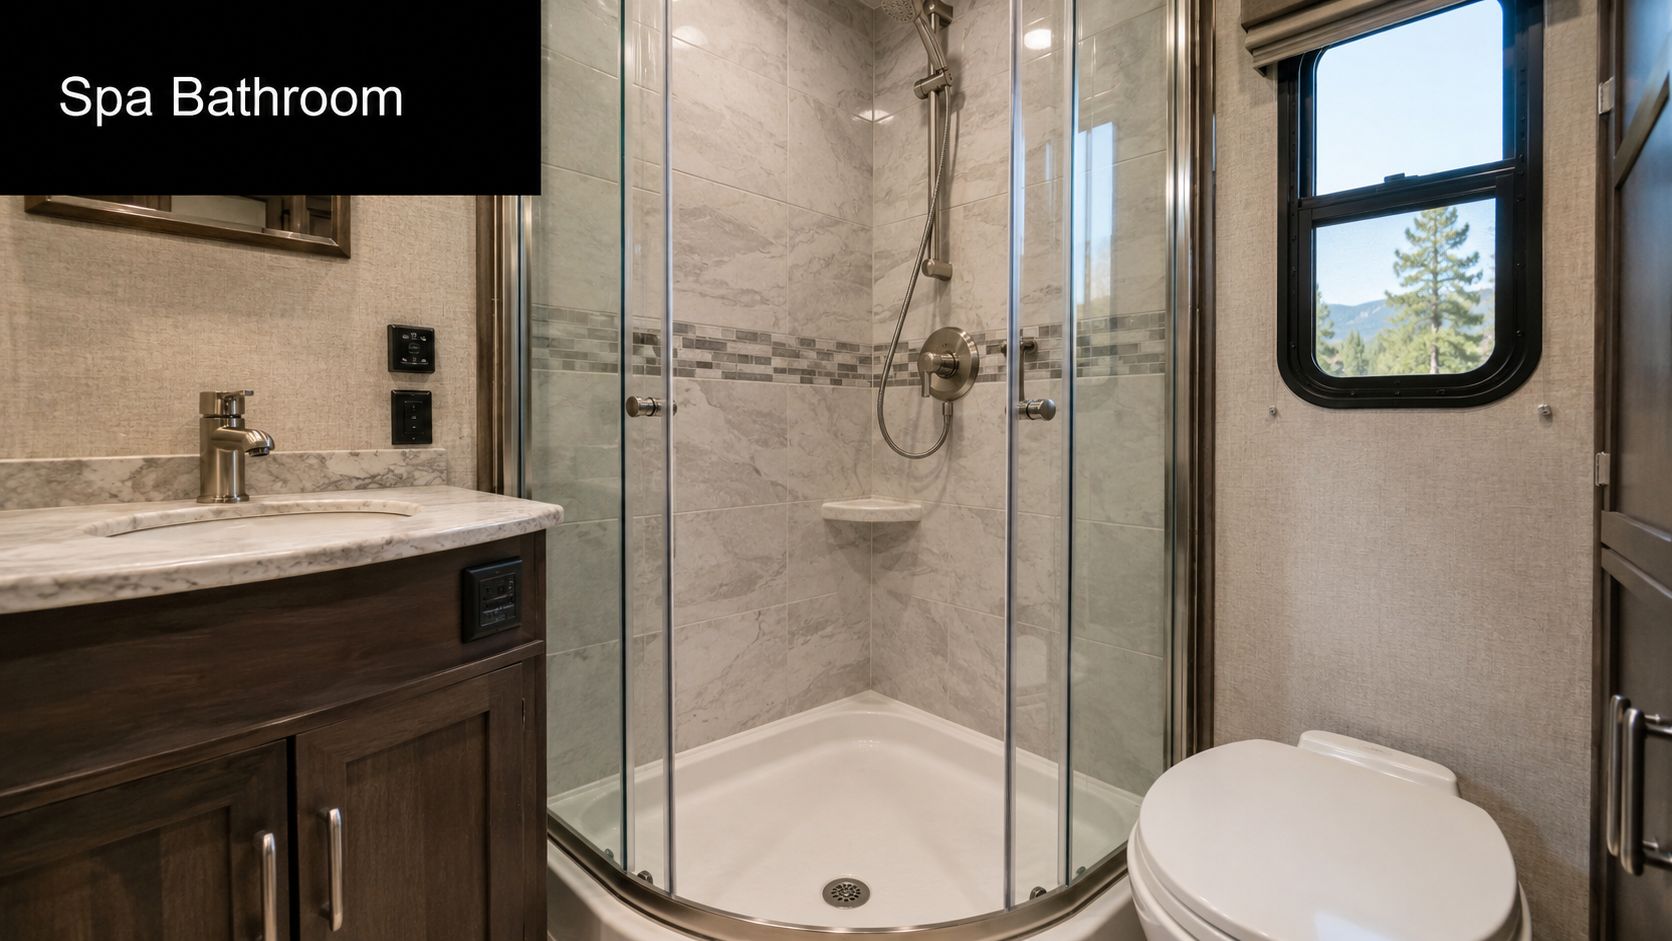
Most bathroom remodels work best when they focus on cleanability, storage, and moisture resistance. A better faucet, updated mirror, new hardware, fresh wall paneling, and a more useful vanity often improve daily use more than trying to force residential features into a compact bath.
Where bathroom remodels go wrong
The mistake we see most is focusing only on appearance. New wall covering looks nice, but if the fixture seals, toilet flange, or shower trim aren't right, the remodel won't stay nice for long.
These are the smartest upgrade paths:
- Comfort: Better shower head, easier-to-clean sink, improved towel storage.
- Function: Slim shelving, medicine cabinet upgrades, hooks where people need them.
- Durability: Materials that can handle heat, cold, and steam without peeling.
If you're planning a more focused bath refresh, our RV bathroom renovation tips are a good place to start. For surface-material thinking, this look at vinyl vs laminate for homes can help frame moisture and durability trade-offs, though RV bathrooms still need lighter, travel-tolerant solutions.
DIY is fine for fixtures, mirrors, hardware, and some wall treatments. Bring in our team for toilet replacement, plumbing changes, soft-floor repair, or anything that hints at past water intrusion. Bathroom remodels are where hidden problems like to show up.
4. Bedroom and Sleeping Area Transformations
After a long pull through Parley's Canyon or a windy afternoon crossing western Utah, the bedroom decides how the next day feels. If sleep is poor, owners notice it fast. Sore backs, blocked walkways, weak reading lights, and awkward storage turn a nice coach into a tiring one.
This part of an RV remodel pays off every night, which is why we usually tell customers to improve the bed area before they spend money on decorative pieces. Factory mattresses are often thin, bed platforms are sometimes poorly ventilated, and storage access can be frustrating in tight floorplans. A few targeted changes can make the coach feel far more livable without tearing half the interior apart.
Best upgrades for real sleep
Start with the mattress, but measure the space like a technician, not a homeowner. RV beds often sit against curved walls, fit inside slide clearances, or rely on lift platforms that need a specific thickness and weight range to operate properly. In Utah's dry climate, breathable materials also matter. Mattresses that trap heat can feel fine on the sales lot and miserable in Moab in July.
Here are the upgrades we recommend most often:
- Replace the mattress first. Cost: about $300 to $1,200-plus depending on size and material. Difficulty: Easy to moderate. DIY works if you can confirm the exact dimensions, corner cuts, and hinge or slide clearance. Call our Motor Sportsland service team if the bed platform lifts, folds, or sits in a slide and you are not sure how much thickness the space can handle.
- Add focused bedside lighting. Cost: about $50 to $250. Difficulty: Easy for simple 12V fixture swaps. Adjustable reading lights let one person stay up without flooding the whole room with overhead light. If you need new wiring, switches moved, or USB charging integrated cleanly, that is service-bay work.
- Improve under-bed storage access. Cost: about $75 to $400. Difficulty: Moderate. Gas struts, better hinges, pull tabs, divider bins, and a cleaner lift path make a big difference. DIY is fine for organizers and light hardware. Bring us in if the platform feels weak, rubs against finished panels, or covers service access you still need.
- Use vertical space carefully. Cost varies widely. Difficulty: Moderate to advanced. Bunks, shelf additions, cubbies, and loft-style sleeping setups can free up floor space in smaller campers, but safe access and weight distribution have to be handled correctly. This is a good place to get professional help before cutting into walls or building permanent structures.
The trade-offs matter here. A thicker mattress usually sleeps better, but it can reduce headroom, block windows, or make it harder to sit up in bed. More storage sounds great until access becomes so awkward that nobody uses it. Built-ins around the bed look custom, but every added panel and cabinet door adds weight, which matters on mountain grades and rougher roads.
We also advise owners to check airflow around the sleeping area before finishing the project. Condensation under mattresses and against exterior walls shows up more often than people expect, especially with cold overnight temps in northern Utah and shoulder-season camping in the Wasatch. Slatted support, vented underlayment, and leaving a little breathing room along outside walls can prevent musty smells and mildew later.
DIY the bedding, soft goods, bins, peel-and-stick accent details, and many direct light swaps. Hand off bed-platform modifications, wall-mounted built-ins, bunk reconfiguration, or any project that affects slide operation, structural framing, or hidden wiring. That is where a remodel can go from clever to expensive in a hurry.
5. Lighting Upgrades and LED Modernization
Lighting changes an RV faster than almost any other project. It affects color, perceived space, and how comfortable the coach feels after sunset.
Older interiors often suffer from harsh overhead fixtures and dim corners. Swapping to LED fixtures, warmer task lighting, and under-cabinet accents gives you better visibility with less heat and a cleaner look. It also makes a huge difference when you're camping in shoulder seasons and spending more time inside.
Don't treat lighting like decoration only
Lighting in an RV is part aesthetics, part power management. That matters even more for boondocking and off-grid camping.
Current RV renovation advice increasingly ties interior upgrades to energy loads. LED lighting, appliance changes, climate upgrades, and dedicated workstations all sound simple, but a key consideration is whether your battery capacity, inverter setup, ventilation, and charging system can support them comfortably without leaning on a generator all the time as discussed in Lippert's RV renovation ideas.
Add all the low-draw lights you want. Just don't assume every fixture upgrade is electrically simple once dimmers, charging ports, and workspaces enter the picture.
For DIY, bulb swaps and some direct fixture replacements are reasonable if you understand polarity and fixture compatibility. If you're adding dimmers, changing circuits, or tying new lighting into a battery and inverter strategy, that's service work. We see plenty of owners in Utah who start with a lighting upgrade and quickly realize they're building toward better off-grid living.
6. Wall and Ceiling Treatments and Aesthetic Updates
Nothing ages an RV interior faster than dark walls, old valances, and yellowed trim. If you want the biggest cosmetic payoff without tearing into major systems, start here.
Painting alone can materially transform the feel of the space, and that's why simple wall and cabinet updates keep showing up in manufacturer and renovation guidance. Light colors reflect more available light, help small interiors feel less boxed in, and pair well with newer flooring and upholstery.
The easiest way to make an RV feel newer
We usually recommend choosing a color palette before you buy a single can of paint or roll of wallpaper. Winnebago explicitly recommends setting a budget and color palette before starting a remodel, which is solid advice because RV interiors feel chaotic fast when finishes are chosen one piece at a time in its remodeling guide.
A few proven options:
- Paint walls and cabinets: High visual impact, especially in older brown interiors.
- Peel-and-stick accents: Good for backsplashes and limited feature areas.
- Updated window treatments: Cleaner lines and less visual clutter than oversized valances.
If you need more style inspiration, browse these camper decorating ideas and then edit hard. In RV design, restraint usually looks better than trying to fit every trend into one box.
DIY is usually the right call for paint, wallpaper, and hardware. Call us if the project involves ceiling panel repair, water-damaged wall sections, or anything close to windows, roof penetrations, or slide openings. Cosmetics hide problems easily. They rarely solve them.
7. Storage Solutions and Organization Systems
Storage is where smart remodels separate themselves from pretty ones. If your counters stay cluttered, shoes pile at the door, and pantry items migrate every travel day, the coach isn't working hard enough.
This is one of the most useful RV interior remodeling ideas because it changes how the space functions without requiring a huge budget. In compact rigs, the best gains usually come from vertical space, hidden compartments, and furniture that earns its footprint.
Build around vertical and hidden storage
Industry renovation guidance consistently prioritizes built-in storage, floating shelves, multi-functional furniture, and even space-saving door changes like pocket doors to recover usable floor area in small rigs in this list of RV renovation ideas. That matches what we see at the dealership. Owners are happiest when traffic flow improves and loose gear finally has a home.
Practical storage upgrades that usually work well:
- Inside-cabinet shelving: Turns dead vertical space into usable organization.
- Hanging kitchen storage: Keeps daily tools off the counter.
- Bench or bed storage: Best for bulky soft goods and seasonal gear.
- Slim entry storage: Catches shoes, leashes, gloves, and flashlights before they spread.
For families, bunkhouse owners, and toy hauler users, circulation matters as much as volume. You don't just need places to put things. You need those places to stay accessible when beds are converted, slides are in, or everyone comes inside during a storm. DIY bins, baskets, and simple shelving are great. Built-ins, pocket door conversions, and structural furniture mods should be measured carefully and often handled by our service department.
8. Furniture Upgrades and Multi-Functional Pieces
Factory RV furniture often checks the box without making anyone happy. It's bulky, upright, and not always shaped for how people relax, eat, work, or put kids to bed.
Replacing one bad piece can change the entire room. We've seen rigs feel twice as usable after swapping a worn jackknife sofa for better seating or replacing a booth dinette that nobody liked with a setup that fits the owners' travel style.
Choose furniture for travel, not just comfort
House-shopping instincts get people in trouble. Residential pieces can look great online, but they still have to fit through the door, anchor safely, clear slides, and survive vibration.
Think through these questions before buying:
- Does it secure for travel?
- Will it block storage doors or bed conversion paths?
- Can you still access windows, vents, and service panels?
- Is it worth the weight compared with what's coming out?
The best RV furniture does at least two jobs. Seating plus storage, dining plus workspace, bed plus lounge. Single-purpose pieces have to earn their keep.
DIY is possible for reupholstery, cushions, and some direct swaps. We recommend professional help for theater seating installs, seatbelt-related seating areas, and anything that changes mounting points. In Utah, where many owners bounce between weekend use and longer trips, versatile furniture matters more than showroom looks.
9. Climate and Water Systems Upgrades
A pretty interior won't save a trip if the coach is too hot, too cold, or annoying to use every morning. Some of the highest-value remodels are the ones people don't notice until they camp in freezing shoulder-season weather or dry summer heat.
Utah is hard on RV systems. High-elevation nights can get cold fast. Southern Utah can cook an unprepared coach by afternoon. Water quality also varies enough that filtration and plumbing comfort upgrades make real sense for a lot of owners.
Comfort upgrades that actually matter
The broader remodeling trend has moved beyond décor and into whole-system comfort. Industry guidance now treats improved insulation, solar support, and climate control as part of practical RV remodeling because the coach often functions like a compact home, not just a weekend shelter in these RV makeover recommendations.
The upgrades we most often discuss with owners include:
- Water heater changes: Better hot water convenience and recovery.
- Filtration upgrades: Better taste and fewer worries at unfamiliar hookups.
- AC support upgrades: Smarter startup and better real-world usability.
- Insulation-focused improvements: Especially useful for shoulder seasons and mountain camping.
If hot water is high on your list, our article on the instant hot water heater for RV owners is a useful next read. For general filtration thinking, these RV water purification insights help frame why many full-timers prioritize cleaner water as part of comfort, not just maintenance.
This category is where DIY confidence should drop a notch. Plumbing, combustion appliances, seals, condensate management, and electrical support all need to be right. Our service team handles these upgrades regularly because one bad connection in a system project can create bigger problems than the original inconvenience.
10. Entertainment and Technology Integration
A lot of owners want their RV to do more than sleep the family. They want a place to stream a movie at Bear Lake, charge devices after a trail day, or knock out some remote work from a campground near the Wasatch.
Technology upgrades can make a rig feel current fast, but this is another area where convenience has to be balanced against power use, mounting safety, and cable management. A clean install matters. So does knowing what your coach can support.
Smart upgrades that don't create clutter
The best tech additions disappear into the space. They don't add loose cords, unstable mounts, or random adapters scattered around the dinette.
Good options usually include:
- Secure TV mounts: Locking brackets designed for travel.
- Charging zones: USB charging near beds, seating, and work areas.
- Work-friendly setups: Small desks, fold-down surfaces, and task lighting.
- Signal support: Helpful if your travel style depends on staying connected.
Dedicated work areas have become a common remodeling theme because many owners need a spot to handle work, school, trip planning, or charging without taking over the kitchen. The strongest setups are still modest. A fold-down desk, targeted power access, a comfortable seat, and good lighting beat a bulky “office” that steals too much floor space.
DIY can handle some device mounts and accessory charging. We suggest service help for hardwired charging systems, wall reinforcement for larger screens, and any project that expands your inverter or battery demands. In an RV, technology should simplify life. If it creates one more thing to rattle, fail, or drain power, it's not finished yet.
10-Point RV Interior Remodeling Comparison
| Item | Complexity 🔄 | Resources & Cost ⚡ | Expected outcomes ⭐📊 | Ideal use cases 💡 | Key advantages |
|---|---|---|---|---|---|
| Kitchen and Galley Upgrades | Moderate–Hard, may require plumbing/propane/electrical pros | $2,000–$8,000; appliances, cabinetry, countertops ⚡ | High ⭐, improved functionality and daily usability 📊 | Families, long-haul/full-time RVers 💡 | Better appliances; optimized storage; modern look |
| Flooring Replacements and Upgrades | Moderate, demo and subfloor checks; call pro for soft spots 🔄 | $1,500–$4,000; LVP, underlayment, trim ⚡ | Very High ⭐⭐, instant modernizing and durability boost 📊 | Active travelers, families, muddy-boot usage 💡 | Waterproof, durable, large visual impact |
| Bathroom Renovations and Wet Room Updates | Hard, extensive plumbing and waterproofing; pro recommended 🔄 | $3,000–$10,000+; fixtures, panels, sealants ⚡ | High ⭐, greater comfort, hygiene, and resale value 📊 | Retirees, long-stay travelers, full-timers 💡 | Improved fixtures, leak prevention, comfort |
| Bedroom and Sleeping Area Transformations | Easy–Moderate, mostly DIY; pros for custom cabinetry or wiring 🔄 | $800–$3,000; mattress, lighting, storage solutions ⚡ | Very High ⭐⭐, direct improvement to sleep quality and satisfaction 📊 | All RVers prioritizing rest and organization 💡 | Better sleep, storage optimization, low disruption |
| Lighting Upgrades and LED Modernization | Easy, simple bulb/puck swaps; pros for new circuits 🔄 | $500–$2,000; LED bulbs/strips, connectors ⚡ | High ⭐, brighter interior and substantial energy savings 📊 | Boondockers and anyone conserving battery power 💡 | Lower power draw; cooler operation; immediate effect |
| Wall and Ceiling Treatments and Aesthetic Updates | Easy–Moderate, painting or peel-and-stick panels 🔄 | $500–$2,500; primer, paint, lightweight panels ⚡ | Very High ⭐⭐, major atmosphere change for low cost 📊 | Budget-conscious remodelers wanting a fresh look 💡 | High visual impact; lightweight; cost-effective |
| Storage Solutions and Organization Systems | Easy–Hard, simple organizers to custom-built cabinetry 🔄 | $800–$3,500; shelving, dividers, plywood for builds ⚡ | High ⭐, reduced clutter and improved functionality 📊 | Families, toy haulers, organized travelers 💡 | Maximizes usable space; customizable; travel-secure options |
| Furniture Upgrades and Multi-Functional Pieces | Moderate, selection and proper anchoring required 🔄 | $1,500–$5,000+; seating, tables, mounting hardware ⚡ | High ⭐, enhanced comfort and living-area usability 📊 | Those seeking comfort upgrades or entertaining space 💡 | Improved comfort, multifunctional layouts, safety when secured |
| Climate and Water Systems Upgrades | Hard, complex HVAC/plumbing/propane/electrical; pros required 🔄 | $2,000–$6,000; tankless heater, filters, insulation ⚡ | High ⭐, reliable comfort and system efficiency year-round 📊 | Year-round campers, cold climates, full-timers 💡 | Endless hot water, better HVAC efficiency, water quality |
| Entertainment and Technology Integration | Moderate, antenna/roof installs may need professional sealing 🔄 | $1,500–$5,000; boosters, smart TV mounts, charging ports ⚡ | Medium–High ⭐, improved connectivity and convenience 📊 | Remote workers, media-focused families, road offices 💡 | Stronger signal, secure mounts, centralized charging |
Ready to Start Your RV Transformation?
As you can see, a few strategic RV interior remodeling ideas can completely change how your rig feels and functions. The best projects usually aren't the flashiest ones. They're the ones that make daily life easier. Better storage, more usable lighting, cleaner finishes, a more comfortable bed, flooring that handles Utah dirt and snow, and systems upgrades that make the coach easier to live in from spring through late fall.
That's also why we usually encourage owners to remodel in phases. Start with what annoys you every trip. If the bathroom feels cramped, tackle that first. If the galley never works, reorganize and refresh it before buying a single decorative accent. If your interior still looks dark and dated, paint and lighting can do more than many expensive projects. Weight, durability, and travel safety should stay at the center of every decision.
At Motor Sportsland, we've seen the strongest remodels come from owners who are honest about how they use their RV. A family trailer has different needs than a couple's fifth wheel. A toy hauler used for desert weekends needs different storage than a motorhome used for long highway travel. A boondocking setup near Utah's remote camp areas should think harder about lighting loads, charging, ventilation, and climate control than a full-hookup campground rig.
DIY absolutely has a place in RV remodeling. Cabinet hardware, paint, soft goods, simple organization, decorative wall treatments, and some furniture updates are great owner projects if you take your time and use RV-appropriate materials. But once a remodel touches plumbing, electrical, appliance venting, structural furniture mounting, soft-floor repair, slide clearances, or leak-prone areas, that's where professional installation protects both the coach and your trip plans.
Our service team in Salt Lake City helps owners sort out those exact decisions. Sometimes that means installing new flooring correctly around a slide. Sometimes it means troubleshooting why a planned lighting upgrade really needs a broader battery conversation. Sometimes it's as simple as helping you avoid a material choice that looks good in a house but won't hold up in an RV crossing Utah's mountain passes and desert heat.
If you're still deciding whether to remodel your current coach or move into a better floorplan, that's part of the conversation too. We're happy to help you compare both paths so you spend money where it makes the most sense for your travel style.
FAQs
Is painting an RV interior worth it?
Yes, for many owners it's one of the fastest visual upgrades. Light paint can make a coach feel brighter, cleaner, and more current without major reconstruction.
What are the best DIY RV interior remodeling ideas?
Paint, cabinet hardware, peel-and-stick backsplash accents, storage organizers, mattress upgrades, and some lighting changes are usually the most approachable DIY projects.
What RV remodel projects should a service team handle?
Flooring around slides, plumbing work, toilet replacement, appliance swaps, climate upgrades, electrical changes, structural furniture installs, and anything involving water damage should usually be handled professionally.
How do I remodel an RV without adding too much weight?
Choose lightweight materials, avoid heavy residential fixtures, focus on surface updates first, and prioritize multi-functional furniture and storage over bulky decorative additions.
Which remodel helps most with small RVs?
Storage improvements usually deliver the biggest everyday payoff. Vertical storage, hidden compartments, and furniture that serves more than one purpose make compact rigs easier to live in.
What matters most for Utah RV owners?
Durability, temperature control, easy-clean flooring, good storage, and power-conscious upgrades matter a lot because Utah owners often deal with mountain cold, desert heat, dust, and mixed camping styles.
If you're ready to upgrade your current rig or shop for one with a floorplan that needs less remodeling, visit Motor Sportsland. Our Utah team can help you browse inventory, talk through renovation ideas, or schedule service for the projects that need expert hands.
