
Demystify Your RV Electrical System in 2026

A lot of RV electrical problems start the same way. You're parked near Jordanelle, dinner is half done, the lights flicker, the microwave quits, and suddenly everyone is staring at the control panel like it's written in another language.
That confusion is normal. A modern RV electrical system looks complicated because it is really several systems working together, not one simple switchboard. New owners often assume power is either “on” or “off,” but in an RV, some things can keep running from the batteries while other items need shore power or a generator. That's why a coach can still have lights and a water pump while the outlets are dead.
Around Salt Lake City, our service team talks through this every week with first-time buyers, families upgrading trailers, and owners getting ready for mountain camping or winter storage. Utah adds its own twists too. Cold mornings, high-altitude boondocking, long storage periods, and remote campsites all make electrical knowledge more than a nice extra. It's part of having a trip that goes smoothly.
Introduction
The Two Halves of Your RV Electrical System AC vs DC Power
The first thing to understand is that most RVs don't run on one electrical system. They run on two separate power systems. Most rigs use a 12-volt DC system for lights, fans, and circuit boards, plus a 120-volt AC system for outlets and appliances when connected to shore power or a generator, as outlined in this RV electrical overview.
It is similar to a cabin with two utility paths.
The 12-volt DC side is your everyday support system. It handles the equipment that needs to run in the background, even when you're not plugged in. That usually includes interior lights, vent fans, the water pump, and various control boards.
The 120-volt AC side is the heavy-duty side. It powers the wall outlets and the larger household-style appliances that need more muscle.
What usually confuses new owners
A lot of people ask, “If my RV has a battery, why won't the microwave run?” That's the exact question that reveals the split between AC and DC.
Your battery bank supports the DC side directly. The AC side usually needs outside help, such as campground shore power, a generator, or an inverter setup that can turn battery power into usable AC power for certain appliances.
A good mental shortcut is this. DC keeps the RV alive. AC makes it feel like home.
That's why you can be dry camping near Bear Lake and still have lights, a water pump, and a functioning thermostat, but not necessarily the same appliance use you'd have at a full-hookup site.
Why this matters in real camping
This isn't just theory. It affects how you camp, how you shop, and how you troubleshoot.
If you're looking at a lightweight travel trailer for weekend trips, your power needs may be simple. If you're shopping for a larger fifth wheel or motorhome with multiple big appliances, your expectations need to match the electrical setup.
Keep these practical differences in mind:
- DC power supports essentials: Lighting, fans, pump operation, and many control functions can still work while off-grid.
- AC power supports high-demand comfort: Air conditioning, many kitchen appliances, and standard outlets depend on a stronger external source unless your RV is built to supply that power another way.
- Both systems affect each other: A problem on one side can create symptoms that make the whole coach feel unreliable.
When owners understand this split, the rest of the RV electrical system starts making sense much faster.
Your Electrical System's Key Players
An RV electrical system works best when you think of it as a crew, not a mystery box. Each part has a job. When one piece stops doing that job, the symptoms can show up somewhere else.
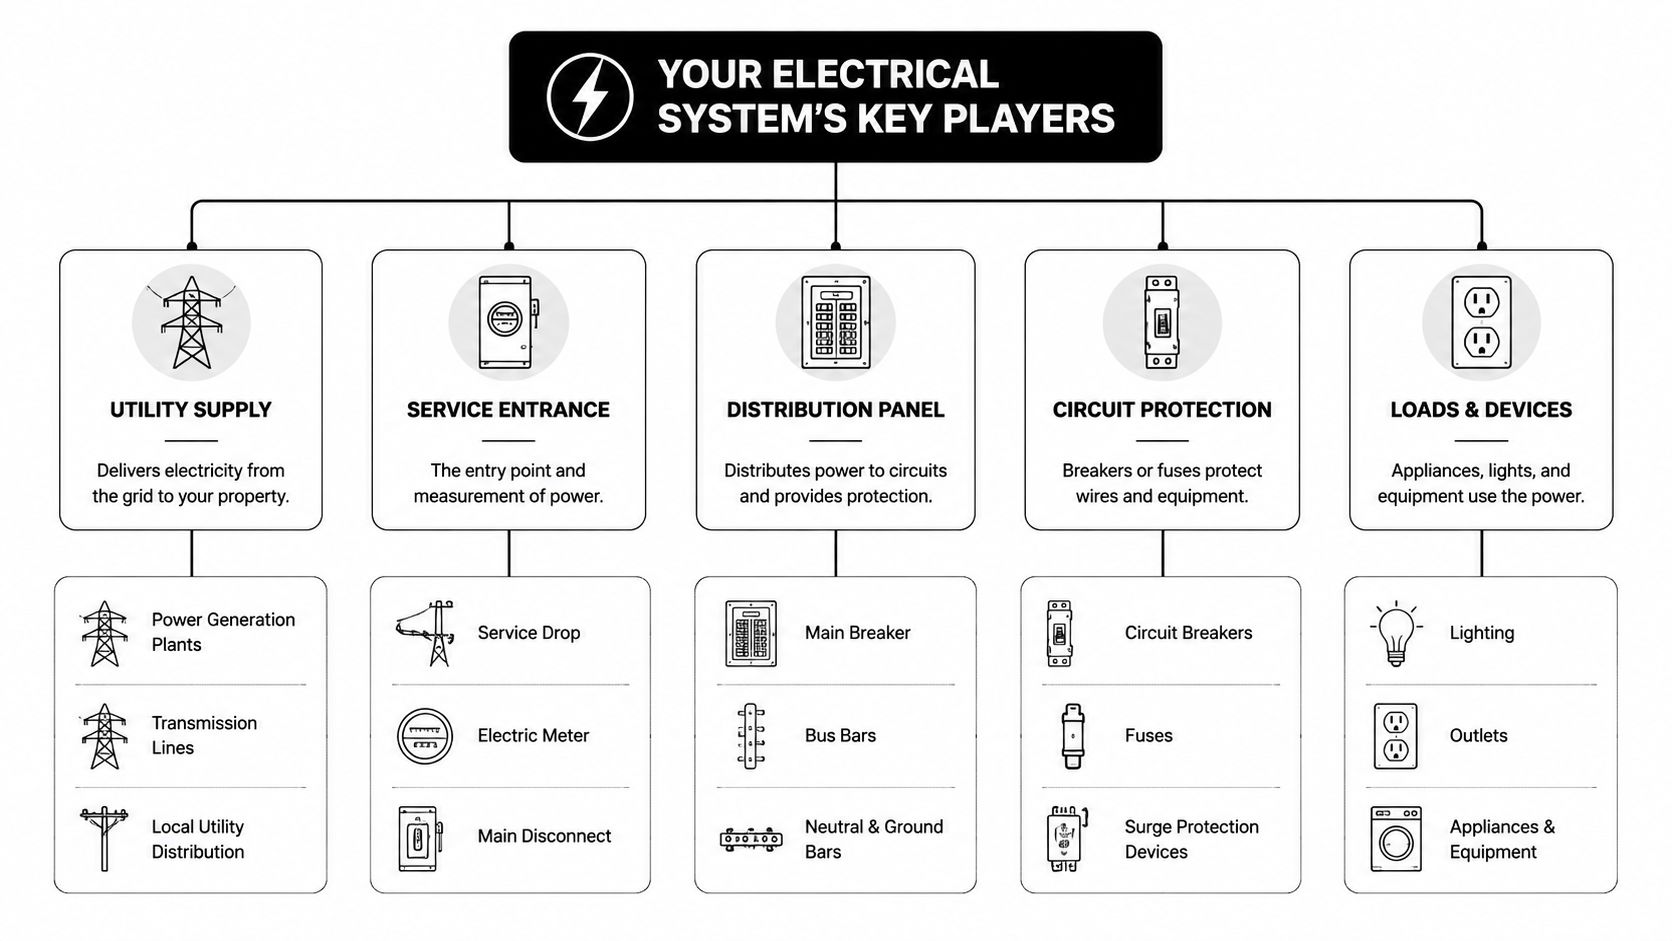
The battery bank and the devices that depend on it
Your house batteries store the 12-volt energy the RV uses for low-voltage equipment. When you're unplugged, they become the heart of the coach's basic function.
In plain terms, if the batteries are weak, a lot of the RV starts acting strange. Lights dim. Fans slow down. Boards and controls get erratic.
Primary job: The battery bank supplies 12-volt DC power for the RV's essential low-voltage equipment.
Some owners also add accessories that draw from this side of the system. For smaller add-ons and portable charging setups, it helps to understand how a 12-volt accessory outlet works. This example of an e-bike power outlet is useful because it shows the style of plug many RV owners already recognize from their coach.
The converter and inverter
These two parts get mixed up all the time.
According to NRVTA's guide to RV electrical systems, an RV electrical system includes three interoperable subsystems: 120V AC from external sources, 12V DC from batteries, and power conversion systems that manage the flow. That same guide notes that a tripped AC breaker disables the converter, which then stops charging the DC battery bank.
Here's the simple version:
Converter: Takes incoming AC power and turns it into DC power so the batteries can charge and the 12-volt side can run.
Inverter: Takes stored DC battery power and turns it into AC power for selected household-style loads when you aren't plugged in.
A converter is common in most RVs. An inverter may be missing, small, or installed only for specific circuits depending on the coach.
If battery charging is the part you want to understand better, our breakdown of an RV battery charger helps clarify how charging equipment fits into the overall system.
The outside inputs and the protection devices
Power has to enter the RV somehow. That's where a few other players come in.
| Component | What it does in plain language |
|---|---|
| Shore power inlet | Accepts campground or home power into the RV |
| Generator | Produces AC power when you're off-grid and need more than battery-only camping |
| Solar panels | Feed charging power back to the battery side through supporting equipment |
| Transfer switch | Directs power from the correct source in coaches equipped with multiple inputs |
| Breakers and fuses | Shut circuits down when there's a fault or overload |
Breakers and fuses deserve special respect. They're not annoyances. They're your warning system.
If one appliance dies, look for a local circuit issue. If a whole side of the RV goes down, think bigger. Power source, main breaker, converter function, or battery condition.
Once you know these names and jobs, opening the electrical compartment feels a lot less intimidating.
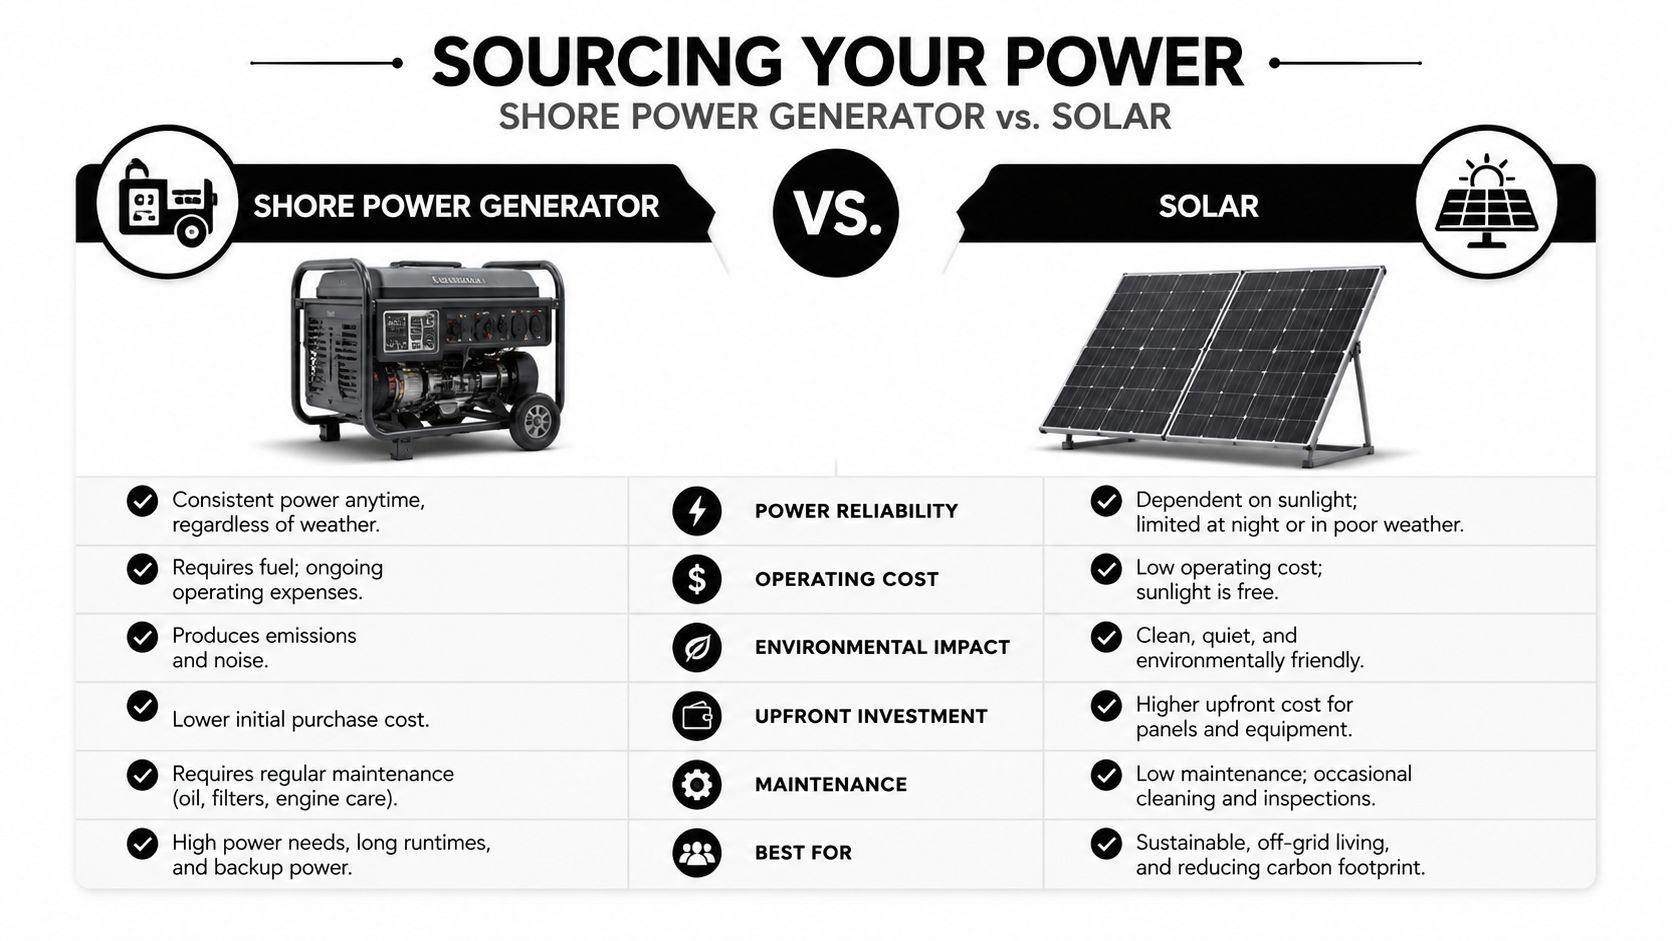
Sourcing Your Power Shore Power Generator and Solar
Most electrical questions in the field come down to one practical issue. Where is the RV getting power right now?
That answer changes how much you can run, how long you can stay out, and how comfortable camp life feels.
Shore power at campgrounds and home hookups
Shore power is the simplest source for most owners. You plug into a pedestal or appropriate hookup, and the RV can operate much more like a small apartment.
The big dividing line is 30-amp versus 50-amp service. A 30-amp, 120-volt connection provides about 3,600 watts, while a 50-amp split-phase connection provides about 12,000 watts, according to NIRVC's RV electricity guide.
That difference matters in everyday use.
| Service type | Practical takeaway |
|---|---|
| 30-amp | Better suited to smaller rigs and more careful load management |
| 50-amp | Gives larger RVs room to run multiple high-draw appliances at the same time |
If you've ever wondered why one trailer can run modest loads comfortably while a large fifth wheel can feel much more house-like at the pedestal, this is a big part of the answer.
Generator use in remote Utah camping
A generator is your off-grid heavy lifter. It's the tool owners rely on when they want AC-style power away from hookups, especially in places where running bigger appliances matters.
That can be useful during hot-weather camping, shoulder-season trips, or long stays where battery-only camping won't cover your needs. The tradeoff is noise, fuel, and maintenance.
Field rule: If you want the feel of full-hookup camping while parked far from hookups, a generator usually does the hardest work.
Solar for quiet battery support
Solar fits a different camping style. It's quiet, passive, and especially popular with Utah owners who like to spread out and stay away from packed campgrounds.
Solar doesn't replace every other power source in every setup. What it does well is help keep batteries charged so your low-voltage side stays healthy longer. For owners planning remote camps, it also helps to see how other outdoor users think about solar power for remote hunting, since the same off-grid planning logic applies to RV travel.
If roof-mounted solar is on your list, our guide on how to mount a solar panel to an RV roof is a useful next read before you buy parts or drill anything.
Basic Troubleshooting When the Lights Go Out
You are parked outside Bryce Canyon on a cold morning. The furnace fan ran through the night, the cabin lights look dim, and one outlet suddenly seems dead. In our Salt Lake City service department, that kind of call usually turns out to be a simple chain reaction, not a mystery failure.
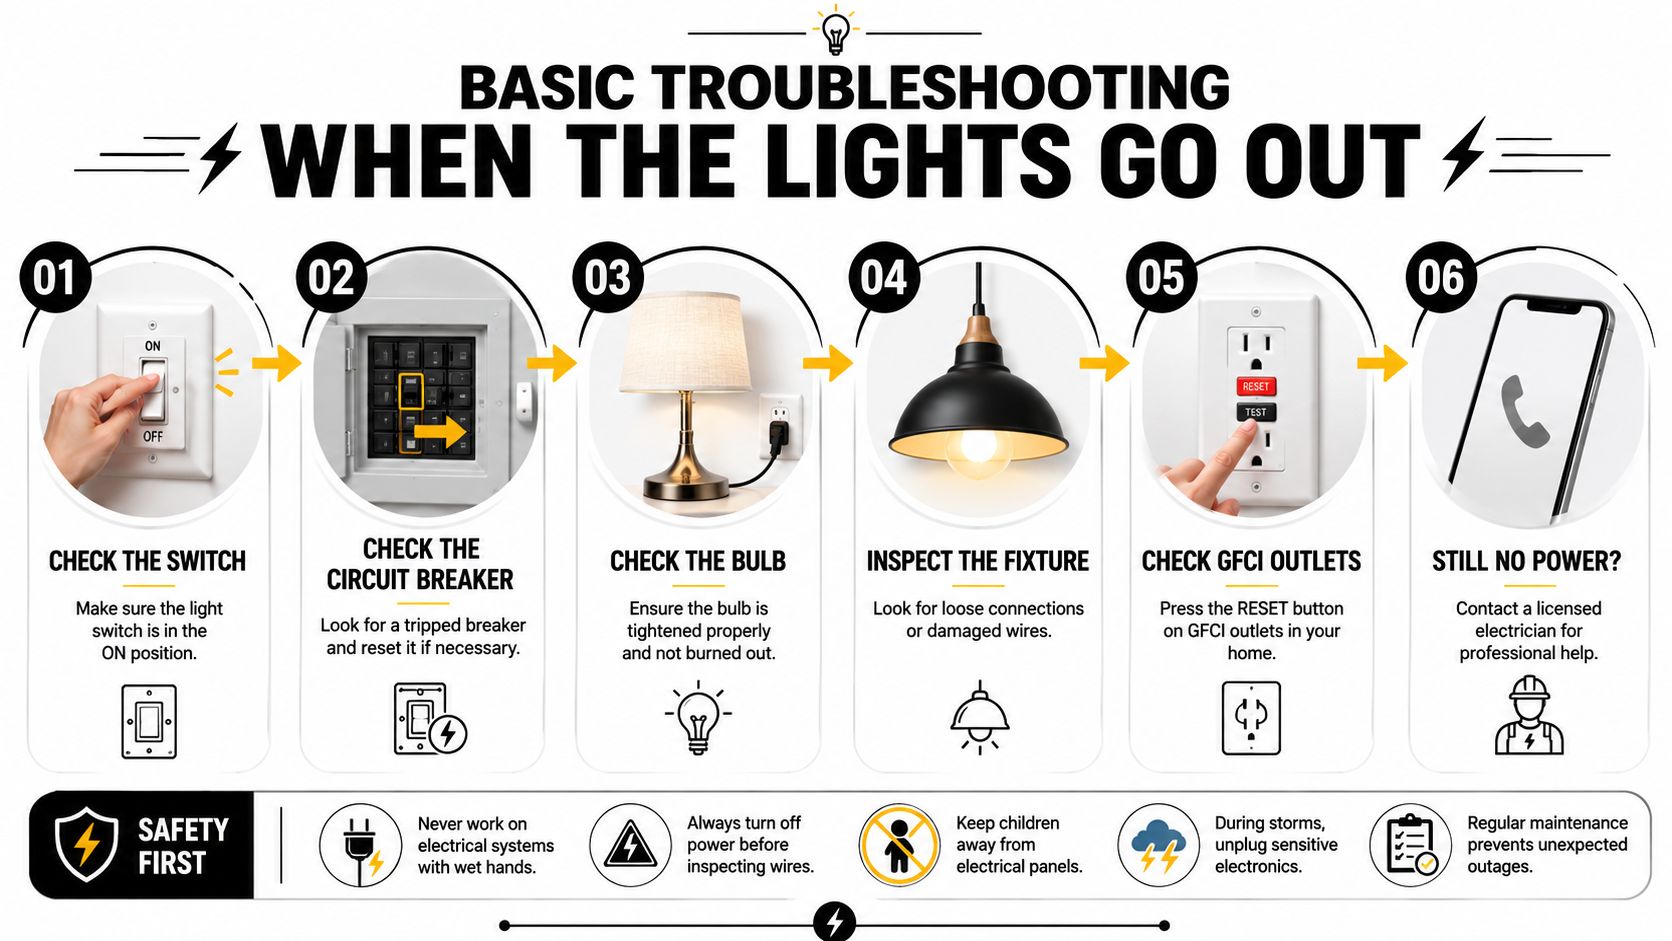
The key is to troubleshoot in order. Your RV electrical system works like two connected circuits in the same body. If you figure out which side is struggling first, AC or DC, the rest gets much easier.
Start with the easiest checks
Start by asking a narrow question. Did one thing quit, one area quit, or did the whole coach go dark?
That question saves time because each answer points you toward a different part of the system.
- Identify the scope: Is it one outlet, one appliance, all 120-volt items, or all 12-volt items?
- Check the power source: Confirm the pedestal, home outlet, or generator is supplying power.
- Inspect breakers: A tripped breaker often sits halfway and can look normal at a glance.
- Inspect fuses: On the DC side, one blown fuse can disable lights, a slide, a pump, or several related components.
- Check battery condition: Low battery voltage can cause strange symptoms, especially in cold weather.
- Treat the monitor panel as a clue, not proof: A panel reading helps, but a meter and direct inspection tell you more.
A lot of owners focus on the first thing that stopped working. We see the opposite approach pay off. Step back and trace the path of power, the same way you would trace a water leak to the valve instead of staring only at the puddle.
Here's a helpful walk-through if you like seeing troubleshooting in action:
What a tripped breaker or blown fuse can mean
If all AC appliances stop working, check the campground source, generator output, the main breaker, and then the branch breakers. One bad pedestal or a partially tripped main can shut down the whole 120-volt side.
If lights, the water pump, or tank monitors stop working, move to the 12-volt side. Look at battery charge, battery disconnect position, the fuse panel, and whether the converter is charging properly when plugged in.
If only one appliance is dead, stay local first. The issue may be that device, its outlet, its GFCI, or one dedicated circuit.
We regularly inspect coaches that owners feared had a major electrical failure, only to find a tripped breaker, a switched-off battery disconnect, or a battery bank that dropped too low overnight.
The hidden battery drain many owners miss
Parasitic draw is one of the most common causes of dead batteries in newer RVs. Even when the coach looks off, small devices may still be pulling power. Stereo memory, control boards, Wi-Fi gear, leveling systems, alarms, and smart accessories all take small bites. Over days or weeks, those bites add up.
In Utah, this is a common issue because many owners store their RV between trips, then head back out into the mountains expecting everything to be ready. Cold weather makes the problem worse. Batteries already lose performance as temperatures drop, so a quiet background load can leave you with a weak or fully drained bank sooner than expected.
Watch for these signs:
- The battery is weak after storage: You parked with everything off, but the coach comes back sluggish or dead.
- Electronics still show signs of life: Displays, sensors, or control boards stay active even when you thought the rig was shut down.
- The RV works fine plugged in but struggles unplugged: That usually points to battery condition, charging issues, or hidden 12-volt loads.
This comes up often with newer models, especially coaches packed with convenience electronics. It also shows up after lithium conversions that were only partly completed. If the charging profile, battery monitor, or disconnect strategy was not updated to match the new battery setup, owners can chase the wrong problem for weeks.
A simple meter check usually tells the story faster than guesswork.
If you have gone through the basic checks and the symptoms still do not make sense, a methodical diagnostic is the smart next step. Electrical problems rarely improve when parts get replaced at random.
Upgrading Your System for Utah Adventures
You feel electrical upgrades most clearly at camp. Park a stock trailer at a cold, high-elevation site in Utah, and power starts to feel limited fast. Add the right equipment, and the same rig becomes much easier to live with for a long weekend or a longer boondocking trip.
From our service department in Salt Lake City, we see the same pattern over and over. The best upgrade is the one that matches how you camp, not the one with the longest feature list. Utah owners usually care about quiet nights, dependable battery performance in shoulder-season cold, and enough reserve power to handle remote sites where hookups are not part of the plan.

Upgrades that change the camping experience
Solar helps replace what your 12-volt system uses during the day. For owners who camp around southern Utah or spend time away from hookups, that often means less generator run time and fewer worries about arriving home with drained batteries.
Lithium batteries give you more usable battery capacity and hold voltage more steadily under load. In plain terms, lights stay brighter, fans run more consistently, and the system feels less strained when you are living on battery power.
An inverter upgrade adds more household-style power when you are unplugged. If you want to run selected outlets, charge laptops, or power a TV and small kitchen appliances from the battery bank, the inverter needs to be sized and wired for that job. If you are comparing coaches or planning a retrofit, these RV inverter installation details can help you see what the project really involves.
Why lithium conversions go wrong
Lithium upgrades are one of the most misunderstood electrical projects we see.
A battery swap by itself is often only half the job. The charging equipment has to match the new battery chemistry, or the system may charge poorly, stop short of full capacity, or behave in ways that send owners chasing the wrong problem. That is especially common on newer RVs with more electronics and more layers between the battery bank and the appliances you use every day.
A converter works like the battery charger built into the coach. If it was designed around lead-acid charging and never updated, a new lithium bank may never perform the way you expected.
Practical rule: Treat the battery, converter, and monitor settings as one system.
In our shop, this comes up often with partial upgrades. An owner installs lithium batteries, but the converter profile, battery monitor, disconnect strategy, or solar controller setup still reflects the old system. The result can look like a bad battery when the issue is a mismatch between parts.
How to choose upgrades based on how you camp
Start with your camping pattern.
- Weekend campground trips: A healthy battery bank and a properly working converter may be enough.
- Boondocking near Moab, Capitol Reef, or farther off the pavement: Solar and added battery capacity usually make a much bigger difference.
- Cold-weather trips in the Wasatch or shoulder-season camping at elevation: Charging behavior and battery type matter more because cold cuts battery performance.
- Family travel with lots of devices and more AC needs: Inverter sizing, outlet planning, and load priorities need careful setup.
An RV electrical system works like a circulatory system. The battery stores energy, the converter and charger replenish it, and the wiring carries it where it needs to go. If one part gets upgraded without the others, the whole system can feel out of balance.
Motor Sportsland can help with electrical upgrades and diagnostics when a project involves converter compatibility, charging behavior, inverter additions, or equipment that needs to work together correctly.
Maintenance Safety and When to Call Our Service Center
The healthiest RV electrical system is usually the one that gets small checks before problems start. You don't need to be an electrician to catch the basics, but you do need a routine.
A simple seasonal checklist
Use this as a practical starting point before a big trip, after storage, or when seasons change.
- Check battery condition: Look for corrosion, loose connections, and signs the batteries haven't held up well in storage.
- Inspect battery water levels where applicable: If your battery type requires it, don't ignore this basic service item.
- Clean the terminals: Dirty or corroded terminals create avoidable headaches.
- Examine the shore cord: Look for worn insulation, heat damage, or bent connectors.
- Test GFCI outlets: If one trips or won't reset, investigate before the next trip.
- Open the breaker and fuse panels: You're looking for obvious trouble such as a tripped breaker or blown fuse.
- Verify disconnect switches: A surprising number of “no power” complaints start here.
Safety rules worth taking seriously
Electrical mistakes in an RV can get expensive fast, and some can become dangerous.
Always disconnect from power before working on the system if you're doing anything beyond simple visual checks.
A few habits matter every time:
- Use the correct cord and adapter setup: Don't improvise with undersized extension cords.
- Respect 30-amp and 50-amp differences: Wrong assumptions here can create confusion and overloads.
- Don't chase faults with random part swaps: Replacing components without diagnosis often adds cost without fixing the issue.
- Stop when you're unsure: Confidence is useful. Guessing is not.
When it's time to get professional help
Call for service when:
- Breakers trip repeatedly
- Batteries won't stay charged
- The converter or inverter behavior seems inconsistent
- You smell heat or see discoloration near plugs, cords, or panels
- You're planning a lithium, inverter, or solar upgrade and want the parts matched correctly
A good electrical inspection is cheaper than a ruined trip and safer than trial-and-error repairs.
Frequently Asked Questions
Why do my RV lights work when the outlets don't?
That usually points to the split between the DC and AC sides of the RV electrical system. Lights commonly run on the battery-backed 12-volt side, while outlets are typically on the 120-volt side.
What's the first thing I should check if my RV suddenly loses power?
Start by figuring out whether the issue affects the whole coach or only part of it. Then check the external power source, breakers, fuses, and battery condition in that order.
Is a dead battery enough to cause multiple RV problems?
Yes. When the battery bank is weak, many low-voltage functions can act erratic or stop working, and some other systems may also behave strangely.
Do I need solar to camp off-grid in Utah?
Not always. Many owners camp off-grid without solar, but solar can make battery management easier and help extend stays without relying as much on a generator.
Can I just swap lead-acid batteries for lithium batteries?
Sometimes, but not safely in every case. Converter compatibility matters, and charging equipment has to match the lithium battery's requirements.
How do I know if my RV has parasitic draw?
A common clue is returning to the RV after storage and finding the batteries much weaker than expected, even though everything seemed turned off.
If you want help sorting out your RV electrical system, planning upgrades, or diagnosing a charging problem before your next Utah trip, you can browse resources and service options at Motor Sportsland.
