
RV Inverter Installation: A Utah Expert's Safety Guide
A lot of Utah RV owners reach the same point. They're parked off-grid near Bear Lake, out by the San Rafael Swell, or tucked into a quieter site away from hookups, and they want normal household power without firing up a generator every time they need coffee, charge a laptop, or run a CPAP. That's where a properly planned RV inverter installation changes the experience.
It also happens to be one of the upgrades that can go wrong fast if it's rushed. We've seen owners choose an inverter by guesswork, mount it in a bad location, or skip key protection on the battery side. The result is usually disappointing performance. In the worst cases, it creates real safety risk.
A good installation isn't just about making outlets live. It's about matching the system to how you camp in Utah, from weekend trips near Jordanelle to longer boondocking stays on rougher roads and at higher elevation. If you're building out your off-grid setup, our article on camping off the grid is a useful companion. And if your plans include bear country, it's also smart to review Counter Assault's guide to bear safety before you rely on outdoor food prep or storage around camp.
Your Ticket to Off-Grid Freedom in Utah
An inverter takes your RV's battery power and converts it into the household-style power many everyday devices expect. That sounds simple. In practice, the right setup depends on where you camp, what you want to run, and how much complexity you're willing to add.
Around Utah, those decisions matter more than many first-time buyers expect. Dry air, summer heat, dusty roads, cold shoulder seasons, and long stretches away from shore power all put pressure on an electrical system. A setup that works fine in a driveway test can become frustrating fast at a dispersed campsite.
A quiet morning in camp is usually what pushes people toward an inverter. They want power without generator noise, not a giant electrical project they didn't need.
The good news is that RV inverter installation is very manageable when you approach it in the right order. Start with the load. Choose the right inverter type. Mount it where it can survive vibration and heat. Protect the battery cables properly. Then decide whether you really need whole-coach power or just a few critical outlets.
That last decision is where many owners either save money or overspend.
How to Choose and Size Your RV Inverter
Sizing errors usually happen at the planning stage. An owner buys the biggest box that fits the budget, then finds out it still does not support the appliances they want to use together, or it demands a larger battery bank than they expected. In RV inverter installation, sizing starts with your actual camping routine and your real loads.
Choose the inverter type first
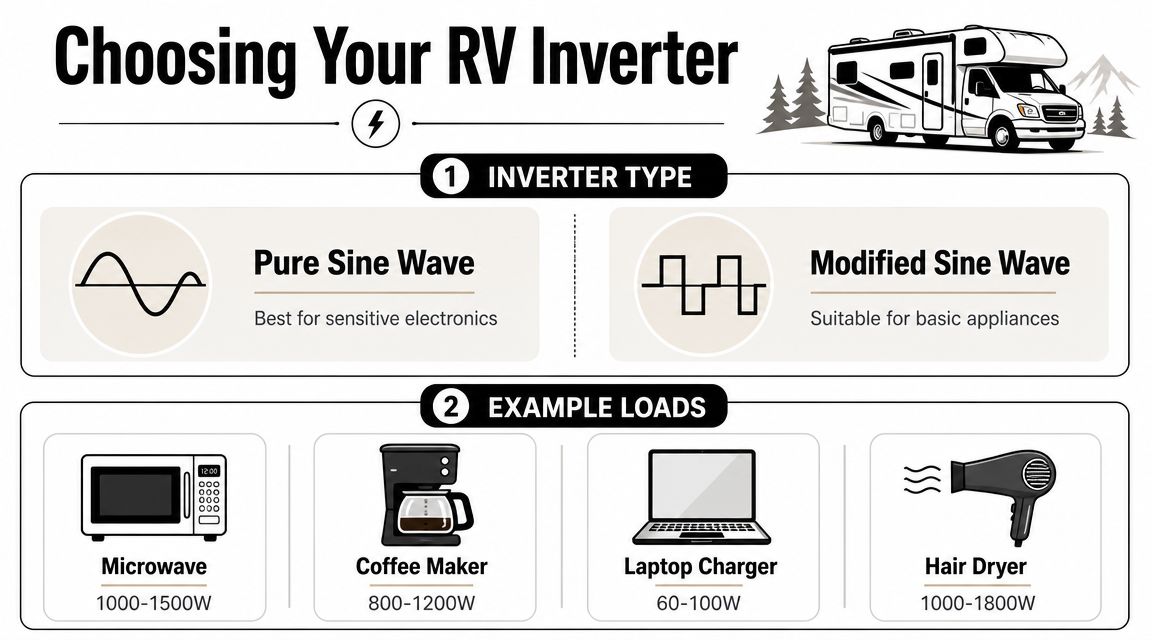
For most modern RVs, pure sine wave is the right call. Laptops, TVs, CPAP machines, battery chargers, and other electronics tend to run better on clean power. Modified sine wave units can still handle some simple loads, but they often bring nuisance issues such as extra heat, noise, or equipment that does not like the waveform.
That matters more for Utah campers than many people expect. If you are spending cold nights at higher elevation with a CPAP, charging devices after a long day off-grid, or trying to get a little work done from a trailer near Moab or Bear Lake, stable power is usually worth paying for.
This visual gives a quick snapshot of the trade-off.
If your inverter plan also includes panels, battery upgrades, or a van-style off-grid setup, our guide to solar power for a campervan helps you map the full system.
Size from simultaneous use
Start with what will run at the same time. That is the number that matters.
A common approach is to total the running wattage of your expected simultaneous loads, account for startup surge, and leave some headroom. One RV-specific sizing walkthrough shows how a combined load around 1,500W can justify stepping up to a 2,000W inverter in its sizing walkthrough.
If an appliance label lists only volts and amps, calculate wattage with Volts × Amps. That simple check keeps a lot of owners from undersizing the system.
A practical way to choose what actually deserves inverter power
The smarter question is not, “How large an inverter can I buy?” It is, “What needs to work when I am off-grid?”
That choice is where people either keep the system reasonable or spend money on capacity they rarely use. At our service counter, we see two common paths. One owner wants quiet mornings with a coffee maker, phone charging, and maybe the TV at night. Another wants microwave use, hair dryer use, laptop charging, and enough flexibility that any outlet in the coach works as if they were plugged into shore power. Those are two different electrical projects, even if both owners say they “just want an inverter.”
A few common examples help:
| Use case | Typical load pattern | Practical planning note |
|---|---|---|
| Morning basics | Coffee maker plus device charging | The coffee maker usually drives inverter size because the draw is short but heavy |
| Evening comfort | TV, laptop charger, phone charging | This is usually manageable with a modest system and good battery capacity |
| Medical and work needs | CPAP, laptop, router-style gear | Clean, reliable output matters more than chasing the largest inverter |
| Hair dryer or microwave use | High single-appliance demand | One appliance can push you into a larger inverter class fast |
The wattage ranges shown in the infographic are a useful reminder that appliance demand varies a lot. A microwave, coffee maker, laptop charger, and hair dryer do not belong in the same planning category. Size the inverter around the loads you will combine, not around the highest number you saw on a product box.
Why many RVers end up considering the same inverter range
Once heating appliances enter the picture, many RV owners start looking at the 2,000W to 3,000W range. That does not mean every coach needs whole-coach inverter power. It means real-world load lists get bigger quickly once you want kitchen convenience instead of basic charging and entertainment.
For boondocking in Utah, that trade-off matters. A larger inverter can support more comfort, but it also pulls harder on the batteries, often needs heavier cabling, and can turn a simple install into a much more involved one. If your typical trip is a weekend near Capitol Reef with modest power needs, a focused setup for a few critical outlets may serve you better than a whole-coach system. If you spend extended time off-grid and want the coach to behave more like it does on hookups, the larger system can make sense.
Practical rule: Size around your busiest realistic hour in camp.
Bigger is not automatically better. The right inverter is the one that supports your priorities, matches your battery bank, and does not force you to pay for capacity you will never use.
Gathering Your Tools and Safety Equipment
The cleanest installs usually start with a boring half hour. Tools laid out. Circuits confirmed dead. Mounting spot chosen. Cable route planned. That prep work prevents most of the problems we see later.
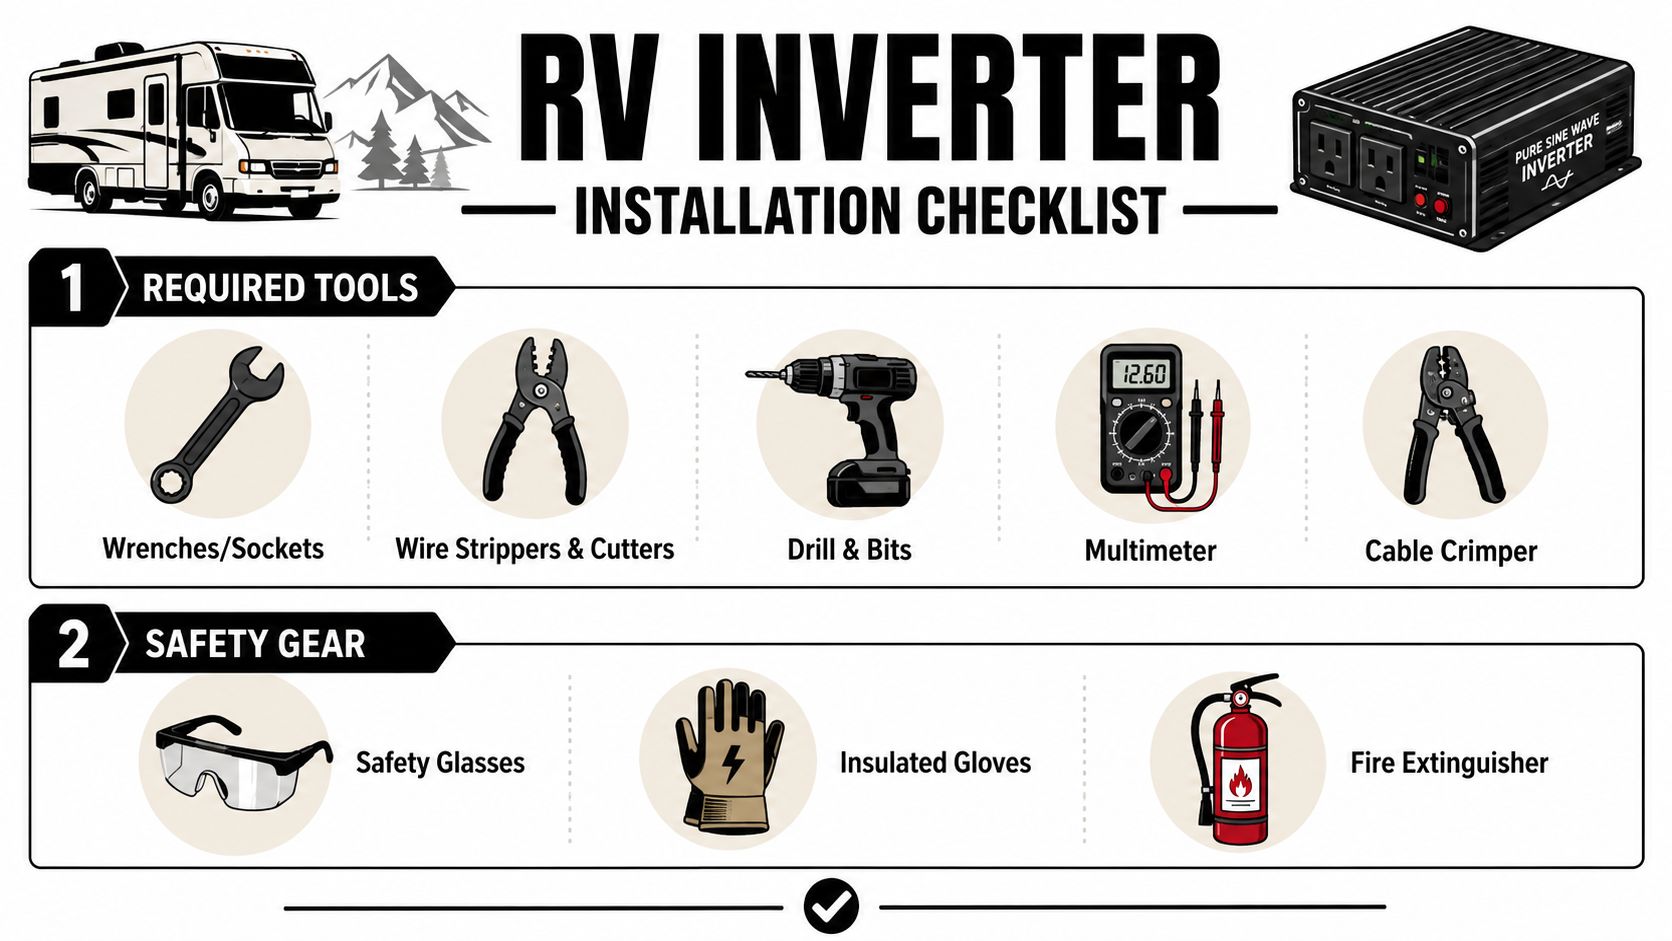
What should be on the bench
For a typical RV inverter installation, gather the tools before you disconnect anything:
- Wrenches and sockets for battery terminals, hold-down hardware, and mounting fasteners
- Wire strippers and cutters for cable prep and smaller control wiring
- Drill and bits for panel mounting or routing hardware
- Digital multimeter to verify power is off and to check polarity
- Cable crimper for heavy battery lugs
On the safety side, don't skip basics:
- Safety glasses when drilling, cutting, or working around batteries
- Insulated gloves while handling battery connections
- Fire extinguisher nearby in case something goes wrong during testing
Power down everything first
Modern guidance on RV inverter installation puts safety first by requiring full power disconnection before work begins, proper grounding, and manufacturer-spec torque on connections. One manufacturer guide cited in RV installation coverage specifies terminal torque in the 12N·m to 14N·m range and advises tying the inverter grounding lug to the RV's common ground as part of a safer installation approach.
In plain language, that means you should isolate every possible power source before touching the system:
- Unplug shore power
- Shut down the generator
- Isolate the battery bank
- Disconnect solar input if your RV has it
A multimeter matters here because a switch position or indicator light isn't proof. Verify the circuit is de-energized.
If you aren't sure whether the circuit is dead, treat it as live.
Preparation mistakes that cost people time
The most common prep failures are simple:
| Mistake | What happens |
|---|---|
| No cable plan | Owners end up with longer DC runs and more voltage drop |
| No mounting plan | The inverter gets installed where heat, dust, or vibration become a problem |
| No termination tools | Lugs get improvised, and those connections often run hot later |
| No verification | A circuit thought to be off still has power from another source |
That's why we tell customers to slow down at the start. Ten careful minutes before the install can save hours of troubleshooting later.
Mounting the Inverter for Safety and Performance
Where the inverter lives matters almost as much as which inverter you buy. A bad location creates heat problems, cable problems, and service problems. A good location supports shorter battery runs, better airflow, and easier inspection later.
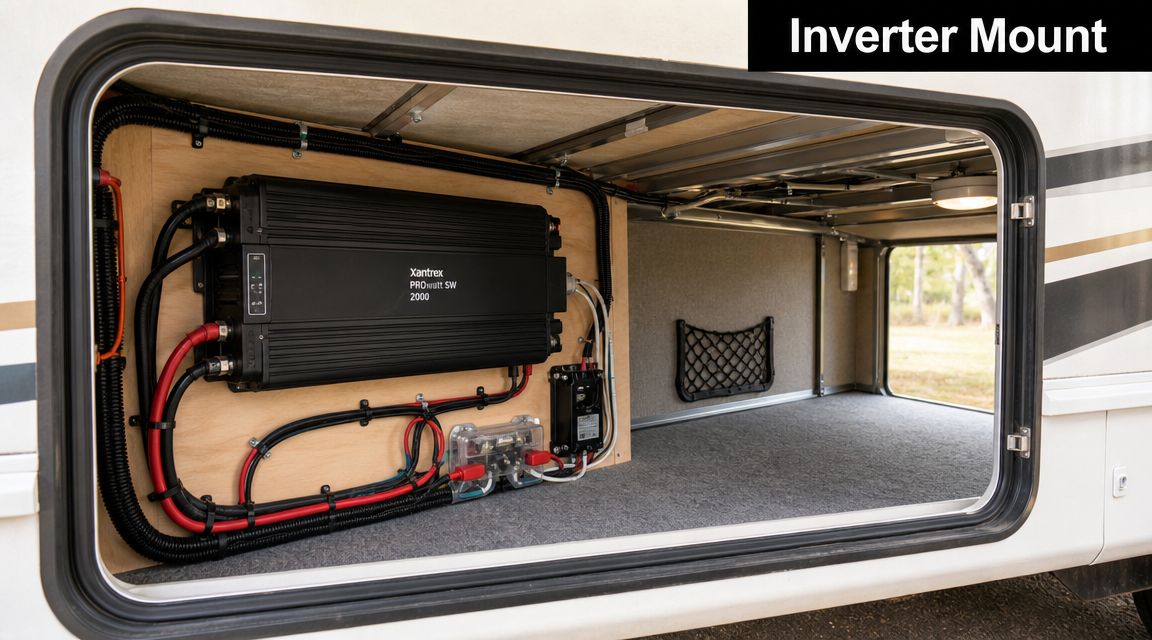
What a good mounting location looks like
The target is a dry, secure, ventilated area close to the battery bank. Pass-through storage bays often make sense because they offer access and a solid mounting surface, but the final choice depends on the RV layout.
Three things usually drive the decision:
- Short DC cable runs help reduce voltage drop
- Solid structure helps the inverter survive vibration on rough roads
- Open airflow helps prevent nuisance shutdowns from heat
Utah roads matter here. A rig that sees washboard forest roads or long stretches to remote camping spots needs hardware that stays tight and a mounting surface that doesn't flex.
Places that cause problems
Some locations should be ruled out quickly:
- Battery compartments, especially with vented lead-acid batteries
- Tight sealed spaces with poor airflow
- Areas near flammable cargo
- Spots exposed to spray, leaks, or regular dust intrusion
Manufacturers call for airflow clearance around the unit. Follow the manual for your specific inverter instead of guessing. If the inverter can't breathe, it won't perform well for long.
A clean install should also stay serviceable. You want room to inspect lugs, check cable condition, and reach reset points or controls without dismantling half the compartment.
Wiring Fusing and Grounding Your New System
Caution matters most during the wiring, fusing, and grounding steps of an RV inverter installation. In our service bays, the trouble we correct after DIY installs usually comes from the same points: no proper fuse at the battery, cable that is too small for the load, lugs that were never torqued to spec, or a weak ground path.
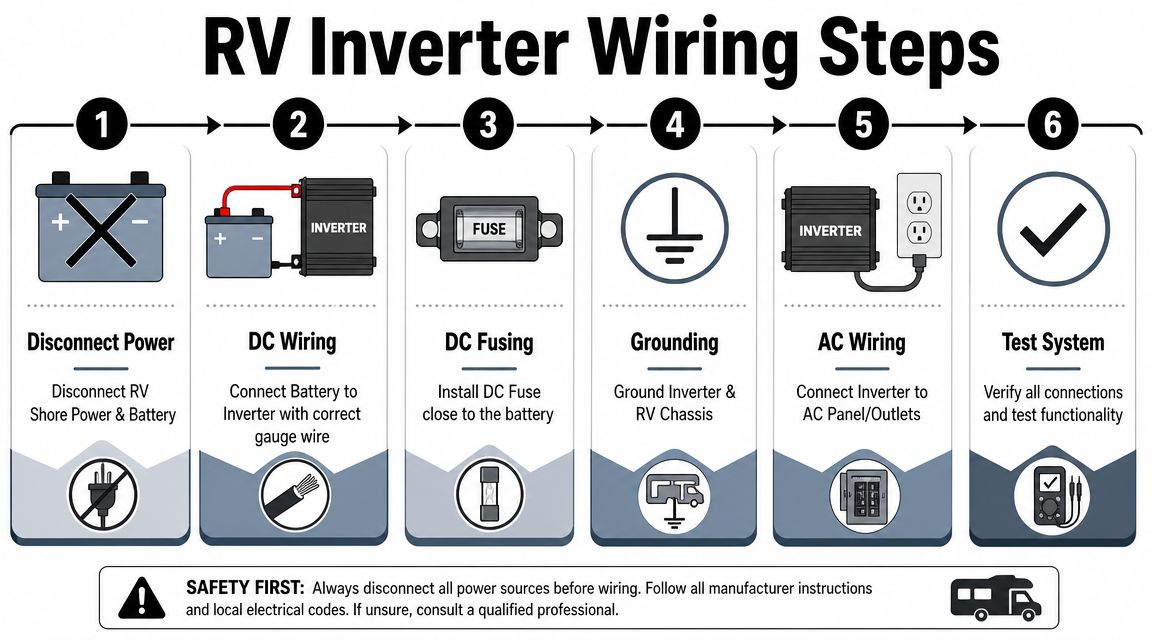
This graphic shows the workflow clearly.
Follow the installation order
The safest sequence is simple. Isolate all power. Confirm the inverter is mounted securely. Install the fuse or breaker on the positive battery lead near the battery. Run the DC cables. Bond the inverter ground. Then connect the AC side.
One RV wiring guide lays out that same order in a clear step-by-step process. The order matters because each step reduces the chance of damaging the next one. It also keeps troubleshooting cleaner if the system does not power up on the first try.
Start with the DC side
The battery cables do the heavy work. A modest inverter can still pull enough current on the 12-volt side to turn a small mistake into heat fast.
Focus on the parts that fail in service:
- Match cable size to inverter load and cable length. Small cable increases voltage drop and heat.
- Keep DC runs short. Every extra foot costs you efficiency.
- Use a proper crimp tool for lugs. A loose crimp may pass a quick test and still fail under load.
- Torque terminals to the inverter maker's spec. Hand-tight is not a spec.
- Support and protect the cable run. Vibration, sharp edges, and storage-bay cargo can damage insulation over time.
Utah use adds another layer. If your RV sees washboard roads near dispersed campsites, or long drives in summer heat, cable support and terminal torque matter even more. We see good parts fail early when the install was not built for vibration.
A connection that feels tight can still be loose enough to overheat under inverter load.
Fuse the positive lead near the battery
The positive battery cable needs overcurrent protection close to the battery. If that cable shorts to frame before it reaches the inverter, the fuse or breaker is what limits the fault.
A good setup usually includes:
| Protection step | Why it matters |
|---|---|
| Fuse or breaker close to the battery | Protects the positive cable during a short-circuit event |
| Short protected run | Limits the amount of unprotected conductor |
| Correctly rated fuse, holder, and cable | Lets the protection device open the circuit as intended |
Do not size the fuse by guesswork. Size it to protect the cable and fit the inverter manufacturer's requirements. If those two do not agree, stop and correct the design before you energize anything.
Grounding supports safety and stable operation
The inverter grounding lug should bond to the RV chassis or the common grounding point specified by the manufacturer. That connection helps clear faults and can reduce nuisance issues that show up as erratic inverter behavior.
Grounding gets skipped on retrofit jobs more often than it should. Owners understandably focus on getting AC power at an outlet. The safer approach is to treat grounding as part of the core install, not cleanup work at the end.
For readers also planning a larger off-grid setup, Solar Energy Management's solar solutions give a useful overview of how inverter design and solar charging choices affect each other.
AC output should match how you camp
After the DC side is right, the AC side needs a deliberate plan. The wiring choice should match what you want to power in Utah, not what sounds impressive on paper.
Two common approaches are:
- Dedicated inverter-fed outlets for a few selected loads
- Transfer-switch or subpanel integration for a more built-in system
Here's a useful walkthrough from the field on that style of setup:
Dedicated outlets are easier to wire, easier to control, and usually a better fit for weekend boondocking. They also make it harder to accidentally run a microwave, hair dryer, or space heater from a battery bank that was only sized for charging devices, a TV, or a CPAP.
Transfer-switch or subpanel integration gives a cleaner user experience, but complexity goes up fast. Shore power, generator power, and inverter power all need to stay isolated and prioritized correctly. When a customer wants those three power sources to coexist cleanly, we usually recommend professional installation.
Whole-Coach Power vs Critical Outlets
This is the decision that shapes the whole project. Many owners start by asking which inverter to buy. The better question is which parts of the RV should be powered by it.
A key choice in RV inverter installation is whether to power the entire coach or just a few critical outlets. Guidance in the RV service space regularly notes that whole-RV retrofits can be inefficient for smaller rigs because they increase inverter size, battery demand, and transfer-switch complexity beyond what many owners require as discussed in this RV-focused video resource.
When critical outlets make more sense
For many travel trailers and smaller motorhomes, selective power is the practical answer.
This approach works well when your off-grid priorities are things like:
- Phone and laptop charging
- A TV or small entertainment setup
- A CPAP outlet
- Occasional use of one kitchen appliance at a time
The upside is straightforward. You can often use a smaller inverter, avoid rewiring the entire coach, and place clear limits on what can run from battery power.
That matters in Utah because a lot of weekend camping doesn't require a whole-house electrical strategy. If you're spending a few nights away from hookups, powering essentials can be enough.
When whole-coach integration earns its keep
There are owners for whom the added complexity makes sense. Full-timers, long-stay boondockers, and buyers building around larger battery banks may want the convenience of selected branch circuits or broader coach integration.
That setup can feel much smoother. It also asks more of everything else in the system:
| Approach | Strength | Trade-off |
|---|---|---|
| Critical outlets only | Simpler, more targeted, easier to budget | Less convenience, more manual load management |
| Whole-coach integration | More built-in daily use | More wiring complexity and greater battery demand |
The mistake is assuming whole-coach power is automatically “better.” In many rigs, it's just more system than the owner will use.
Most successful installs are the ones that match real habits. Morning coffee, charging, and a CPAP setup call for a different design than extended full-time off-grid living.
Ask yourself the right question
The most useful customer conversation usually comes down to this: when you're camped without hookups, what is essential for you to have powered?
If the honest answer is “a few key outlets,” then build for that. If the answer is “I want the RV to feel mostly normal off-grid,” then expect the inverter decision to affect batteries, charging strategy, and AC distribution too.
That's why the strategic side of RV inverter installation matters. It isn't only a wiring project. It's a system design choice.
Common Pitfalls and When to Call Our Service Center
You're set up outside Moab, the coffee maker starts, and the inverter drops out. That kind of failure usually traces back to a short list of installation mistakes, and most of them start on the DC side.
We see the same patterns over and over. The inverter will not turn on. It starts, then shuts down as soon as a real load hits it. Batteries never seem to reach a full charge. Or a new lithium bank acts worse than the old batteries it replaced.
Problems that show up right away
Treat these symptoms as diagnostic clues, not annoyances:
- No power at all usually points to a battery disconnect left open, a blown fuse, or reversed polarity
- Shutdown under load usually means voltage drop, weak batteries, undersized cable, or loose DC terminations
- Heat or humming means stop and inspect the system before you keep testing
- Inconsistent charging usually points to charger setup or component mismatch, not the inverter by itself
Ignoring heat, humming, or inconsistent charging can turn a manageable fix into damaged wiring, failed components, or battery problems.
A lot of owners assume the inverter itself is bad. Sometimes it is. More often, the inverter is reacting to a system problem around it.
The lithium compatibility issue
Battery chemistry mismatch is one of the most common upgrade mistakes. An owner installs LiFePO4 batteries for more usable capacity, but the existing inverter or converter/charger still uses settings meant for lead-acid batteries.
The wiring can look clean and still perform poorly. Wrong charging profiles lead to undercharging, nuisance shutdowns, and erratic battery behavior. That is a service issue we run into regularly, especially on RVs that were upgraded in stages instead of planned as one system.
If your coach already has charging problems, low-voltage shutdowns, or battery behavior that does not make sense, our guide to RV electrical system repair explains the broader diagnostic side.
When it's time to stop troubleshooting
Some jobs cross the line from careful DIY work into AC distribution and system diagnosis. That is usually the point where calling a service center saves time and prevents damage.
Schedule service if any of these apply:
- You are not fully sure the AC side is isolated correctly
- You need a transfer switch, subpanel, or coach circuit integration
- You upgraded to lithium and have not confirmed charger compatibility
- Cables, lugs, or breakers are getting hot
- The project now involves more fabrication or electrical diagnosis than expected
At Motor Sportsland, our service team handles inverter-related electrical diagnosis and repair. That matters when the project started as a simple critical-outlet plan and grew into a larger coach power system.
Electrical mistakes usually show up at the worst time. In Utah, that often means far from hookups, in heat, cold, or both.
Frequently Asked Questions About RV Inverters
Is a 2000W inverter enough for most RVs
It's a practical starting point for many RVers when the load works out that way, especially for selected appliances rather than the whole coach.
Should I power the whole RV or just a few outlets
For many Utah campers, a few critical outlets is the smarter and simpler choice.
Does inverter placement matter
Yes. Close to the batteries, dry, secure, and well ventilated is the right direction.
Do I need a fuse near the battery
Yes. The positive lead needs protection near the source.
Can I keep my old charger with new lithium batteries
Maybe, but you need to confirm it has a proper lithium charging profile.
If you want help planning an RV inverter installation that matches how you camp, contact Motor Sportsland. Our team can help you sort out the difference between a simple critical-outlet setup and a more integrated coach system, whether you're shopping for your next RV, upgrading your current one, or scheduling electrical service in Utah.
