

50 Amp RV Adapter: How to Choose, Install and Troubleshoot

You've parked the trailer, leveled it, and opened the campground power pedestal. Your RV has a large shore-power plug, but the available receptacle is smaller. The kids want the air conditioner on, dinner needs the microwave, and the electric water heater may already be running in the background.
A 50 amp RV adapter can solve the connection problem. It can't solve a shortage of electrical capacity. Before you buy one or plug it in, you need to know which appliances the available supply can support and whether the receptacle is safe.
That distinction matters during hot Utah camping trips, whether you're headed toward Jordanelle, Bear Lake, or the Great Salt Lake. An adapter is useful equipment, but it isn't permission to operate every appliance just because the cord fits.
At Motor Sportsland, we want owners to approach shore power with a clear load budget, the correct adapter, and a repeatable connection routine. Start with the available watts, then check the outlet and cord. You'll make a better buying decision and have a practical way to separate an overload from a problem that needs professional attention.
How Much Power Each 50 Amp Adapter Setup Delivers
Theoretical power by supply and adapter
| Supply at site | Adapter needed | Max power (ideal) | Practical use |
|---|---|---|---|
| 50 amp pedestal (NEMA 14-50) | None, direct connection | About 12,000 watts | Air conditioning, water heater and microwave together, within each leg's limit |
| 30 amp receptacle (TT-30) | 50-to-30 dog bone | About 3,600 watts | One air conditioner or microwave at a time as a conservative starting plan |
| 15 amp household outlet (5-15R) | 50-to-15 adapter | About 1,800 watts | Refrigerator, lights and one small appliance, after checking actual loads |
The full-service capacity shown above comes from FRVA's explanation of shore power, which describes approximately 12,000 watts under ideal conditions. For adapted supplies, RV Electricity explains that a properly wired 30-amp connection offers about 3,600 watts, while a 15-amp household source offers about 1,800 watts under ideal conditions.
Those are theoretical ceilings, not promises about which appliances your particular coach can run. A household circuit may also supply garage tools, a freezer, or other loads you can't see from the driveway.
Build the budget before connecting
A 50 amp RV adapter changes the connection, not the available power. On a smaller supply, the pedestal breaker protects the smaller capacity even though your coach has a larger main breaker.
Air conditioners, electric water-heater elements, microwaves, and battery chargers deserve attention first. Air-conditioner compressors draw extra current during startup; chargers can add a substantial background load when batteries are depleted. Starting several devices together can trip a breaker even when their combined running load seems manageable.
Practical rule: Add the running watts of everything you plan to operate together. As general planning guidance, if that total exceeds about 80 percent of the supply's rated capacity, shed a load and leave room for startup demand.
Consider an illustrative example built from typical campsite loads, not a documented customer story: a Spanish Fork family arrives at a Jordanelle campground in July with a larger coach on a smaller campsite supply. They prioritize the rooftop air conditioner, switch off the electric water-heating element, and pause cooling before using the microwave.
Use appliance input labels, not a microwave's cooking-output rating, for your worksheet:
- Cooling: Record the air conditioner's running input and allow for compressor startup.
- Hidden loads: Include the converter, battery chargers, and refrigerator's electric mode.
- Optional loads: Identify what you'll switch off before cooking.
Our guide to RV shore-power service provides more background on coach capacity. If you're also considering off-grid charging, Dollar Land Store's guide to designing an RV solar power system is useful planning context, but solar equipment doesn't increase a campground circuit's rating.
Choosing the Right Adapter for Your Campsite Outlet
The most common purchase is a dog-bone adapter that lets a larger RV shore cord connect to a smaller campground receptacle. The short flexible section helps avoid hanging the entire cord's weight directly from a rigid plug converter.
Buy by the male source plug and female RV connector, not just the order of amperage numbers in an online listing. Sellers don't always describe adapter direction consistently.
Which adapter fits which outlet
| Adapter | Connects | Best used when | Check before use |
|---|---|---|---|
| 50-to-30 dog bone | RV 50A plug to 30A TT-30 outlet | Campsites with only 30A service | Confirm the outlet is a TT-30 with a working breaker |
| 50-to-15 adapter | RV 50A plug to 15A household outlet | Emergency or home use with light loads | Confirm GFCI protection on the source and keep loads low |
| 30-to-50 adapter | RV 30A plug to 50A pedestal | Smaller rig on a 50A site | Confirm the pedestal breaker rating and that the adapter is rated for it |
| 50-to-50 extension cord | RV 50A plug to 50A pedestal | Long run from pedestal to coach | Use an RV-rated cord and check for voltage drop |
An extension cord isn't a conversion device. It adds reach, weight, electrical resistance, and another connection that needs inspection, so use the shortest suitable RV-rated cord.
A smaller rig connected to a larger pedestal still has its original wiring and main-breaker limits. The adapter doesn't upgrade the RV.
Match the electrical configuration
A welding outlet or range receptacle can resemble an RV connection without providing the correct neutral and grounding arrangement. Electrical Flux's RV receptacle wiring guide identifies the standard RV supply as a four-conductor arrangement with separate hot, neutral, and equipment-grounding conductors.
Physical fit isn't an electrical test. Don't modify blades, remove a grounding pin, or use a converter intended for unrelated equipment.
For an illustrative Wasatch Front example, a retiree planning a state-park stay checks the receptacle shape, printed markings, breaker label, and visible condition before choosing an adapter. That's a useful shopping check, not proof that the wiring behind the pedestal is correct.
Use this buying checklist:
- Recognized listing: Look for an appropriate safety listing from a recognized testing organization.
- Outdoor construction: Choose weather-resistant housing and substantial strain relief.
- Sound contacts: Reject bent, loose, corroded, or discolored blades.
- Readable ratings: Confirm current and voltage ratings printed on the adapter body.
- Correct direction: Match the source receptacle to the male end and the RV cord to the female end.
When Neutral, Ground and GFCI Problems Mean Stop
A surge protector doesn't make a bad outlet safe. Neither does a plug adapter. If the receptacle is loose, scorched, ungrounded, or fails testing, leave it unused and have campground staff or a licensed electrician address it.
Look at the mating surfaces and housing before making a connection.
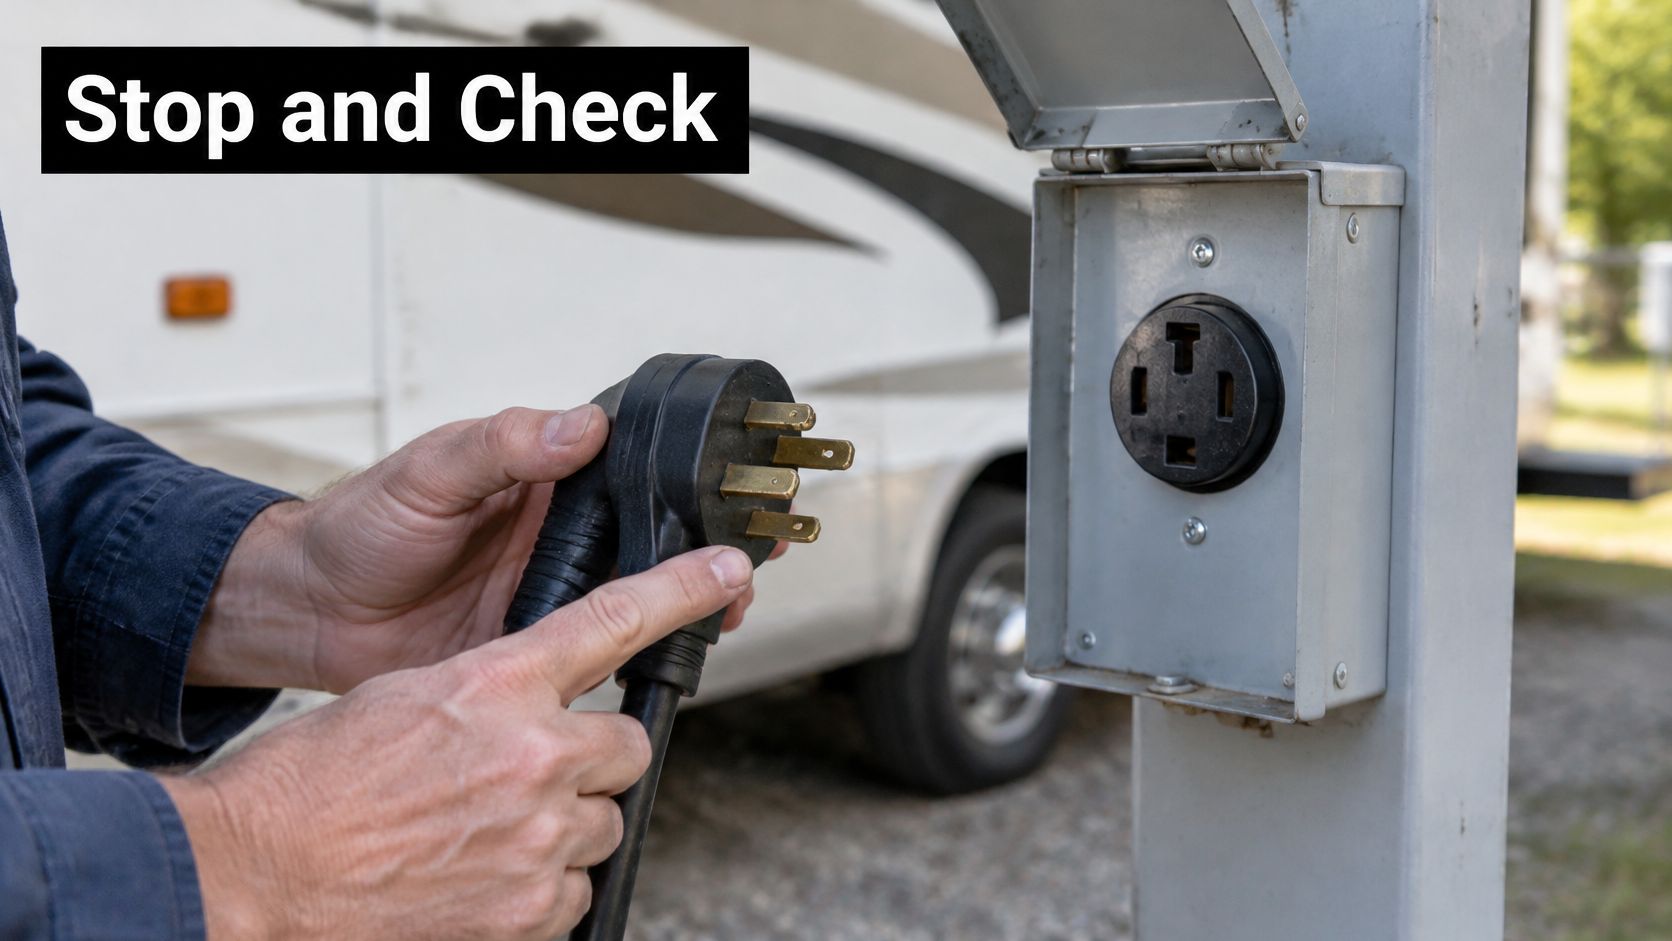
Neutral and ground serve different jobs
At a correctly wired RV receptacle, neutral and equipment ground remain separate. Neutral carries normal return current; equipment ground provides a protective fault path.
An adapter or energy-management device that improperly bonds them can put return current onto the RV frame. The Heartland shore-power document warns against arrangements that defeat grounding continuity or introduce hazardous neutral-to-ground connections.
Don't assume an EV adapter or a device labeled energy management is appropriate for an RV. Use equipment explicitly intended for the source and coach connection.
GFCI trips require diagnosis
The NFPA code material distinguishes 125-volt, 15- and 20-amp receptacles from larger RV-site receptacles when describing GFCI requirements and the RV-site exception. A household adapter is not a substitute for working GFCI protection where it's required.
Treat repeated GFCI trips as a fault to diagnose, not an inconvenience to bypass. Moisture, damaged insulation, an appliance fault, or an improper neutral connection can cause leakage that needs attention.
Never remove the grounding pin or bypass a GFCI to keep the RV powered.
Stop using the connection if you notice:
- Mechanical damage: The plug won't stay seated, the housing is cracked, or contacts move.
- Heat damage: Plastic has melted or the receptacle shows scorching.
- Failed protection: A tester reports a wiring fault or the GFCI won't operate correctly.
- Shock symptoms: Touching the coach produces a tingle or shock. Keep people away and have power disconnected safely.
Our RV electrical-system guide can help you understand the components involved. A permanent home hookup needs a licensed electrician and local code review, not a different plug converter.
How to Connect a 50 Amp Adapter Step by Step
Use a purpose-built RV receptacle tester or a compatible electrical-management system with wiring diagnostics. A basic household polarity tester can't verify every part of a larger RV receptacle, and a noncontact voltage pen can't confirm correct wiring.
Keep this connection sequence handy at the pedestal.
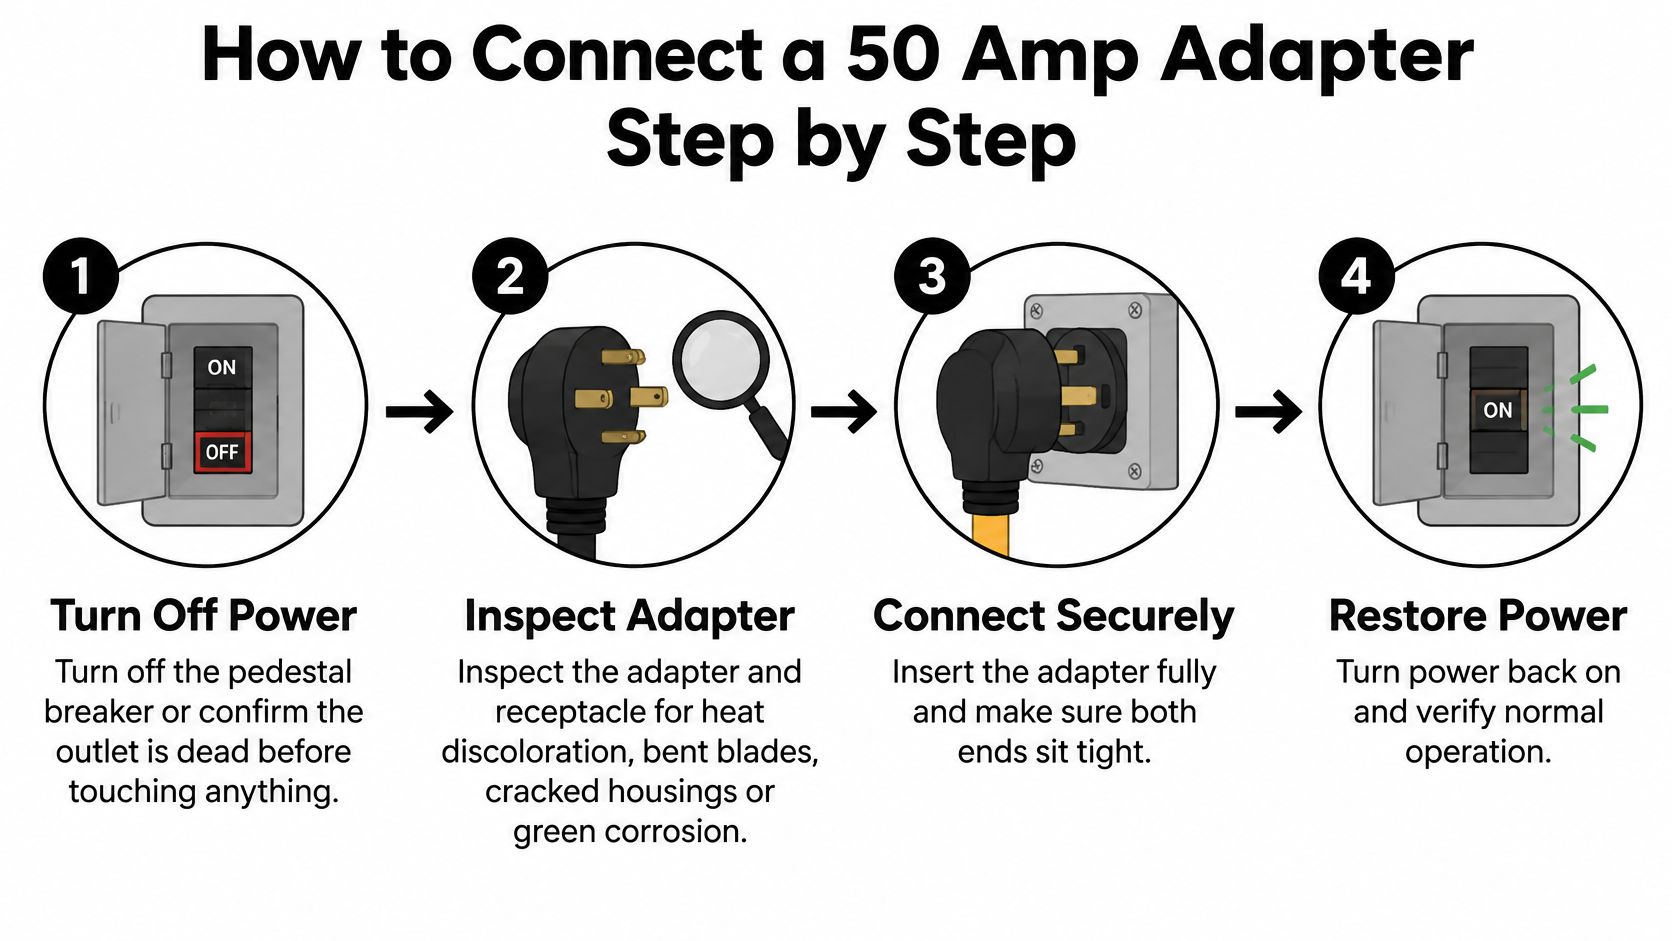
Follow the connection sequence
Turn off source power. Switch off the pedestal breaker before inserting or removing plugs, or have the outlet confirmed dead if no local disconnect is available. This reduces arcing at the contacts; don't open the pedestal enclosure or assume a breaker label proves the outlet is de-energized.
Inspect both mating ends. Look for heat discoloration, bent blades, cracked housings, damaged insulation, or green corrosion on the adapter, cord, and receptacle. Replace damaged portable equipment and leave a damaged pedestal unused rather than trying to improve its fit.
Test the receptacle before attaching the coach. With the source breaker off, insert a properly rated plug-in tester, energize it according to its instructions, and verify its wiring and voltage indications. Turn the breaker off again before removing the tester; if you don't have suitable test equipment or understand the result, ask for qualified help rather than probing live contacts.
Switch off the RV main breaker and appliances. Keep the generator stopped and follow the coach manufacturer's instructions for inverter or transfer-switch operation. Removing loads prevents appliances from starting unexpectedly while you're checking the new connection.
Seat the adapter and shore cord fully. With the pedestal breaker off, connect the adapter to the receptacle and the RV cord to the adapter, following any protective-device manufacturer's connection order. Support the cord so it doesn't pull sideways, and keep every connection dry, raised, and out of puddles.
Restore power and verify voltage before loading. Turn on the pedestal breaker, check the protective device or monitor, and then turn on the RV main breaker while appliances remain off. On full RV service, verify each hot leg to neutral using suitable monitoring equipment; don't open energized panels or insert handheld probes unless you're qualified.
Add loads gradually and start the largest appliance last. Allow background equipment to stabilize before starting the air conditioner, then watch voltage and inspect the connection for abnormal heating over the next several minutes. Respect compressor restart delays and stop immediately for buzzing, burning odor, softening plastic, or excessive heat.
RV Camping's pedestal-check guide describes approximately 120 volts from each hot leg to neutral on standard RV service. For most owners, a properly rated plug-in monitor is the practical way to check voltage without exposing live wiring.
Connection habit: The RV main breaker goes on only after the supply connection has been checked. You want to evaluate the source before appliances add load.
For an additional visual explanation of the hookup process, watch this demonstration.
Troubleshooting Breaker Trips, Heat and Low Voltage
A breaker trip during air-conditioner startup often points to excessive combined load. Switch off the microwave or electric water-heating element, stagger compressor starts, and see whether the reduced load operates normally. An immediate trip with appliances off needs diagnosis rather than repeated resets.
Symptom, cause and fix at the campsite
| Symptom | Likely cause | First fix |
|---|---|---|
| Breaker trips when air conditioner starts | Total load exceeds the supply capacity | Switch off a high-draw appliance and stagger starts. If it trips again with a reduced load, stop resetting it and investigate. |
| Adapter or plug feels hot | Loose contacts or corroded blades | Turn off source power, unplug, inspect, replace the adapter, and have the receptacle checked before reconnecting. |
| Lights dim and appliances stutter | Voltage drop from a long or undersized cord | Shorten the cord or move to a verified higher-capacity supply. Stop operating affected appliances until voltage is acceptable. |
| One side of the coach has no power | Open hot leg or failed breaker | With power off, check accessible breaker positions and plug seating. Leave the rig disconnected if testing still indicates a missing supply leg. |
Load shedding can take only moments. Replacing a damaged cord, moving sites, or having an electrician repair a receptacle takes longer, but those are appropriate fixes when the connection itself is defective.
Separate an overload from a fault
Note which breaker trips: the pedestal breaker, RV main, appliance branch breaker, or a GFCI device. Each protects a different part of the system, and that information helps a technician narrow the problem.
- Trips only with combined loads: Reduce simultaneous demand before suspecting the adapter.
- Trips immediately with little load: Disconnect and arrange diagnosis for a possible short, ground fault, or equipment defect.
- Heat concentrated at a connector: Suspect poor contact, not just excessive total watts.
- Intermittent power when the cord moves: Stop using the connection. Don't wiggle it until power returns.
Don't reseat an energized plug. Turn off source power first, and never treat a hot connection as normal just because the breaker hasn't tripped.
For coach-side symptoms, use our Utah RV electrical-repair guide to organize what you report: source type, appliances operating, breaker involved, tester indications, and visible damage. For repeated GFCI trips, disconnect the suspect setup and arrange fault diagnosis rather than trying another unprotected outlet.
Pick Your Adapter and Confirm It Before You Plug In
Before a trip, confirm the adapter against the outlet and the power your RV can use. A matching plug only connects the equipment; it does not increase the supply's capacity.
- Identify the source: Read the receptacle markings and inspect its visible condition.
- Match both ends: Confirm the adapter's source plug and RV connector, not just its sales name.
- Budget the load: Decide which appliances can run together and which must wait.
- Check protection: Use suitable testing equipment and follow the power-off connection routine.
- Reject damaged equipment: Don't pack a scorched adapter as an emergency spare.
If you're unsure about an outlet, ask before buying. A photo of the receptacle face, markings, and breaker label can help identify its configuration, but it cannot confirm that the wiring is safe.
Buy for reliability, not just fit
Look for a recognized safety listing, weather-resistant housing, clean, undamaged blades, and clearly printed current and voltage ratings. Keep a sound spare adapter and a short RV-rated extension cord in the rig, protected from moisture and loose cargo.
Motor Sportsland sells RV parts, and its service department provides maintenance checks, repairs, installations, plumbing work, and electrical work. The service team can help with coach-side installations and electrical faults. A permanent residential RV receptacle should be evaluated by a licensed electrician; coach-side service does not assess your home's electrical supply.
Send parts or service questions through the contact form on motorsportsland.com, or visit Motor Sportsland's Millcreek or Spanish Fork location. Bring your RV model information and any tester messages so the team has useful details to work with.
Frequently Asked Questions About 50 Amp RV Adapters
Does a 50 amp RV adapter give my RV more power?
No. An adapter changes the plug connection, not the available power. The supply and your RV's electrical limits determine what you can run.
Can I plug my RV into a dryer or welding outlet?
Only if the receptacle provides the correct hot, neutral, and ground arrangement for your RV. Appearance alone cannot confirm compatibility. Have an electrician check an uncertain installation.
Will a surge protector make a bad outlet safe?
No. Surge protection cannot fix loose contacts, scorched components, or missing grounding. Some basic surge devices may not detect wiring faults.
What should I do if the adapter plug feels hot?
Turn off the source power before unplugging. Inspect the blades and contacts, replace a suspect adapter, and have the receptacle checked before reconnecting. Replace damaged cord ends, too.
When should I call an electrician?
Call for a loose, scorched, ungrounded, or failing receptacle, repeated source-side GFCI trips, or a permanent home RV outlet installation. If the fault follows the RV between verified supplies, arrange a coach electrical inspection.
Motor Sportsland sells RV parts, and its service department handles maintenance checks, repairs, and installations. Visit Motor Sportsland to send a parts or service question, or bring your adapter and cord to the Millcreek or Spanish Fork location to discuss your setup.
