
RV 50 Amp Service Explained for Utah Owners

You pull into a Utah campground on a hot afternoon, connect your RV, and start the air conditioners. Then the microwave comes on, the electric water heater begins heating, and the pedestal breaker trips. Half the family loses power while the other half of the coach keeps running. That confusing moment is usually easier to understand once you stop thinking of RV 50 amp service as one oversized power line.
A 50-amp connection uses two separate 120-volt legs, and your RV distributes appliances between them. The headline capacity can reach 12,000 watts, but that figure is a ceiling, not a promise that every appliance can run safely at once. Load balance, voltage at the campground, cord condition, adapters, and the neutral conductor all matter.
This guide explains the system in plain language, helps you compare 30 amp and 50 amp rigs, and shows where a simple owner check ends and qualified electrical work begins. Whether you're shopping for a bunkhouse trailer near Salt Lake City, a fifth wheel for Bear Lake, or a toy hauler headed toward the Wasatch Mountains, these details can help you choose and use your RV with more confidence.
What an RV 50 Amp Service Actually Does
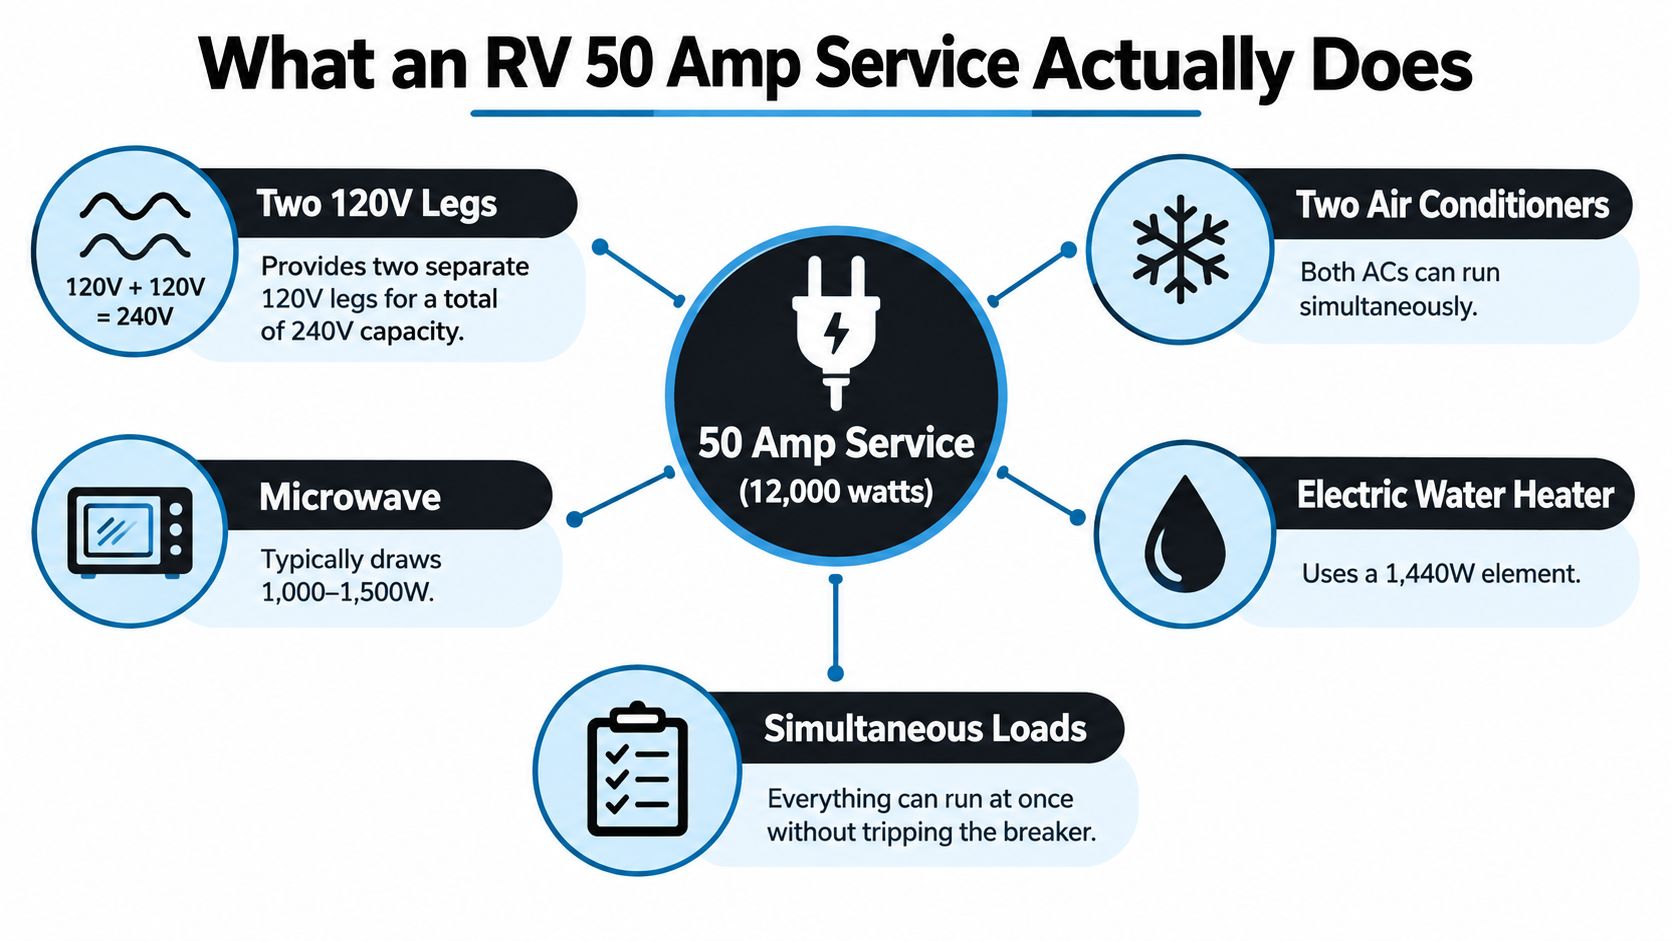
You arrive at a Utah campground, plug in your coach, and run an air conditioner, microwave, and water heater. The pedestal may still trip because RV 50 amp service is not one oversized power line. It is a four-wire connection that divides available power between two 120-volt hot legs, a neutral, and an equipment-grounding conductor.
Each hot leg can supply up to 6,000 watts, calculated from 50 amps multiplied by 120 volts. Together, the theoretical capacity is 12,000 watts, as shown in this RV 50 amp service power diagram. Treat that figure as a ceiling, not a guarantee that every appliance can operate together.
In practice, the coach receives two independent 120-volt feeds rather than one giant feed. Ordinary RV appliances draw 120 volts from one hot leg to neutral. Although the legs are 180 degrees out of phase, typical RV appliances do not use them as a 240-volt supply. The Heartland Owners electrical guide explains the basic arrangement.
Load placement makes the two feeds useful. One air conditioner may use one leg, while a second air conditioner, kitchen receptacles, or the water heater use the other. Balanced loads reduce the chance of overloading one side while capacity remains available on the other.
The pedestal and RV still set practical limits. Cord length, adapters, campground wiring, voltage drop, and simultaneous appliance use all matter. A 50-amp inlet does not promise that both air conditioners, a microwave, water heater, induction appliance, washer or dryer, and battery charger can run safely at once. Before troubleshooting, test the pedestal with a proper meter. Stop at the inlet if it shows heat, discoloration, loose connections, or partial power. Licensed electrical work is safer than a YouTube repair. For more background, read this guide to understanding your RV electrical system.
Why Two Hot Legs Change the Way Your RV Lives
Your RV's electrical panel divides branch circuits between the two hot legs. That arrangement gives a larger coach two power lanes, but the lanes still have individual limits.
For example, the bedroom air conditioner might be connected to leg one. The kitchen receptacles and living room air conditioner might sit on leg two. The microwave, water heater, converter, and other circuits are distributed according to the RV's design. You don't normally choose that arrangement from the campsite, but you should understand it when diagnosing a problem or evaluating a used RV.
How to recognize the two sides
Start with your owner's manual or the circuit labels inside the breaker panel. Turn on one appliance at a time and observe which breakers, displays, or EMS readings respond. A power-management system may shed a high-demand load when one leg becomes busy, while a transfer switch selects between shore power and generator power. An inverter may supply selected circuits from the batteries rather than from the campground connection.
The system can behave strangely when one leg loses contact. You might still have lights, outlets, or an air conditioner on one side while other appliances are completely dead. That partial-power symptom can come from the pedestal, shore cord, plug, inlet, EMS, transfer switch, or an internal connection. It isn't proof that the whole RV has lost power.
Practical rule: If only part of the RV works, don't keep resetting breakers at random. Identify which circuits remain live and have the connection tested before assuming an appliance failed.
A properly working neutral carries the imbalance between the two legs. It isn't an optional extra, and a loose or damaged neutral can create a dangerous voltage imbalance. Testing that condition requires appropriate equipment and electrical knowledge, so stop using the connection if readings are abnormal and get qualified help.
50 Amp versus 30 Amp in Plain English
A Utah campsite can make the difference obvious. On a hot afternoon at Jordanelle, a smaller trailer may need to choose between the air conditioner, microwave, and hair dryer. A larger rig on 50 amp service can usually run more of those loads together, provided the pedestal and RV wiring are working correctly.
A 30-amp RV connection has one 120-volt hot leg, a neutral, and a ground. Its theoretical capacity is 3,600 watts, calculated as 30 amps multiplied by 120 volts. A 50-amp connection has two 120-volt hot legs, plus neutral and ground, for a theoretical total of 12,000 watts across both legs. The Cummins RV electrical basics guide explains the basic arrangement.
| Feature | 30 Amp Service | 50 Amp Service |
|---|---|---|
| Plug configuration | Three-prong connection | Four-wire NEMA 14-50 connection |
| Power arrangement | One 120-volt hot leg | Two 120-volt hot legs |
| Theoretical capacity | 3,600 watts | 12,000 watts across both legs |
| Practical camping use | Stagger heavy loads | Run two roof air conditioners and more loads together |
| Typical fit | Smaller travel trailers and many Class C motorhomes | Larger fifth wheels, toy haulers, and motorhomes |
The practical difference is load management. Many smaller travel trailers and Class C motorhomes work well on 30 amps if owners stagger the microwave, water heater, hair dryer, and air conditioner. Larger fifth wheels, toy haulers, and motorhomes with two air conditioners are commonly wired for 50 amps, allowing demand to be distributed between two legs.
An adapter can make a 50-amp cord fit a 30-amp pedestal, but it cannot create extra power. The plug shape changes while the available service remains 30 amps. Treat that adapter like a smaller doorway, not an added lane.
Choose based on the floor plan and camping habits. A family using two air conditioners during a hot Jordanelle afternoon may appreciate 50 amps. A couple with a smaller trailer who camps in cooler mountain weather may find 30 amps adequate, as long as the pedestal tests correctly and heavy appliances are used one at a time.
Inside the Rig Components You Should Know
Your RV's shore-power path is easier to understand as a sequence. Power enters at the exterior inlet, travels through the shore cord and main protection, passes through switching or management equipment, and then reaches individual branch circuits.
Follow the power path
- Shore power inlet: This is the exterior connection point where the detachable cord plugs into the RV. Look for loose movement, cracked housing, scorching, corrosion, or heat discoloration.
- Main breaker panel: The panel contains the main breaker and branch breakers for circuits such as air conditioners, kitchen outlets, the water heater, and the converter or charger. A tripped breaker should be reset only after you've considered what caused it.
- Transfer switch: If the RV has a generator, the transfer switch selects the permitted source and helps prevent shore power and generator power from connecting incorrectly.
- Inverter: An inverter converts battery-supplied DC power into AC power for selected circuits. It doesn't create unlimited energy, and its role varies by RV design.
- EMS or power monitor: An electrical-management system can watch voltage and wiring conditions, then disconnect the RV when the incoming supply is unsafe.
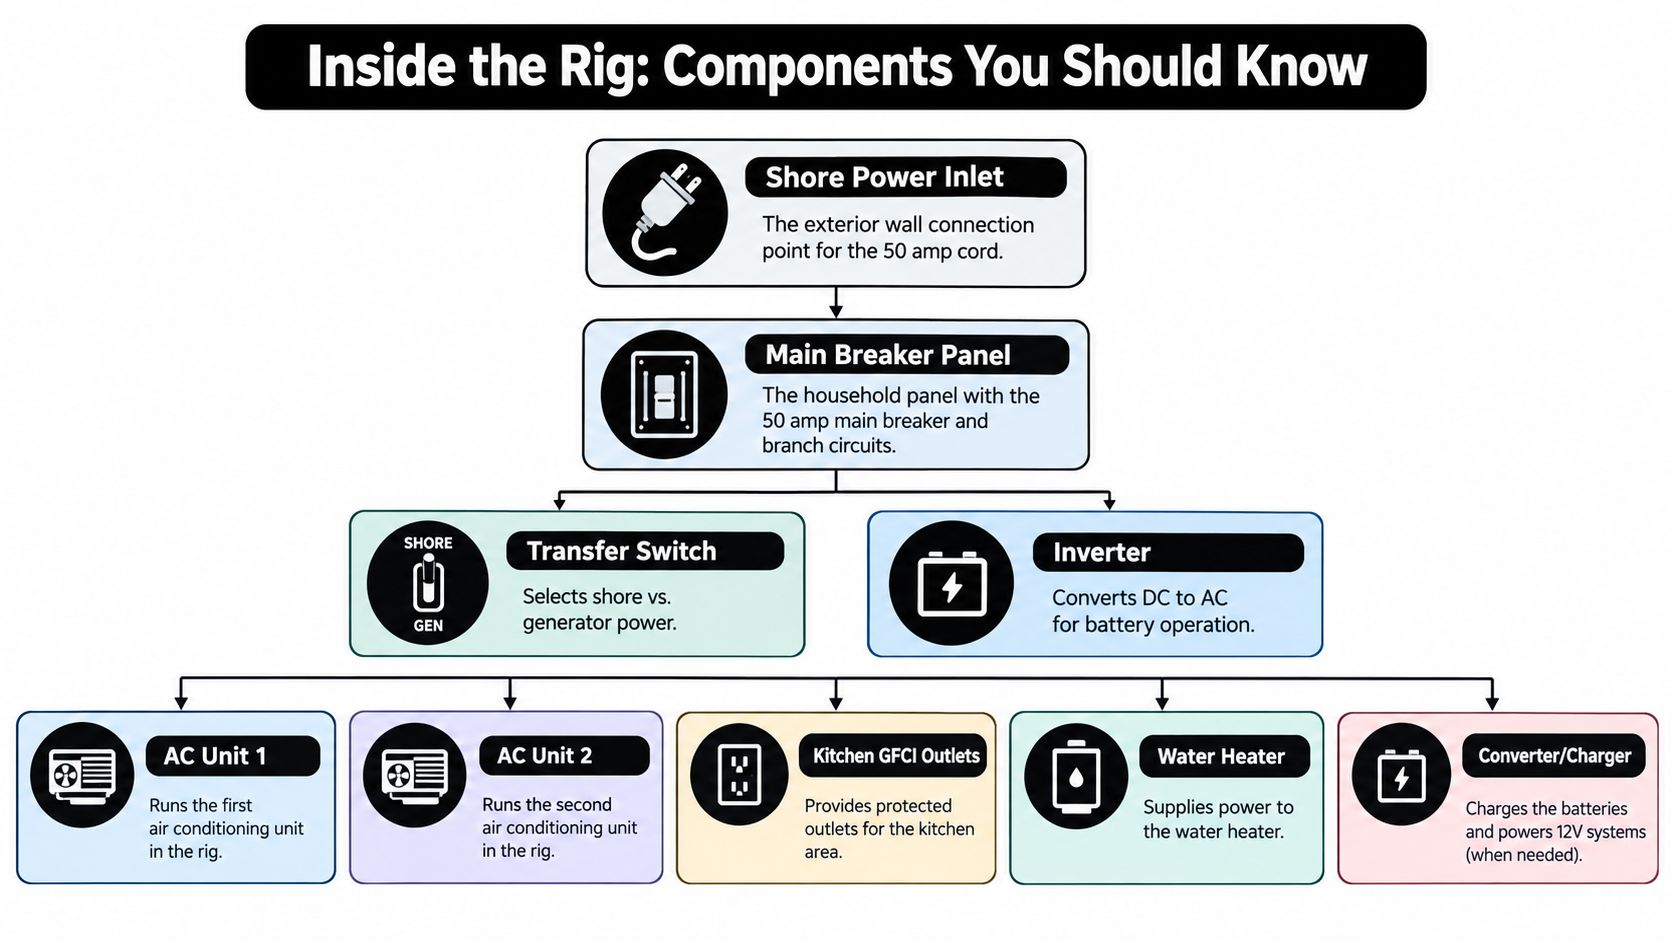
When you tour a new or used rig, ask which circuits share each leg, which breaker supplies the electric water heater, and where the inverter and transfer switch are located. If you're comparing an electric hot water heater for RV, check whether its demand will overlap with the circuits your family uses most.
A heat-damaged cord or inlet deserves replacement, not repeated resets. For inverter questions, our Utah RV inverter installation safety guide can help you understand why correct wiring and system isolation matter.
Install Options DIY versus Licensed Electrician
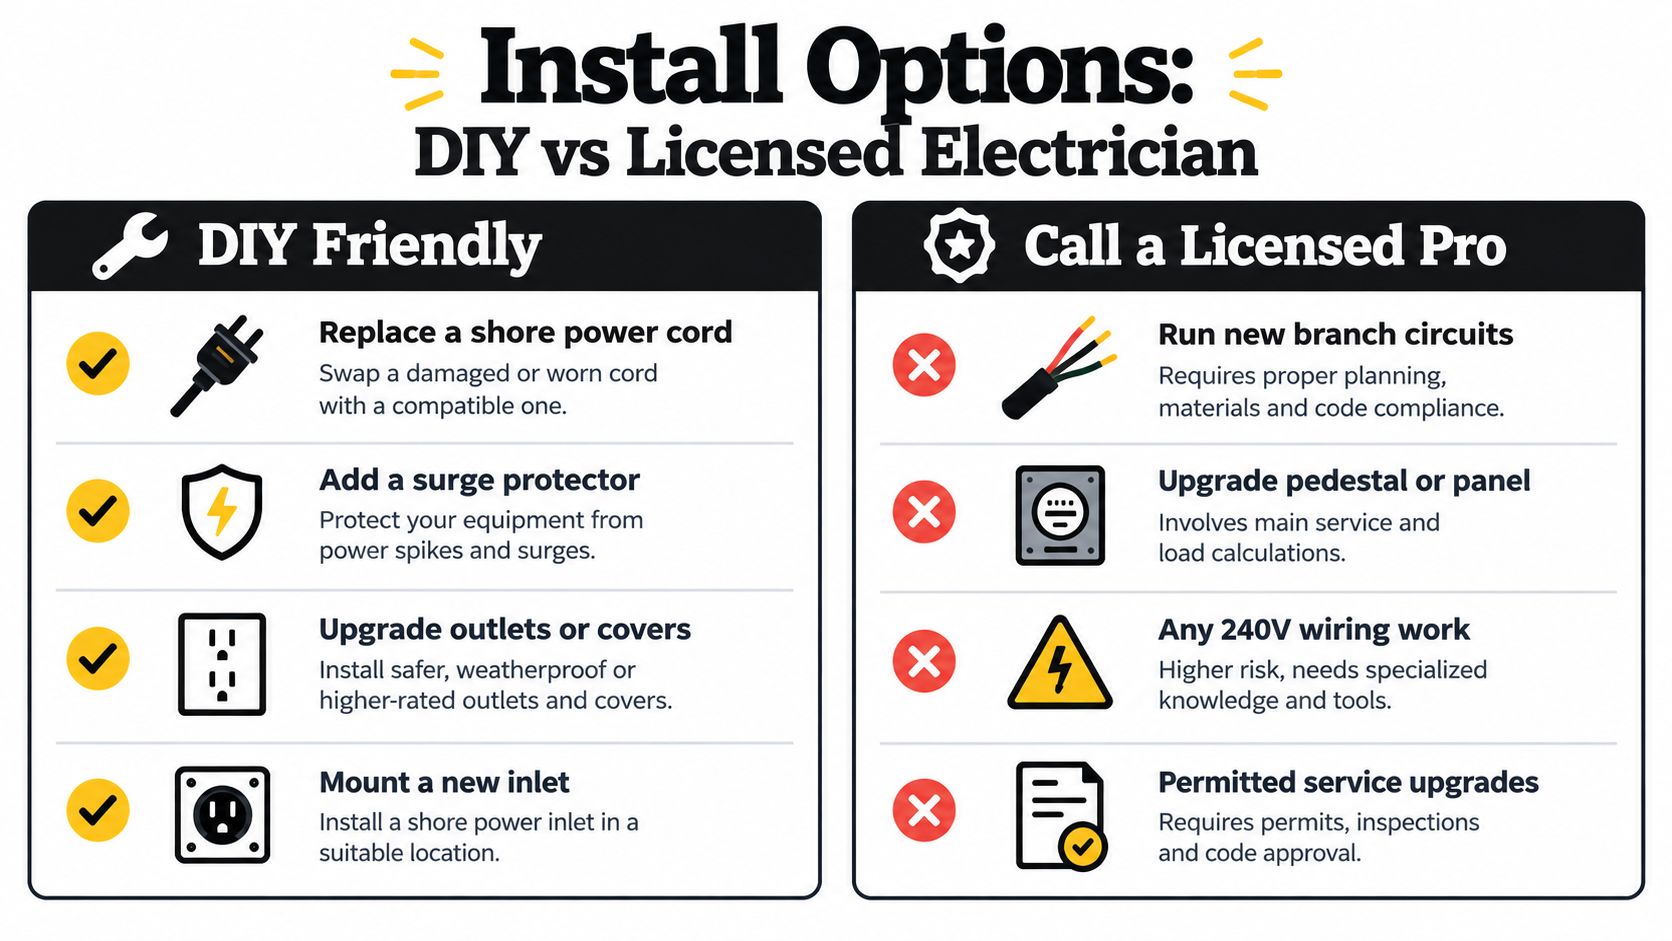
Some electrical jobs are reasonable for a careful owner. Others involve enough current, conductor sizing, bonding, and code requirements that they belong with a licensed electrician or qualified RV technician.
Work owners can usually handle
Replacing a damaged shore cord is often a straightforward service task when you use the correct replacement and follow the manufacturer's procedure. Adding a quality surge protector or EMS at the pedestal is also an owner-friendly upgrade when the device matches your service type and you inspect the connections each time.
Other manageable work may include replacing an exterior cover or upgrading an outlet, provided the circuit is de-energized and you understand the existing wiring. Mounting a new inlet can be simple on some RVs, but the connections behind the inlet still need to be secure and correctly matched to the RV's design.
- Replace a shore cord: Match the plug, rating, length, and connection style. Stop if the inlet or internal cable shows heat damage.
- Add a surge protector or EMS: Use a device made for the RV's service and follow its connection sequence.
- Upgrade an outlet or cover: Confirm the circuit and use a properly rated replacement.
- Mount a new inlet: Treat the wall work as only half the job. The wiring termination requires care.
Work that should stay with a professional
Running a new feeder, installing a sub-panel, upgrading a pedestal, or changing the RV's main electrical architecture isn't a plug-and-play project. A new installation may involve a 6/3 or 6/4 feeder cable, a dedicated breaker, a correctly rated receptacle, grounding and neutral separation, and local permit requirements. The conductor choice depends on the complete installation, not just the label on the receptacle.
A detached garage or shop deserves special attention. The route, burial method, disconnecting means, grounding electrode requirements, and four-wire feeder arrangement all depend on the site and applicable electrical code. A longer route, including one exceeding 25 feet, can also make voltage drop and installation method more important. (KOA RV electrical guidance)
Before any work begins, ask:
- Where will the panel or pedestal sit?
- How long is the feeder route?
- Will the garage or outbuilding need a true four-wire feeder?
- Does the local jurisdiction require a permit and inspection?
- Is the existing service large enough for the new load?
A straightforward 50-amp outlet installation usually lands well under a thousand dollars, while long runs, trenching, sub-panels, and pedestal construction can climb much higher. Those figures are practical planning guidance rather than a quote, because labor, access, materials, and jurisdiction vary.
Permits and inspections aren't pointless paperwork. They document that the circuit was installed with suitable breakers, conductors, receptacles, and bonding. That record can matter if a later insurance claim or warranty question involves electrical work.
Safety boundary: Never guess at neutral-to-ground bonding, feeder sizing, or panel connections. Turn those decisions over to a licensed electrician.
Our team has seen Utah owners focus on saving installation labor while overlooking the cost of correcting an unsafe circuit later. If you're near Millcreek or Spanish Fork, a qualified RV service center can inspect the rig-side equipment, while a licensed electrician handles household, garage, or pedestal wiring that falls under local jurisdiction.
Load Planning and the 80 Percent Rule
A hot Utah afternoon can expose a weak load plan quickly. Both air conditioners run, the electric water heater starts, and someone heats lunch in the microwave. The RV may have a 12,000-watt theoretical supply, but sustained use depends on how those demands are divided between its two hot legs.
For continuous operation, plan around 80 percent of each 50-amp leg. That means about 40 amps, or 4,800 watts per leg, and approximately 9,600 watts total across both legs. The two-leg arrangement works like two lanes on a road. Keeping traffic moving in both lanes reduces the chance that one leg reaches its limit while capacity remains available on the other.
Build a simple load plan
Read the data plates on the air conditioners, water heater, microwave, induction appliance, washer or dryer, and battery charger. Record running demand, then note startup demand for motor-driven equipment. List your two highest-draw appliances on each leg, because the total is only useful when the loads are actually balanced.
If both air conditioners are running, switch the electric water heater to propane when the RV supports that option. Otherwise, wait until the microwave finishes before adding another large load. A space heater on an already busy winter circuit can trip a breaker even when no single appliance seems unusually demanding.
A tripped breaker signals that a circuit or leg has reached its limit. Repeated resets can heat a weak connection and conceal a failing pedestal. Campground voltage may also sag when many sites draw heavily, especially during hot weather.
Use an EMS to monitor incoming conditions, but make the load plan yourself. It can warn or disconnect during unsafe voltage, while it cannot correct an overloaded leg. If appliance labels, leg assignments, or the RV inlet leave you uncertain, have a qualified technician test the system rather than guessing.
Troubleshooting Partial Power and Pedestal Problems
Half the RV goes dark, but the refrigerator and a few lights keep working. Start calmly. Partial power often means one hot leg has lost contact or tripped, not that every appliance failed.

Use a safe decision path
- Check the pedestal breaker: Turn off the RV's major loads, then inspect the campground breaker position. Don't force a breaker that feels damaged or won't hold.
- Check the RV panel: Look for a tripped main or branch breaker. Reset it once only after reducing the load.
- Check GFCI outlets: A tripped GFCI can remove power from downstream receptacles without affecting the entire coach.
- Read the EMS display: Compare the two leg readings if your system provides them. A missing leg or abnormal voltage calls for disconnection.
- Inspect the cord and plug: Scorch marks, melted plastic, loose blades, corrosion, or a hot connector are stop-using-now conditions.
A qualified person can test line-to-neutral on each leg, line-to-line, and neutral-to-ground. Those readings help separate a problem in the pedestal from one in the cord, inlet, EMS, panel, or RV branch circuit. If a neutral is loose, damaged, or improperly wired, voltage can redistribute between the legs and expose 120-volt equipment to severe overvoltage. A normal-looking receptacle doesn't rule that out. (RV campground hookup guidance)
A dog-bone adapter from a 50-amp RV to a 30-amp pedestal reduces available capacity. It doesn't upgrade the pedestal, and the entire RV must be managed as a 30-amp connection. Owners who need a different household connection can review the considerations in our guide to a 50 amp to 15 amp adapter, but an adapter isn't a substitute for a properly rated circuit.
Watch the following demonstration only as a general educational aid, not as permission to open an energized pedestal or RV panel.
Call the campground or a qualified service professional when readings are abnormal. Panel, pedestal, receptacle, and feeder repairs require appropriate training and, in many cases, licensed electrical work.
Caring for Your RV Electrical System Year Round
Utah gives RV electrical systems a wide range of working conditions. Wasatch winters bring storage concerns, while high-altitude summer trips can mean long air-conditioner cycles and heavy campground demand. A small inspection routine helps you catch heat, corrosion, and loose connections before they become a trip-ending fault.
Use a seasonal maintenance rhythm
- Inspect the inlet and plug monthly: Look for discoloration, pitting, cracked plastic, bent blades, and a connection that feels loose.
- Exercise breakers annually: With the RV safely disconnected, follow the owner's manual and confirm that breakers reset normally. Replace a breaker that feels abnormal instead of forcing it.
- Use an EMS or quality surge protector: Choose equipment that matches the RV's service and protects against the incoming conditions your system can detect.
- Store the cord without tight kinks: Coil it gently, keep it dry, and protect the plug from ground moisture and impact.
- Prepare for winter storage: Follow the RV manufacturer's battery-disconnect guidance and protect the converter, charger, and electronics from unnecessary standby demand.
- Inspect before and after trips: Check the pedestal before connecting, then look at the cord and inlet again when you return home.
A 50-amp rig is useful when your floor plan includes two air conditioners, a large family, a toy-hauler garage, or several residential-style appliances. It still needs load planning because the service rating describes capacity, not the health of the campground supply or the condition of every connection.
DIY maintenance can cover visual inspections, careful cord replacement, and installation of an appropriate EMS. New feeders, garage circuits, pedestal upgrades, neutral and ground work, and RV panel modifications should go to qualified professionals. For a seasonal inspection, converter upgrade, EMS installation, or electrical diagnosis, the Motor Sportsland Service Center handles RV maintenance, repairs, installations, and electrical work at its Utah locations.
Motor Sportsland helps Utah RV owners inspect shore-power systems, diagnose electrical faults, install suitable upgrades, and prepare trailers, fifth wheels, toy haulers, and motorhomes for the season. Visit Motor Sportsland to browse current inventory, arrange service, or plan a visit to the Salt Lake City area showroom with your RV electrical questions.
Frequently asked questions
What does RV 50 amp service mean?
It means the RV uses a four-wire NEMA 14-50 connection with two 120-volt hot legs, one neutral, and one ground. The theoretical combined capacity is 12,000 watts, but the practical safe load depends on leg balance, voltage, wiring, and appliance demand. (Heartland Owners electrical guide)
Is RV 50 amp service 240 volts?
The connection has two hot legs that provide combined capacity, but ordinary RV appliances generally operate at 120 volts from one leg to neutral. A typical RV isn't using the connection as a household 240-volt appliance circuit.
Can I plug a 50-amp RV into a 30-amp pedestal?
Yes, with a properly rated dog-bone adapter. The adapter changes the connection format, but your RV receives only the smaller service and you must manage appliances accordingly.
Why does half my RV still have power?
One hot leg may have tripped, lost contact, or failed somewhere between the pedestal and the RV branch circuits. Check breakers and EMS information, then have the connection tested if the problem remains.
What does a loose neutral do?
A loose, damaged, or incorrectly wired neutral can allow voltage to redistribute between the two hot legs. That can expose 120-volt appliances to severe overvoltage, so disconnect the RV and seek qualified help.
Can I install a 50-amp outlet myself?
Some owners can replace a cord, add an EMS, or perform limited outlet work. A new feeder, garage sub-panel, pedestal, bonding arrangement, or service upgrade should be designed and installed by a licensed electrician, with permits and inspection when required.
