
RV Fiberglass Repair: Step-by-Step Guide for Utah Owners

You're crouched in the driveway with a bucket of soapy water, working along the lower sidewall of your trailer after a weekend at Jordanelle, and your hand catches on something that isn't smooth. A star-shaped crack the size of a quarter sits under the bedroom window, white powder packed into its center. You press it with a thumb. It doesn't give.
That's good news, and it settles nothing. The same crack can mean a five dollar tube of gelcoat or a three-layer laminate rebuild, and the only thing separating those outcomes is depth and what's happening behind the skin.
Fiberglass is the dominant material in this market for a reason. The global recreational-vehicle composite-panels market was valued at $3.8 billion in 2025, and fiberglass represented 41.3% of it that year, according to Dataintelo's RV composite-panels report. All those panels take hits from hail, branches, campground posts and road debris. Every one of those hits raises the same question: fill it, or rebuild it?
The order that answers that question is always the same. Classify the damage by depth and fiber exposure, confirm the wall is dry, then choose the repair. Skip the middle step and a beautiful patch can sit on top of a wall that's already failing, because trapped moisture keeps working under new resin until the bond lets go. Motor Sportsland has sold and serviced RVs in Utah for more than 55 years from Millcreek and Spanish Fork, so its Service Center sees this kind of damage regularly.
Assess Fiberglass Damage by Depth Before You Fill Anything
Start with the damage itself, not the repair product. Match what you see to a row below, then read the caveat that follows the table, because one row in this list is where most DIY jobs go wrong.
| Damage | Depth or signs | Repair approach | DIY or pro |
|---|---|---|---|
| Gelcoat scratch or hairline crack | Surface only, fibers not exposed | Clean, sand lightly, touch up gelcoat or paint | DIY |
| Surface void or chip | Under 2 mm deep, fiber layer intact | Fiberglass-resin putty, sand, refinish | DIY |
| Crack reaching reinforcing fibers | Deeper than 2 mm, or dry white fibers visible | Remove damaged laminate and rebuild in layers | Pro for structural areas |
| Limited delamination | Soft or hollow spot under 4 sq ft, dry backing | Adhesive injection with clamping | Pro recommended |
| Large or wet delamination | Over 4 sq ft, or wet or rotten backing | Remove and replace skin and substrate | Pro |
| Crack near window, slide-out or roof seam | Any depth, with movement or water intrusion | Inspect before any repair | Pro |
Two of those rows look identical from three feet away. A hairline crack in gelcoat and a crack that has opened the laminate underneath present the same thin dark line, and the difference only shows when you pick at it with a dental tool or a knife point.
Why depth decides the repair
A 2020 peer-reviewed study of fiberglass-reinforced polymer surface repairs tested putty-repaired specimens under tensile procedures per ASTM D3039/3039M-17 and flexural testing per ASTM D790 Procedure A. Flexural-strength requirements were satisfied across every tested repair case. Tensile performance became unacceptable in some specimens once surface damage exceeded 2 millimeters in depth, which led the authors to conclude that putty-based repair suits shallow defects where the laminate's roving layer stays intact, as reported in the Journal of the Korean Society for Quality Management.
That is a useful engineering reference, not an RV-specific law. The specimens were not trailer sidewalls, and panel thickness, resin type and backing all shift the number. What transfers is the principle: shallow damage is a surface problem, deeper damage reduces tensile integrity and stops being a filler job.
Bench test you can run in the driveway: drag a pick across the crack. If it glides over a hard surface, you're in gelcoat. If it drops into a groove and comes out with white fibers on the tip, you're into the roving and the repair just changed category.
On a travel trailer or motorhome, deeper gouges, collision damage, delamination and crushed corners call for removing the damaged laminate and rebuilding in layers rather than surface filler. That's true at the corner castings, around the wheel wells, and anywhere the panel has been pushed in and sprung back.
Cracks that sit near a window frame, slide-out opening or roof transition deserve separate treatment regardless of depth, because movement and water intrusion are the main problem there, not the crack width. Roof and seam damage in particular tends to travel, so it's worth reading up on how to repair a travel trailer roof before you assume the crack is the whole story.
One more step before you commit to a row. A surface that feels dry and looks dry can still hide a failing wall, and the moisture check below is what separates a repair that lasts three seasons from one that blisters in eight months.
Check for Moisture and Delamination Before Sealing
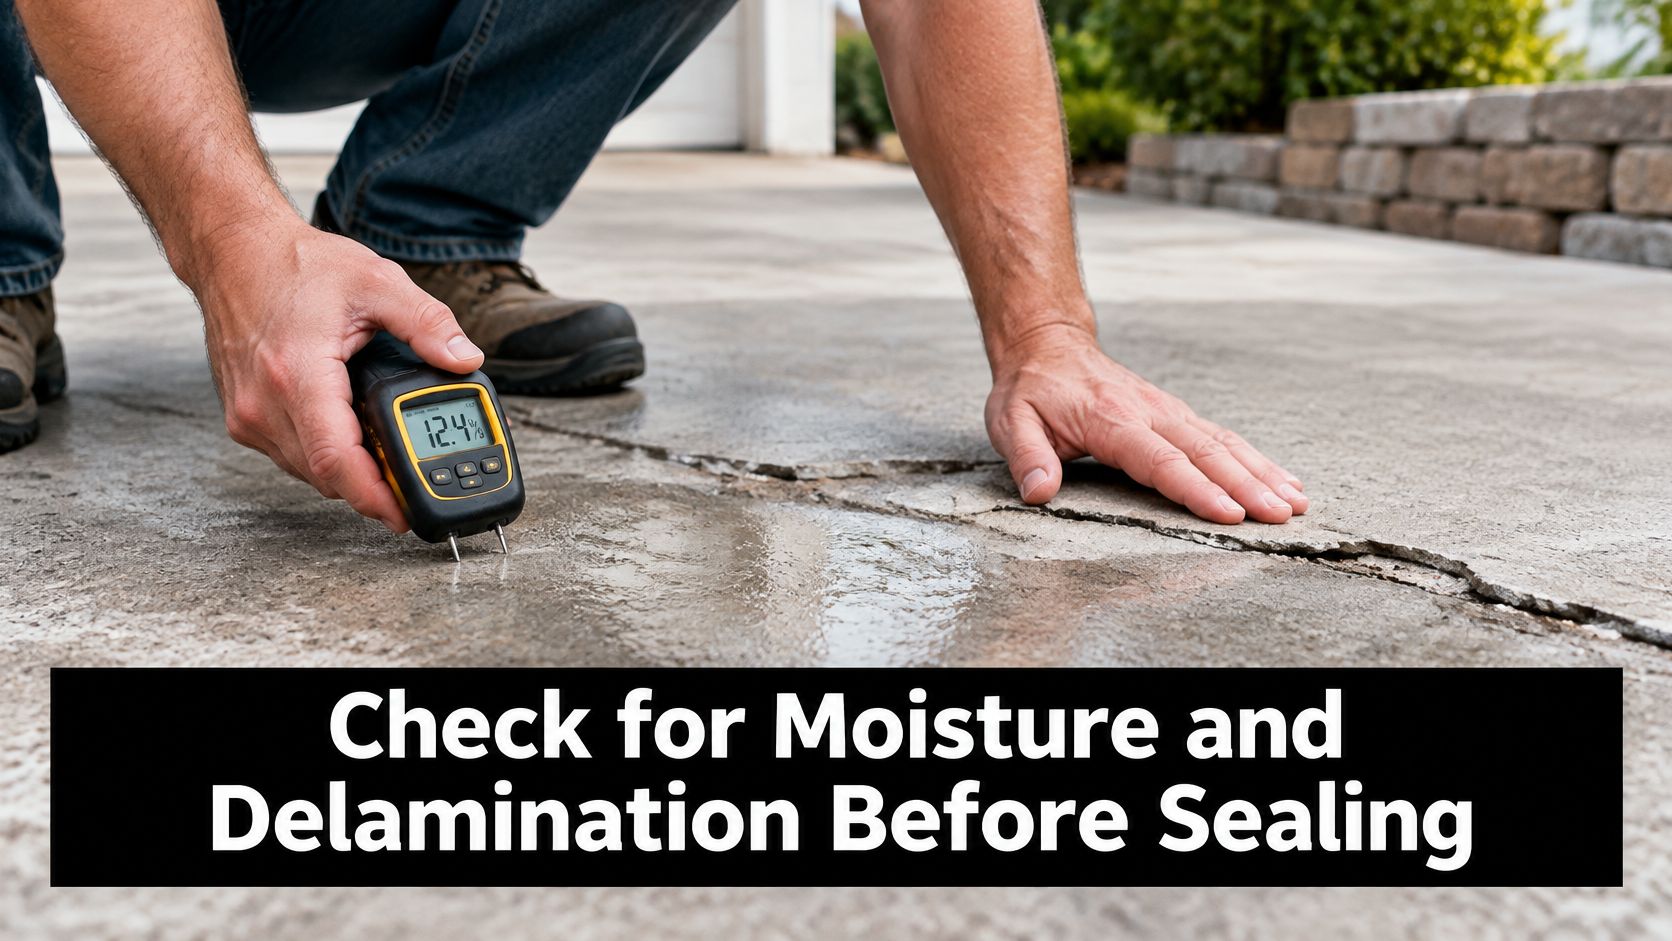
A patch that looks flawless proves nothing about the wall under it. Fiberglass composites lose mechanical performance after moisture exposure, and one study reported strength reductions of 40% in unidirectional laminates and 54% in cross-ply laminates after hygrothermal aging, according to research indexed by the U.S. Department of Energy's OSTI. Stiffness often declines more slowly than strength, which is why a sidewall can feel solid under your palm while its reserve capacity is already gone.
Four checks to run before any filler goes on
- Tap the skin with a knuckle along the panel on a six-inch grid and listen. A crisp ring means bonded laminate. A dull thud means the skin has separated from the backing.
- Press the edges of the suspect area with your thumb, especially below window frames and around hatch rings where water collects. Give under your thumb means delamination, even when the surface looks perfect.
- Read the sealant, not the fiberglass. Cracked caulk at a window frame, a lifted roof edge or a failed marker-light gasket marks where water has been entering for years.
- Compare moisture readings across the panel with a pin or capacitance meter. Comparative readings beat a single number every time, because the same meter reads differently on a sun-warmed panel, a shaded panel and a damp one. A high reading that clusters near a seam and drops off toward mid-panel points you straight at the entry point.
Mark soft spots with painter's tape as you find them. When the meter reading and the tap test disagree, open a small inspection area with a hole saw or a cutoff wheel before you close anything up. Cutting a 2-inch window into the wall costs an hour. Guessing wrong costs a panel.
When injection adhesive is the right call
Adhesive injection has real limits. A published repair specification describes it as suitable when the affected zone is under 4 square feet and the edges can be reached for injection ports without removing major trim or slide-out components, as outlined in this delamination repair specification. The backing behind the void also has to be sound, because adhesive has nothing to grab in crumbled foam and will not hold against wet or rotten substrate.
The procedure is straightforward but unforgiving. Small access ports go in, low-viscosity structural adhesive gets injected into the void, and a vacuum press, clamps or braced platens force the skin back against the substrate immediately while the adhesive cures. Insufficient clamping lets the repair separate again, and at that point the fix is removing the skin and rebuilding that section of wall.
The injection and clamping sequence is easier to follow on video than in text.
Utah makes this check worth repeating every spring. Snow sits against the south wall all winter, freeze-thaw cycles work the sealant open, and then summer sun bakes the panel while mountain roads vibrate everything loose on the way to Bear Lake. Walk the seams in April with a meter and a tube of sealant, and you'll catch most intrusion while the damage is still cosmetic; our RV exterior sealant routine that prevents water damage covers where to look. Once the wall reads dry and the repair is done, the cosmetic stage matters too, and the Titan Coatings gel coat guide explains how that outer layer protects the laminate underneath.
Safety Gear and Workspace Setup for Resin Work
Polyester resin releases styrene vapor while it cures, and the dust that comes off cured laminate under a sander is glass. Set up outdoors in shade, or in a garage with the door open and a fan moving air across the work area and out. A closed trailer is off limits for layup, even in winter, even with the windows cracked.
Gear checklist
- Respirator with organic-vapor cartridges for mixing and layup. A dust filter stops particles and lets styrene straight through.
- P100 or N95 dust mask for sanding cured laminate, swapped in once the resin work is finished.
- Nitrile gloves rather than latex, with a fresh pair ready when the first set turns tacky.
- Safety glasses for grinding and sanding overhead, plus long sleeves to keep resin and glass fibers off your forearms.
- Fire extinguisher within reach while resin is curing, since the cure reaction generates its own heat.
Catalyst belongs in cool storage away from the mixing area, because a warm bottle shortens your working time before you even open it. For a second pass on the full setup, the PPE guidance for UAE contractors is a solid benchmark: crews who work through extreme heat treat respirator fit, ventilation and skin coverage with the same discipline a resin job demands.
Set the shop temperature before you open the can
Aim for a workspace near 75°F (24°C). Cold stretches cure time and lets resin drain out of the laminate before it gels. Heat does the opposite, cutting working time until you are left holding a cup of jelly. Keep a thermometer on the bench and mix smaller batches when the day runs warm. Humidity slows the cure too, and wind carries grit that lands in wet resin and stays there, so pick a dry, still day for the work.
Stage everything before the hardener goes in: degreaser, 80-grit abrasive, 180 to 220-grit sanding pads, fiberglass cloth and mat, a roller or squeegee, disposable brushes, mixing cups, masking tape and a moisture meter. Once the resin is catalyzed the clock is running, and hunting for a roller mid-layup is how patches end up thin on one side.
Rule for rags: spread them flat outdoors until the smell of solvent is gone. A bunched pile in a bucket builds its own heat as the resin cures.
How to Patch a Structural Crack Without Leaving a Weak Spot
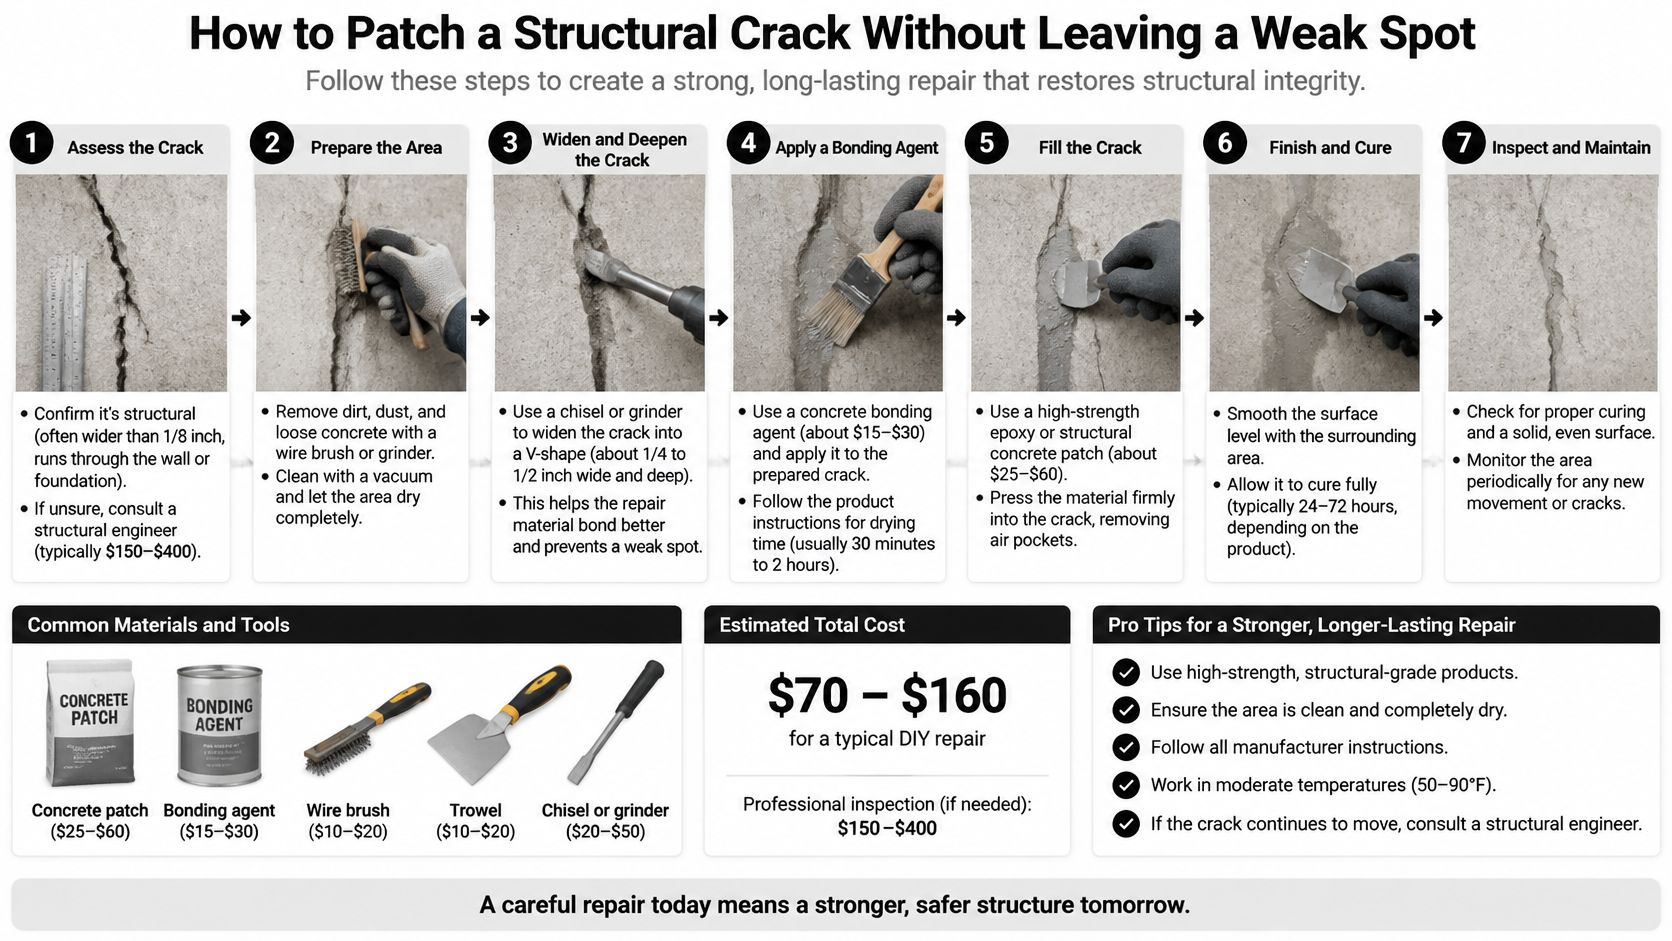
A patch that holds for years and one that cracks along the same line by next season differ in preparation and chemistry. Run this sequence only after the damage has checked out as a true structural crack on a dry, solid panel. If the moisture meter or the tap test flagged trapped water or delamination, cloth and resin will only seal the problem in.
Step by step
- Degrease the whole area. Strip wax, grease and road film with a proper degreaser and let it flash off. Contamination between old laminate and new resin is the most common reason a patch lifts at the edges.
- Grind out the damage. Remove all loose or shattered laminate with roughly 80-grit abrasive until you reach material that rings when tapped. Extend the preparation 2 to 3 inches beyond the visible crack, because fractured fibers run further than the line you can see.
- Bevel the perimeter. Taper the edges so the new laminate transitions gradually into the old instead of ending in a step. 3M's fiberglass crack-repair procedure recommends roughly a 12:1 taper for a scarfed edge, so a 1/8-inch laminate needs about 1.5 inches of taper. That geometry spreads load across a wide bond area and removes the abrupt stiffness change that reproduces a crack.
- Clean the cavity. Wipe out dust with acetone on a clean rag and let it dry completely. Grinding dust acts like a release agent.
- Cut progressive patches. Lay out fiberglass cloth or mat in a stack of increasing size, with the smallest piece deepest in the cavity and the largest at the outer surface. A patch cut to the exact shape of the hole has nothing to bond to.
- Wet out each layer. Apply resin, set the cloth, and roll or squeegee out bubbles and wrinkles between layers. A workable target is about a 50:50 fiber-to-resin ratio by weight, with periodic compaction or debulking between layers so the laminate stays dense.
- Use only enough resin to wet the reinforcement. Resin-rich patches add weight without proportionate strength, and excess resin increases shrinkage, brittleness and the sanding you'll do later.
- Let it cure fully. Keep the repair unloaded until the laminate has reacted all the way through. Surface-set is a handling milestone; the fully reacted state is what carries stress.
Chemistry and temperature
3M's product data cites an approximately 8 to 12 minute working time at 75°F (24°C) for a polyester fiberglass-resin system and an approximate two-hour cure at that temperature, with cooler conditions extending both. Mix small batches. A big cup of resin in a warm garage gels in your hand and gets thrown away.
That same data sheet gives a mixing example of 1 ounce of resin with 10 drops of hardener, stirred thoroughly for 30 to 45 seconds. Treat it as one product's specification. The ratio printed on your label governs your batch, whatever a forum or a generic guide says.
Cure time moves with formulation, ambient temperature, laminate thickness and catalyst level, so the technical data sheet decides when the repair can go back into service. Log your batch size, shop temperature and cure time alongside your repair photos. The next technician will want them.
Practical rule: if the label and a forum post disagree, the label wins.
Where patches fail
The failure modes are consistent: damaged fibers left in place, sharp patch edges, trapped air, contamination and too much resin. Each one produces a patch that looks fine and behaves badly, usually after the first hard freeze.
Durability also depends on what the panel faces afterward. Laboratory work on repaired GFRP laminates found hydrothermal aging can reduce indentation performance even after repair, with some modified fiber patches holding up better than others, according to research on repaired GFRP laminates. On an RV, the test is repeated wet-dry cycles and constant highway vibration.
Finishing without hiding a problem
Sand the cured laminate, close pinholes with a compatible reinforced filler and restore the contour. Finish with a finer filler and 180 to 220-grit sanding before gelcoat or paint.
Before any cosmetic coat goes on, inspect for dry white fibers, voids, raised edges and remaining cracks. Those mark incomplete wet-out or poor consolidation, and paint only preserves the defect. Never seal a damp or flexing area. Unresolved water intrusion, delamination or substrate movement will defeat a cosmetically clean repair, and the second attempt costs more than the first.
What Professional Fiberglass Repair Costs
A published RV delamination-repair price table lists national-average ranges, and it's the clearest picture available of how the tiers stack up. Utah pricing can land above or below these numbers depending on shop load and access, so treat them as a starting point and ask for a written estimate.
| Repair type | Typical cost range | Applies to |
|---|---|---|
| Polyurethane-foam injection | $400-$800 | Limited delamination with intact backing |
| Partial panel replacement | $800-$2,200 | Damage confined to one section of a panel |
| Full sidewall panel replacement | $2,500-$6,000 | Widespread delamination or structural failure |
These figures come from a published RV delamination repair price table stated as current national-average ranges.
What moves a quote within a tier
Labor is the variable, and it's driven by access, hidden damage, drying and cleaning the substrate, rebuilding multiple fiber layers, matching the contour, and refinishing. A quarter-sized crack that turns out to sit over wet insulation moves from the injection tier to the panel tier fast.
Composite work escalates quickly when access and underlying damage are significant. A U.S. Department of Defense investigation into fiberglass-reinforced-plastic piping found a typical repair needed a crew of two or three plus support equipment, commonly took 8 to 10 hours, and carried reported costs of $2,000 to $3,000, per the DTIC report on FRP pipe repair. Buried industrial pipe is a different job from an accessible trailer sidewall, but the cost drivers are identical: locating hidden damage, removing loose laminate, drying the substrate, rebuilding layers, then sanding and refinishing.
Our Service Center handles maintenance checks, repairs, installations, plumbing and electrical work, which matters when a leak at a fixture and a soft spot in the wall turn out to be the same problem.
Ask for depth measurements, moisture readings, a materials list and before-and-after photos in the written scope. A shop that documents those has done the diagnosis, not just the estimate.
Book a Service Visit When Your Repair Needs One
A patch that reopens, a soft spot near a seam, or readings that stay high across the panel all point past a surface repair. If the damage is deeper than the gel coat, sits near a window, slide-out or roof seam, or has returned after filling and paint, book the visit before another layer hides the cause. Also book when you cannot ventilate and sand safely where the RV is stored.
Bring four things and the estimate gets sharper: photos from several angles, one close-up with a tape measure in frame, a depth measurement, and moisture readings from several points on the panel. Add a short note about leak history and whether the wall sounds hollow or dull when tapped. That lets the technician compare depth, moisture and backing condition before deciding between a surface repair and deeper work.
Motor Sportsland offers RV collision and repair services. To book, describe the RV, choose repair, installation or maintenance, pick a time, and the service team confirms the appointment. Questions about sales, service, parts or financing can go through the contact form.
Utah spring hail, winter freeze-thaw and mountain roads can produce new cracks. Schedule a seam and sealant check before the first trip of the season rather than after the first leak.
Frequently Asked Questions About RV Fiberglass Repair
Can I patch a crack under 2 mm myself?
Usually yes, provided the substrate is dry, the spot sits away from windows, slide-outs and roof seams, and you can ventilate and sand properly where the RV is parked.
How do I know if the wall is delaminated?
Tap the skin for hollow sounds, press the edges of the suspect area for give, and compare moisture readings across the panel instead of trusting one number.
Can injection adhesive fix a soft spot?
Only when the affected area is under 4 square feet, interior moisture is below 22%, and the backing is intact. Crumbled foam cannot accept adhesive.
How long before a repaired area can go back into service?
Follow the resin's technical data sheet. Cure time depends on formulation, ambient temperature, laminate thickness and catalyst level.
What does professional repair cost?
National-average ranges run about $400 to $800 for foam injection, $800 to $2,200 for partial panel replacement and $2,500 to $6,000 for full sidewall replacement. Get a written estimate that includes depth measurements and moisture readings.
Should I call a pro if a DIY patch has cracked again?
Yes. A returning crack usually signals water intrusion or substrate movement that a surface fix cannot solve.
Motor Sportsland's Service Center in Millcreek and Spanish Fork provides repairs, collision repair, maintenance checks and plumbing and electrical work. Bring your photos, depth measurement and moisture readings, and you get a straight answer about whether your crack is a Saturday project or a panel job. Visit Motor Sportsland to see what we work on, then book a service appointment before your next trip into the Wasatch.
