
RV Plumbing Issues in Utah: Diagnose, Fix and Prevent Them

You're packing for Jordanelle or Bear Lake, you turn on the pump, and it keeps cycling with every tap closed. Or you open a cabinet and find the bottom damp, with no obvious drip above it. That's how most RV plumbing issues announce themselves in Utah, not with a burst pipe but with a small symptom you can talk yourself out of for one more trip.
Don't. A slow leak behind a shower valve or under a sink can reach flooring, insulation and wiring before it shows on the surface, and one cold night on the Wasatch Front can split a fitting you won't find until spring pressurization. Our team at Motor Sportsland works on this pattern all season, and the order matters more than the parts. Test for pressure loss first, isolate the fixture, then decide if it's a driveway fix or a shop job. Winterization and dumping aren't separate chores either. They're part of the same system, and keeping the living space warm does not protect exposed plumbing underneath it.
Diagnose Common RV Plumbing Problems at a Glance
A damp cabinet floor is rarely just a damp cabinet. Modern rigs pack a toilet, shower, water heater, pump, filters and three tanks into a footprint barely bigger than a closet, with supply lines running behind panels and under floors. One failed fitting behind a shower valve can soak cabinetry, flooring and the wiring bundle beside it before anything shows on the surface.
Start with the symptom you can see, hear or smell, then make the first check in the table before you buy parts. Work the order the way a service bay does: pressurized fresh water first, drains second, holding tanks third. Pressurized leaks do damage while you sleep. Drain and tank faults are unpleasant, but they usually wait until morning.
A warm cabin proves nothing about the plumbing. Low-point drains, the exterior shower line, tank valves and the water heater bypass sit outside the heated envelope, so a rig that feels toasty inside can still split a fitting on a single-digit night on the Wasatch Front. Diagnosing and winterizing are the same job done twice.
| Symptom | Likely cause | First check | DIY or service |
|---|---|---|---|
| Pump cycles with all taps closed | Leaking fitting or pump check valve | Pressure test with fixtures closed | Diagnose yourself, repair by service if the pump is faulty |
| Damp spot under a sink | Loose supply line or cracked trap | Dry paper towel test, tighten fittings | DIY |
| Slow toilet flush, gurgling | Blocked black-tank outlet or vent | Check vent cap and black-tank valve | DIY for vent, service for tank |
| No hot water | Bypass valve in wrong position or empty tank | Check bypass setting and tank level | DIY |
| Hot water smells or runs weak | Sediment buildup or worn anode rod | Drain tank and inspect sediment | DIY flush, service for tank replacement |
| Sewer smell in bathroom | Dry P-trap or blocked vent | Run water into drain, check vent path | DIY |
| Water from outside shower | Cracked fitting or freeze damage | Shut off supply and inspect low points | DIY if accessible, service if hidden |
| Cloudy or sour fresh water | Old water or dirty fresh tank | Drain, flush and sanitize the tank | DIY |
What the table can't tell you
Two symptoms often share one cause. A pump that cycles and a faint sewer smell can both trace back to a toilet valve passing water slowly. A weak shower and cloudy water can both point to a clogged inlet filter, not a failing pump. If your first check comes back clean, don't replace the most expensive part next. Move to a proper pressure test and let the gauge sort it out. The parts you can reach are usually the culprit, and the ones you can't are worth cutting into only once you have a number that says you must.
How to Test for Leaks Before You Open the Walls
Opening a wall to hunt for a leak is the last step, not the first. Most leaks live at fittings you can reach, and a regulated pressure test tells you whether you have a leak at all before you cut anything.
The sequence below follows the workflow in the Let's RV post-winter systems check, which pressurizes the potable-water circuit to approximately 40 to 50 psi with a regulated supply and an inline gauge.
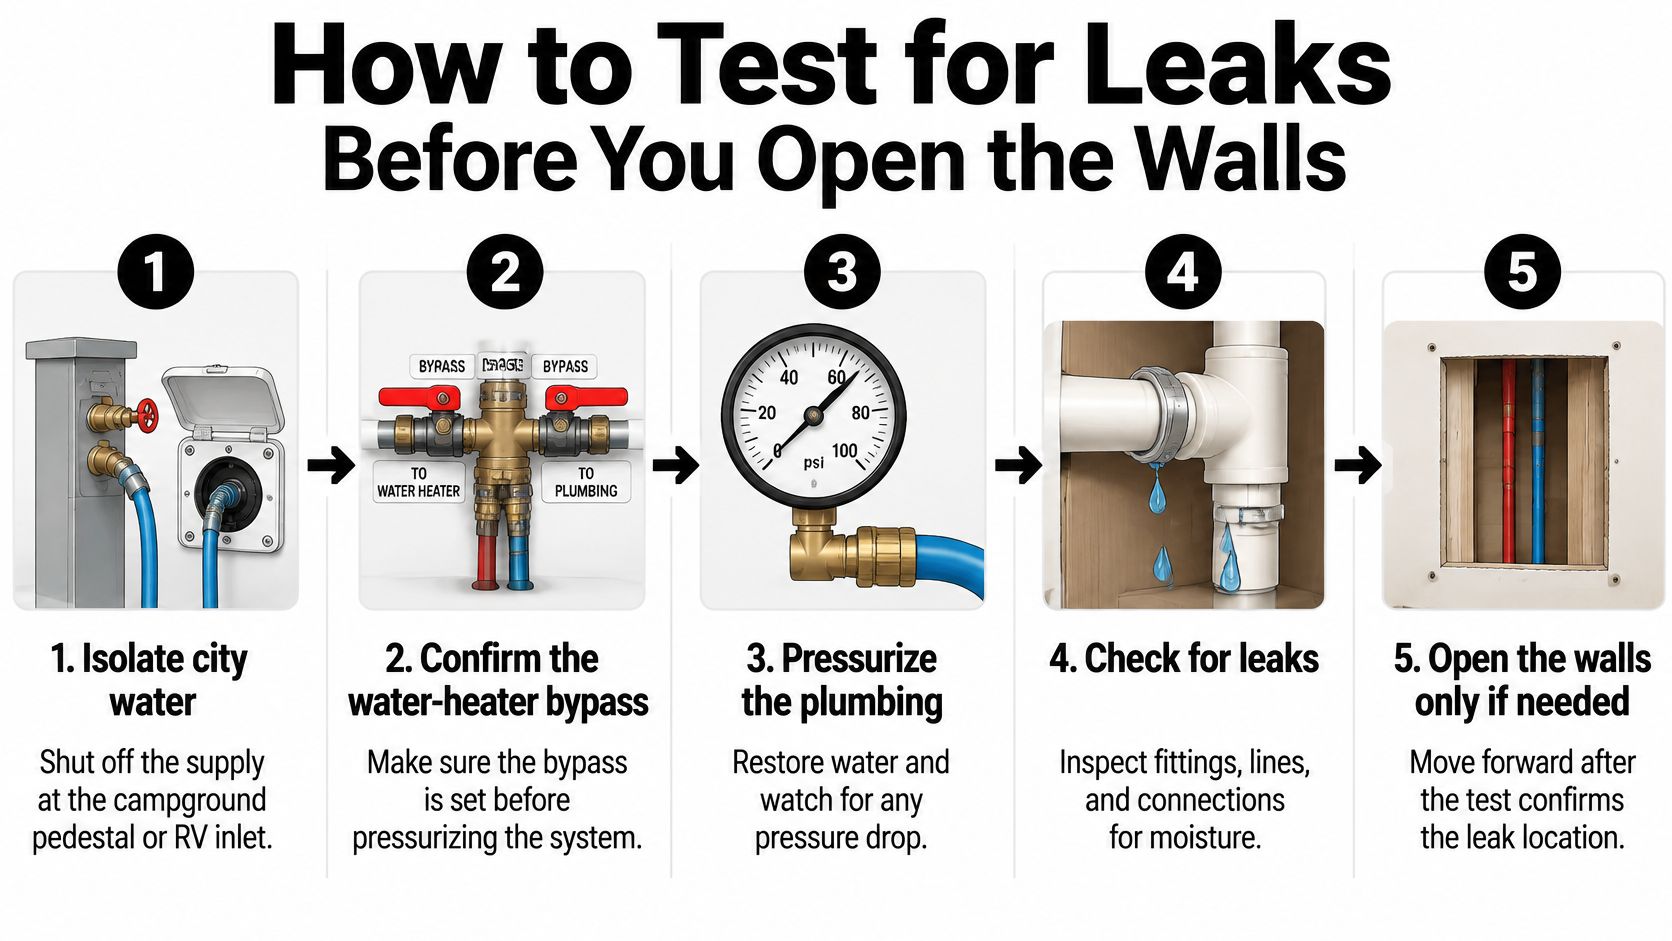
The test, step by step
- Isolate city water. Shut off the supply at the campground pedestal or RV inlet. Confirm the water-heater bypass valves and low-point drains are closed, because an open drain will read exactly like a leak.
- Connect a regulated supply with a gauge. Use a pressure regulator and inline gauge rather than a bare hose. You need a number you can watch, not campground pressure you can't control.
- Pressurize to about 40 to 50 psi. Fill the fresh-water circuit slowly and bleed air at a faucet. Air trapped in lines compresses and can mask a small pressure drop.
- Close every fixture. Shut faucets, the shower valve, the toilet supply and the outside shower. The outside shower is the one owners forget, and its handheld head can weep unnoticed.
- Watch the gauge and listen. Give it two or three minutes. A steady needle and a quiet pump mean the system is holding. A falling gauge or repeated pump starts mean water is escaping somewhere, or the pump check valve is letting pressure bleed back.
- Isolate by section if it drops. Close off fixtures in groups, kitchen first, then bathroom, then outside shower and appliances. When the drop stops, you've narrowed the search to that branch.
A pump that restarts within roughly 15 minutes with all fixtures closed is a practical field indicator that pressure isn't being retained. Treat it as an indicator, not a pass or fail rule, because the exact timing varies by pump model and system volume.
Watch how a pressurized check looks on a real rig before you try it on yours.
Check the high-failure spots first
Before you suspect a hidden line, inspect pump fittings, filter housings, the toilet valve, water-heater connections, the outside shower and appliance supply lines. Run a dry paper towel around each joint. It shows moisture your fingers miss and tells you whether a stain is old or active.
Practical rule: A pressure drop proves the system is losing pressure. It doesn't prove a pipe is split until you've isolated every fixture, including the toilet vacuum breaker.
Four mistakes account for most bad test results. Owners test with the water heater bypassed incorrectly, so part of the circuit never pressurizes. They overlook the toilet's vacuum breaker, which can drip only under pressure. They read any drop as a pipe leak without isolating fixtures. And they use unregulated compressor air, which can damage plastic fittings and valves that were fine before the test.
A clean result looks boring. The gauge holds steady, the pump stays quiet with fixtures closed, and every paper towel comes away dry. If the gauge falls and every accessible fitting is dry, stop there. That's when a technician earns the fee, because the next step is accessing a hidden run without tearing out more paneling than the repair requires.
Fixing Common RV Plumbing Problems and Choosing DIY or Service
Skill isn't the only question. I would sort any repair with these criteria before picking up a wrench:
- Access: Can you see the failed part and get both hands on it, or is it behind a panel?
- Risk: Does the job involve propane, 120-volt power or a pressurized tank?
- Warranty: Will opening the component void coverage on a newer rig?
- Verification: Can you pressure test your own repair afterward?
- Parts match: Do you have the exact cartridge, seal or valve for that model, not a close equivalent?
If you can't verify the repair, you haven't finished it. You've only changed a part.
Repairs owners usually handle well
Clogs come first because they're the most common. Pull and clean the strainer, flush with hot water, then clear the trap with a small drain cable made for narrow RV pipe. Skip strong chemical drain cleaners in the black tank. They can damage seals and sensors and upset the bacterial breakdown you want in that tank.
Faucet drips call for a cartridge, not a harder twist on the handle. Shut off the pump and city supply, open the faucet to drain pressure, then swap in the matching cartridge. Cranking a worn cartridge tighter buys you a week and scores the valve body.
Low flow at one tap often isn't the pump at all. Check the aerator and the inline filter before you condemn anything larger, and if the filter housing itself is cracked or bypassing, this walkthrough on repairing a camper water filter covers the housing and seal checks in the right order.
Toilets fail in predictable ways. A toilet that runs or won't hold water in the bowl usually needs a flapper or bowl seal. A sluggish flush with water backing up can mean a dirty vacuum breaker or a vent problem, so check the roof vent cap for debris or a wasp nest before you pull the toilet.
Water heaters need two checks before parts. Confirm the bypass valves match the mode you're in, camping or winterized, because a bypass left open gives you lukewarm water and looks exactly like a failed element. Then, with the tank cool and power off, flush sediment from the drain valve. A sulfur smell in hot water only often means a worn anode rod on steel-tank models.
Pumps deserve restraint. Clean the inlet strainer, check for air leaks on the suction side, and prime the pump with a full fresh tank. Our guide to the RV fresh water pump walks through weak flow and constant cycling in detail. If the pump still cycles after your pressure test shows tight lines, the internal check valve is the likely culprit and replacement becomes reasonable.
Sort your repair
| Repair | Handle yourself | Call a service center |
|---|---|---|
| Clogged sink or shower drain | Yes, after cleaning the strainer and using a drain cable | Repeated clogs or a blocked vent or main line |
| Faucet drip or cartridge swap | Yes, with the matching cartridge | Corroded valve body or fittings that will not seal |
| Toilet flapper or seal | Yes | Cracked bowl or failing valve assembly |
| Water pump replacement | Only if you can isolate, prime and test it | Pump cycling after leaks are ruled out |
| Water heater sediment flush or anode | Yes, with the tank cool and power off | Cracked tank, leaking relief valve or gas-side work |
| Hidden leak behind walls | No | Yes, water damage spreads quickly |
| Freeze split in a hidden run | No | Yes, followed by a full pressure test |
| Black tank valve or sensor | Yes for cleaning the sensor | Seized valve or sensor replacement |
A shop visit buys you more than the single repair. You get the correct manufacturer part, a whole-system pressure test after the fix, and a written watch list of fittings that are aging but not yet leaking. That list is what keeps a small job from becoming a floor replacement.
Winterizing Your RV to Prevent Freeze Damage
Water expands by approximately 9% when it freezes, and the Camping World winterization cost guide puts damaged water-line repairs at roughly $200 to $1,500 or more, with unnoticed interior water damage reaching approximately $5,000 to $15,000. One freezing night is enough when water sits in a low point.
Heating the cabin doesn't change that math. Exposed low-point drains, exterior shower lines, tank valves, filters and the water-heater bypass assembly sit outside the heated envelope on most travel trailers and fifth wheels. A rig stored in Salt Lake City or camped near Bear Lake with the furnace running can still split an outside shower fitting while the bedroom stays comfortable.
The two-stage method
The RV Pro winterization procedure uses air first and antifreeze second, keeping regulated air at or below 30 psi unless your manufacturer states otherwise. Follow it in order:
- Drain everything. Empty the fresh tank, water heater, low-point drains, filters, toilet valve and outside shower. Open faucets so lines drain by gravity.
- Bypass the water heater. Set the bypass valves and leave the heater drained. You don't want gallons of antifreeze in that tank, and you must never energize it empty.
- Blow out each fixture. Attach a city-water blowout adapter, apply regulated air, and open each hot and cold fixture individually, including the toilet valve. Let the compressor recharge between fixtures so pressure pulses don't stress fittings.
- Purge the hidden traps. Open or separately purge check valves, vacuum breakers, the black-tank flush line and the water-heater relief circuit. Trapped water in these spots is the principal cause of spring surprises.
- Add antifreeze through the pump inlet. Draw RV-rated, non-toxic propylene-glycol antifreeze through the pump's winterization inlet, starting at the fixture closest to the pump. Open hot and cold sides separately until a consistent colored flow appears, then add some to each drain trap.
- Document the job. Photograph valve positions and antifreeze at each fixture, and keep receipts and service records with the date.
If you find a line already frozen, thaw it gradually and never force water through it. These safe ways to thaw frozen pipes cover gradual warming methods that won't scorch plastic fittings or surrounding paneling. Open flames and heat guns held in one spot cause the second repair.
| Item | Typical cost range |
|---|---|
| Professional winterization | $85-$150 |
| DIY winterization supplies | $20-$50 |
| Damaged water line repair | $200-$1,500 or more |
| Water pump replacement | $200-$500 |
| Cracked water heater tank | $600-$1,200 or more |
| Incomplete winterization repairs | Can exceed $3,000 |
Those winterization figures come from Roamly's guide to keeping RV pipes from freezing, which estimates professional winterization at roughly $85 to $150 and DIY supplies at about $20 to $50, while incomplete winterization can produce repairs exceeding $3,000. Our own step-by-step guide to winterizing an RV in Utah adds the local timing.
No shore power doesn't block the job. The purge runs on regulated air and antifreeze, not electricity, as long as you can power a compressor briefly or use a charged portable unit. Keep the documentation either way, because coverage can differ when an insurer decides damage came from failure to winterize. Receipts, photos and a dated service record are cheap evidence.
Professional winterization is worth it when your rig has a residential fridge with an ice maker, a washing machine, or bypass valves you can't reach confidently. You're paying for the fixtures you'd otherwise forget.
Dumping Tanks, Utah Rules and Booking a Plumbing Check
A heated living space gives owners false confidence. Furnace air never reaches low-point drains, exterior shower lines, tank valves and water heater bypasses the same way, so those fittings can freeze and crack while the interior feels comfortable. Treat the dump routine and the pre-season leak test as one system.
Connect the sewer hose tightly at both ends before you open any valve, then confirm the inlet is approved for RV discharge. Open the black-water valve first and let it empty fully while you hold or secure the hose. Open the gray-water valve second so soapy water flushes black-water residue out of the hose. Close both valves, rinse and stow clean. A hose stored dirty keeps its odor no matter what treatment you add later.
The Grand County sanitary dumping station guidance recommends that black-then-gray order for exactly this flush effect. The same guidance prohibits wastes, chemicals or substances beyond wastewater from RV kitchens and personal sanitary conveniences. Solvents and household chemicals never go in the tanks.
Use designated stations for both tanks. Utah State University Extension guidance for RV camping directs campers to empty black-water and gray-water tanks at a designated RV dump station rather than releasing wastewater on the ground. Gray water carries soaps, food residue and grease. A ditch, storm drain, stream or patch of soil is never a substitute, and cooking grease belongs in the trash at the campsite, not down the galley sink.
| Rule | Value and source |
|---|---|
| Payson dump station hours | 7 a.m. to 3 p.m., free to use (Payson) |
| Utah RV park dump requirement | Sanitary dump station required unless every site has a sewer connection |
The City of Payson RV dump station page lists the station as free with service limited to 7 a.m. through 3 p.m. Plan fuel, groceries and checkout around that window. The park requirement comes from Utah Rule R392-301-6 for recreational vehicle parks, which requires a sanitary dump station unless every site is connected to an approved sewer system. Before you book, confirm whether your site has a sewer riser or the park relies on a shared station. Our detailed RV waste tank dumping and cleaning guide covers rinsing, sensors and storage between trips.
Check dump hours when you book the site, not when both tanks read full on departure morning.
Booking the plumbing check
I recommend a pre-trip check that covers four points in one visit: a pressure test, bypass-position confirmation, outside shower and low-point drain inspection, and fresh-tank sanitation check. Catching a weeping valve or a bypass left half open costs far less than opening a wall for moldy paneling. Our RV service department provides maintenance checks, repairs, installations, plumbing work and electrical work, and serves owners across Salt Lake City, Millcreek, Spanish Fork and throughout Utah.
To book, describe your RV, pick the services you need (repair, installation or maintenance), choose a time, and our service team confirms the appointment. Schedule a fall check before the first mountain freeze and a spring check before the first long trip, so a cracked fitting turns up in the service bay instead of at a campsite by the Great Salt Lake.
Frequently Asked Questions About RV Plumbing Issues
How do I know whether my RV has a leak or a pump that needs replacing?
Close every fixture, pressurize the system, and watch the gauge while listening to the pump. If pressure holds but the pump still cycles on its own, suspect the pump check valve. If pressure falls, isolate fixtures in groups until the drop stops, then inspect that branch with a dry paper towel before you replace anything.
How much does professional winterization cost compared with doing it myself?
Professional winterization runs $85 to $150, while DIY supplies run about $20 to $50 for antifreeze and a blowout adapter if you already own a compressor. The DIY route saves money only if you purge every low point, vacuum breaker and flush line. One missed fitting can erase the savings several times over.
Can I winterize without shore power?
Yes. The two-stage method uses regulated air and antifreeze drawn through the pump's winterization inlet, so it doesn't depend on campground electricity. You still need a way to run a compressor briefly, and the water heater must stay bypassed, drained and switched off. Photograph your valve positions when you finish.
Is gray water safe to dump on the ground?
No. Gray water from sinks and showers carries soap, food residue, grease and other contaminants, even though it looks harmless. Empty both tanks at a designated RV dump station with the hose secured before you open any valve. In remote parts of Utah, identify your dump location before you leave the campground.
Why does my fresh water smell sour?
The usual cause is old water sitting in the tank or a fresh tank that hasn't been sanitized, not a broken pipe. Drain the tank fully, flush the lines, sanitize the system, then refill with fresh water through a clean filter. If only the hot side smells, check the water-heater anode rod and flush sediment instead.
When should I call a service center instead of fixing it myself?
Call when the leak is hidden behind walls, a tank or water-heater shell is cracked, a valve is seized, or a freeze split needs repair followed by a full pressure test. Also call when the job touches propane or gas-side water-heater work. Those repairs need correct manufacturer parts and verified testing, not approximations.
If your pump is cycling, a cabinet floor feels damp, or winter storage is coming up and you'd rather not gamble on a split line, our service team can pressure test the whole system, handle the plumbing repair, and document your winterization for your records. Visit Motor Sportsland to book a plumbing check in Millcreek or Spanish Fork, describe your rig and the symptom you're seeing, and we'll confirm a time that gets you back on the road with a system that's been tested, not guessed at.
