
RV Sink Repair: A Practical Guide for Utah Owners

A sink that behaves perfectly in your driveway can start gurgling halfway through a Utah trip. You pull into a campsite near the Wasatch Mountains, open the cabinet, and find a damp towel under the P-trap. Or the basin drains slowly while everyone is waiting to wash dishes after a day near Jordanelle or Bear Lake. These problems look small, but RV plumbing has less room for error than household plumbing. Vibration, freezing temperatures, plastic fittings, and inconsistent campground water pressure all work on the same connections.
Good RV sink repair starts with finding the reason for the failure, not just tightening the first fitting you see. This guide covers safe drain clearing, leak diagnosis, faucet and pump problems, cracked sink basins, winterization, and the point where a repair should move from the driveway to a service bay. Most accessible problems need basic hand tools and careful inspection. Hidden leaks, freeze-damaged lines, and water damage deserve a more cautious approach.
When a Sink Starts Misbehaving on the Road
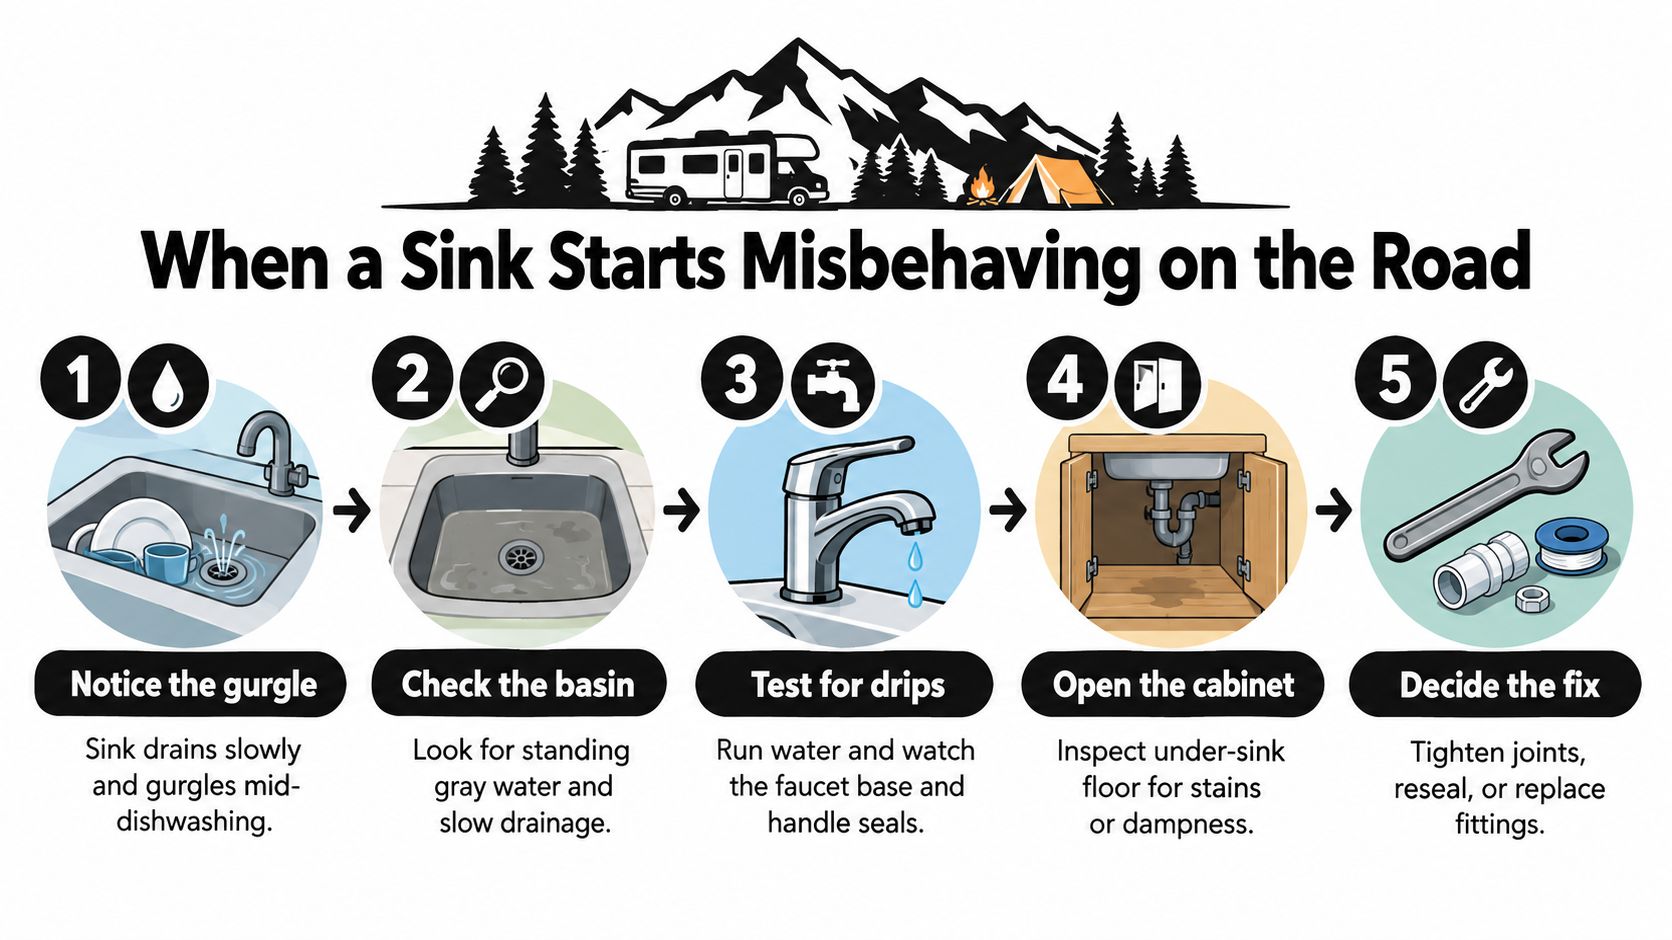
A family can finish a mountain drive, level the RV, and discover that the kitchen sink gurgles after every wash cycle. The faucet still runs, but gray water sits in the basin. A few minutes later, a drip appears beneath the cabinet. The leak may have started on rough pavement, but the visible symptom doesn't always identify the failed part.
The common failure patterns are useful starting points:
- Slow drainage usually points to food, grease, hair, or debris in the drain path, although gurgling can also indicate a restriction farther toward the gray tank or its vent.
- A P-trap leak often follows road vibration, an imperfectly aligned slip joint, or a worn rubber washer.
- A dripping or stiff faucet may have a worn seal or cartridge, with mineral buildup making the handle harder to operate. Utah's hard water can make that problem more noticeable.
- A cracked basin may result from freezing water, impact, flexing, or stress around an over-tightened drain or mounting point.
Follow the water from supply to tank
An RV sink system is easier to understand when you trace the water in order. Water comes from the city-water inlet when you're connected to a campground supply, or from the fresh tank when the 12-volt water pump pressurizes the system. A pressure regulator protects the plumbing from unusually strong campground supply pressure. From there, braided hoses or PEX lines feed the faucet.
After water leaves the faucet, it passes through the basin drain and tailpiece, enters the P-trap, and continues through the trap arm toward the gray tank. The P-trap holds a small amount of water to block sewer gases. It can also become a winterization trouble spot because trapped water doesn't always drain completely.
The parts I check early are the thin plastic slip nuts, rubber P-trap washers, accordion-style drain sections, and inexpensive faucet cartridges found on many entry-level coaches. Plastic threads can last a long time when aligned correctly. They fail quickly when someone uses a wrench to force a crooked connection.
Practical rule: Hand-tighten plastic slip nuts first. Use a tool only for a small finishing adjustment, and stop as soon as the connection seals.
Here is the connection map for a first inspection:
- Hand-tight: Slip nuts and most P-trap connections should start and finish by hand.
- Light tool assistance: A basin wrench or channel-lock pliers can help with a stubborn faucet or drain nut, but the fitting must stay aligned.
- Threaded supply connection: Use compatible sealing methods only where the fitting calls for them. PTFE tape belongs on suitable tapered threads, not on slip-joint washers.
- Never force: Cross-threaded plastic often appears tight while still leaking. Replacing the fitting is safer than crushing it.
Road vibration can loosen a sound connection, but over-tightening is a common reason a previously good plastic thread becomes unusable. The diagnostic approach throughout this guide is simple: isolate pressure, identify the exact source, consider vibration or freeze damage, and replace the weak component rather than repeatedly tightening it.
Clearing Clogs Without Damaging Plastic Plumbing
Start with the least aggressive explanation. Check whether the gray tank vent is obstructed, listen for gurgling, and make sure the sink stopper or drain screen isn't stuck with debris. A localized blockage usually responds differently from a tank or vent restriction, so don't pour chemicals into the basin before you know which problem you're addressing.
Turn off the pump and disconnect city water. Remove standing water with a cup, then place a bucket beneath the trap. Loosen the P-trap by hand, inspect the trap arm, and remove the debris directly. If the blockage is farther along, use a small hand auger or a flexible plastic snake intended for RV plumbing.
Traditional drain snakes can damage plastic tanks, rubber seals, plastic toilets, and waterless P-traps, according to RV plumbing guidance on safe clog removal. A metal snake can scrape or puncture softer plumbing, turning a clog into a leak. Harsh chemical drain cleaners can also attack seals and gaskets. Baking soda followed by warm water is a gentler option for light residue, but it won't replace mechanical cleaning when grease or solid debris has formed a plug.
Clean the mating surfaces before reassembly. Install fresh washers if the old ones are flattened, start every slip nut squarely, and tighten by hand before making a small final adjustment. Run water into the basin, inspect the trap, and dry the cabinet before traveling.
Basic parts can be inexpensive, and an accessible clog is often a manageable driveway job. Set aside enough time to remove, clean, reassemble, and test the drain rather than rushing the final connection.
Tracking Down and Fixing Leaks at the P-Trap and Supply Lines
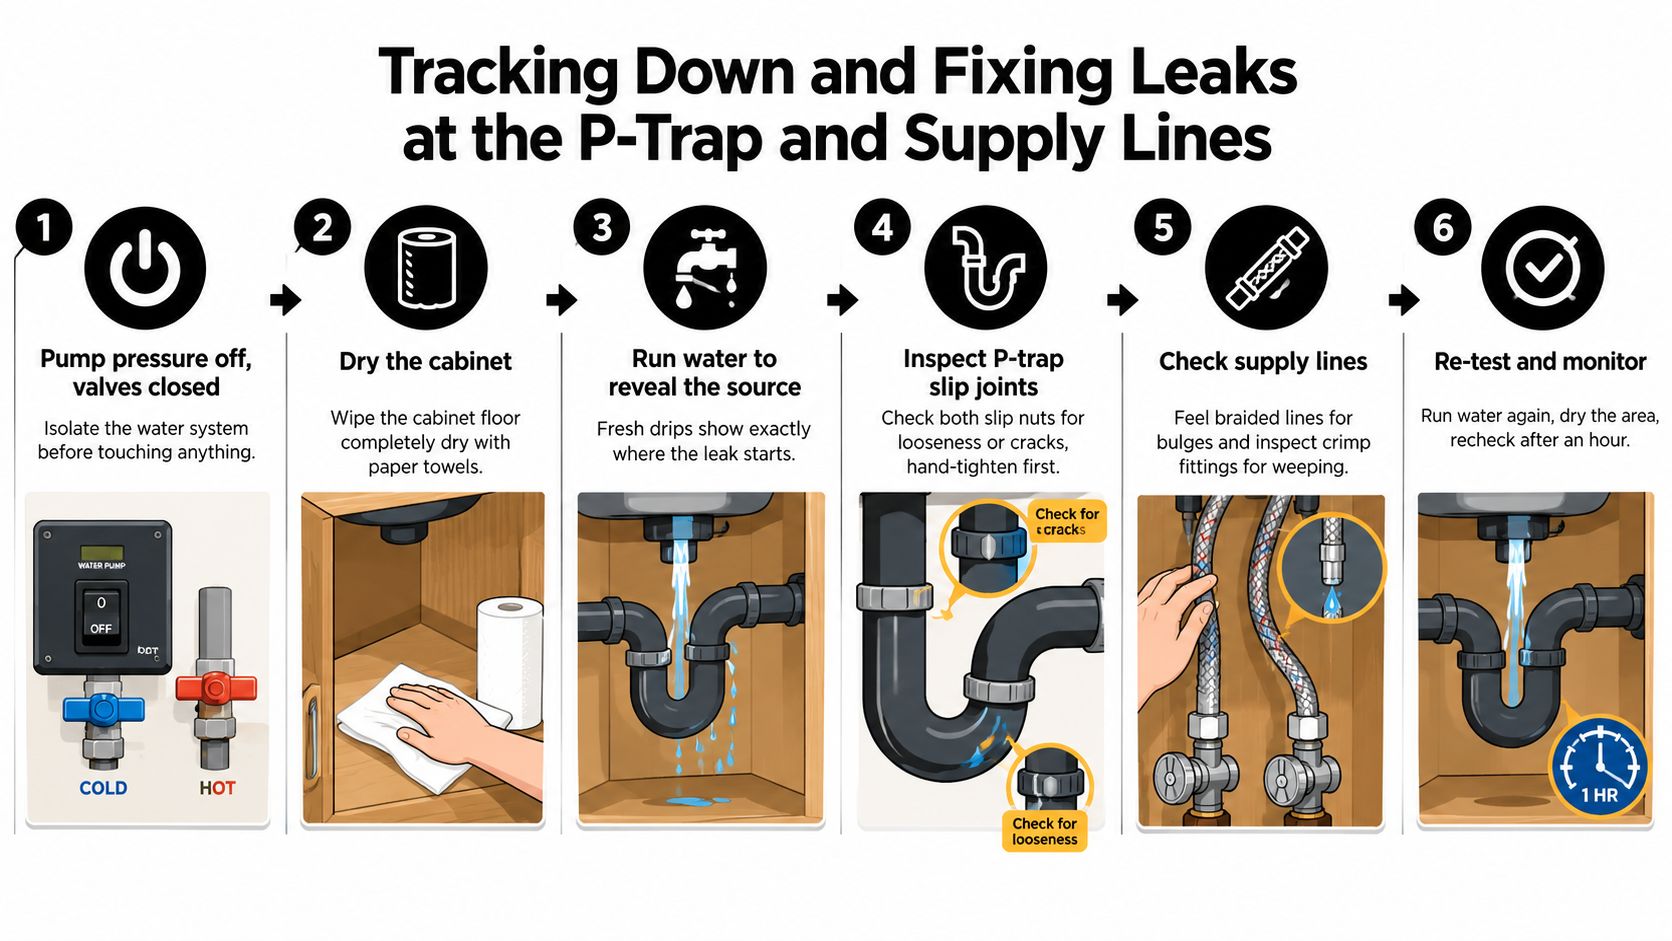
A pressure-off inspection prevents a small leak from becoming a cabinet flood. Shut off the water pump and city water, open the faucet to release residual pressure, and place a bucket under the sink before touching the trap. This method is also recommended in a field guide to RV plumbing leaks, which identifies loose slip nuts, worn washers, and cracked P-traps as common sources.
Dry the cabinet floor completely with paper towels. Run the faucet, then watch the first place that becomes wet. A drip at the P-trap needs a different repair from a bead forming at the faucet tailpiece, and a dry test can hide a leak that appears only when the system is pressurized.
P-trap and supply-line checks
Inspect both slip joints for hairline cracks, distorted washers, and misalignment. Road vibration can loosen the connection, while winter water left inside the trap can split the plastic. Remove the nut by hand, clean the surfaces, replace the washer, and reassemble without cross-threading. If you need a visual walkthrough, this remove p-trap step by step guide shows the basic removal sequence.
For a supply-line drip, inspect the braided hose fittings at the faucet tailpiece and the connections near the pump or city-water side. Feel for bulges and look for moisture at crimped ends. Hold the faucet shank with one tool while loosening the supply connection with another so the faucet doesn't twist in the countertop.
Keep channel-lock pliers, a basin wrench, a flashlight, replacement washers, paper towels, and PTFE tape for compatible threaded joints in the repair kit. The repair may be straightforward, but any fitting that refuses to seat, spins in damaged threads, or leaks again after correct reassembly needs replacement rather than more force.
Use the paper-towel test after repair. Run the faucet, dry the joint, and check again after the cabinet has remained closed for a while. The supplied RV sink leak repair video can supplement the inspection, but it shouldn't replace checking your own fittings and plumbing layout.
Faucet, Sprayer, and Water Pump Problems Worth Knowing
A faucet can fail while every drain connection remains dry. A dripping spout usually involves a worn seat or seal. A stiff handle often points to mineral scale or a failing cartridge. A pull-out sprayer that won't retract may have a stretched hose or damaged return mechanism.
Start by identifying the faucet brand and model from the marking on its base or the paperwork supplied with the RV. RV faucets don't always use interchangeable internal parts, so matching the cartridge is safer than assuming a universal replacement will fit. Remove the handle carefully, inspect the retaining hardware, replace the cartridge or O-rings, and test the handle before reinstalling the trim.
A replacement sprayer head can be a practical fix when the original head is cracked or clogged. Keep the hose from twisting as you tighten the connection, and check the seal at the sprayer coupling.
The pump can create a misleading faucet complaint. If the pump cycles while every tap is closed, look for a pressure-side leak, a failed check valve, or air entering near the sink plumbing. A pressure gauge can help separate a pump fault from a small supply-line leak, but tracing intermittent pressure loss may take substantially longer than swapping a faucet cartridge.
For a broader diagnostic process, use this RV water pump troubleshooting guide. If the pump runs near a damp cabinet or wiring, isolate power before investigating further.
Repair or Replace When the Sink Basin Itself Is Cracked
A crack in the basin deserves more scrutiny than a bead of caulk. First identify the material, then check whether the damage is cosmetic, localized, or spreading from a structural point. A small hairline crack in an otherwise rigid acrylic or ABS sink may accept an epoxy or plastic-welding repair. A crack that flexes under light pressure is warning you that the basin has lost structural strength.
Freezing can split a basin or its drain assembly, while an over-tightened strainer can create stress around the drain opening. Countertop movement and road vibration can widen a repair that looks sound in a stationary driveway. If the countertop cutout has absorbed water and started delaminating, replacing only the basin may leave the core issue in place.
| Material | Typical Lifespan | Repair Viability | Approx. Replacement Cost |
|---|---|---|---|
| ABS | Varies with use, UV exposure, and installation | Good for small, stable cracks; replacement is better for spreading damage | Varies by size and fit |
| Acrylic | Varies with use and support | Patchable when the crack is narrow and the basin remains rigid | Varies by size and fit |
| Fiberglass | Varies with reinforcement and moisture exposure | Limited when reinforcement is wet or soft | Varies by size and fit |
| Stainless steel | Generally tolerant of vibration and temperature changes | Small cosmetic damage may be manageable, but structural damage calls for replacement | Varies by gauge and configuration |
The right comparison isn't just repair price versus replacement price. Include the condition of the cabinet, countertop, faucet, drain opening, and mounting hardware. A cosmetic patch can trap moisture if the area isn't cleaned and resealed correctly.
For fitting questions and installation considerations, review this RV sink installation guide. A sink that has repeated stress, a soft mounting surface, or a widening crack is usually a replacement candidate, not a caulk project.
Winterizing and Dewinterizing to Prevent the Next Failure
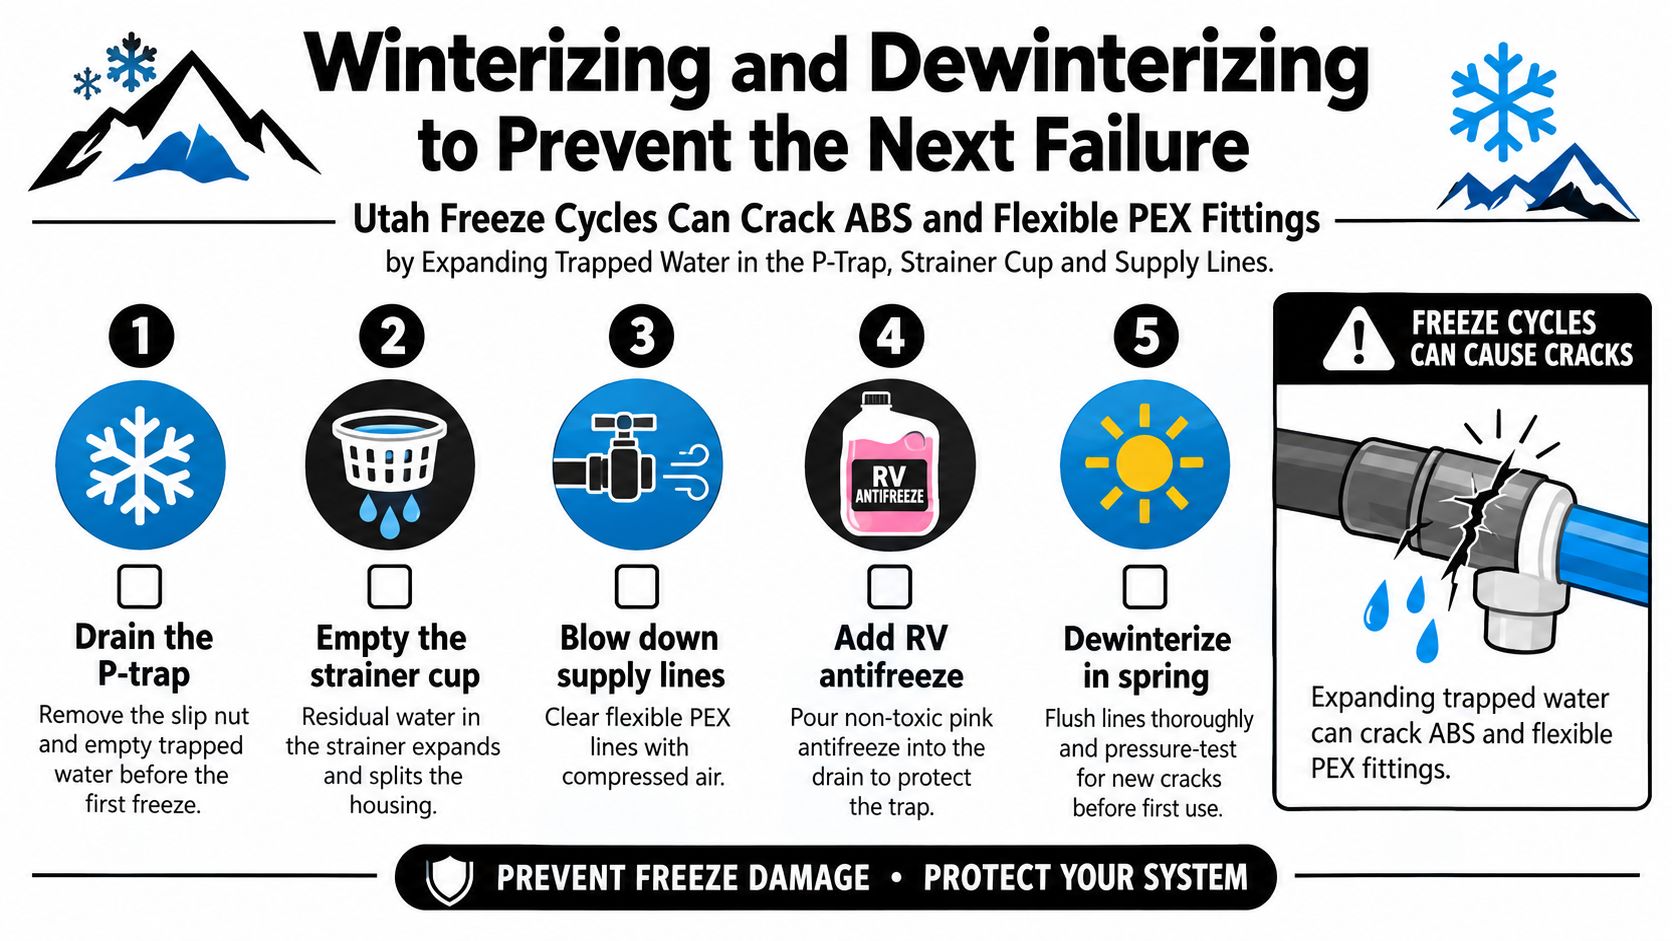
A sink can look dry after a fall trip while water remains in the P-trap, strainer cup, or supply lines. In Utah storage conditions, freezing water expands and can split plastic fittings. Road vibration then opens a small weakness, so a leak may appear only after the RV is back in service.
Drain the fresh tank, bypass the water heater, and open the low-point drains. Set the RV's winterize or siphon valve, then pump non-toxic RV antifreeze through the plumbing until each faucet runs pink. Follow this RV winterization guidance across the kitchen sink, bathroom sink, shower, and outdoor shower. The goal is to replace trapped water throughout the fixture lines, not just empty the tank.
Protect the drains separately. Pour RV antifreeze into each sink and shower drain so the P-traps contain freeze-resistant fluid. Procedures commonly call for one cup per drain, while some use one to two cups or at least two pints, depending on the fixture and system. This RV winterization checklist explains those variations. Use enough fluid to displace plain water in the trap without forcing liquid where it does not belong.
A spring inspection catches hidden cracks
Dewinterize in reverse. Remove the antifreeze, flush every fixture until the water runs clear, sanitize the fresh-water system with the manufacturer's recommended dilute bleach procedure, and rinse thoroughly. Remove inline water filters before winterization, then replace or reinstall them after flushing because antifreeze can damage filter components. Use this RV dewinterizing guide from Motor Sportsland for the spring sequence.
Inspect the sink trap, slip nuts, faucet base, pump, filter connections, water heater fittings, outside shower, black-tank flush, and ice-maker line. A complete RV dewinterizing procedure also recommends checking each fixture and connection before regular use.
Run the pump and watch the cabinet floor. A fitting weakened by freezing may pass a quick faucet test, then seep as vibration or repeated pump cycles move it. Check campground hookups with a pressure regulator, since excessive incoming pressure can stress plastic supply fittings even after winter damage has been avoided. Finding that leak at home is easier than repairing it beside a cold campsite.
Knowing When to Call the Service Bay
A P-trap reseal, faucet cartridge replacement, or sink strainer swap is reasonable for an owner who can work carefully in a cramped cabinet. The job changes when the water source is hidden, the plumbing passes beneath the floor, or the leak has already damaged the structure.
Use this triage guide before deciding whether to keep working in the driveway:
| Issue | Typical Cause | DIY Feasible? | Estimated Labor |
|---|---|---|---|
| P-trap slip-joint leak | Worn washer, loose connection, misalignment | Often, if accessible | Short, accessible repair |
| Faucet cartridge problem | Worn seal, scale, failed cartridge | Often, with a matching part | Moderate fixture repair |
| Sink basket strainer leak | Failed seal or loose mounting hardware | Often, if the basin is sound | Moderate fixture repair |
| Cracked drain pipe under the floor | Freeze damage, vibration, impact | Usually not | Requires access and diagnosis |
| Gray-tank valve failure | Valve wear, freezing, or damaged linkage | Sometimes, but access varies | Specialist inspection may be needed |
| Cabinet water damage | Hidden leak and prolonged moisture | Limited | Repair must address plumbing and substrate |
| Pump-area electrical concern | Moisture near wiring or a short | No | Isolate power and seek professional diagnosis |
| Damaged manifold or tank sensor | Freeze damage or component failure | Rarely | Specialized testing and access |
An RV repair can become expensive when a leak is concealed behind cabinetry or under the floor. Accessible plumbing repairs commonly fall around $150 to $500, while concealed leaks involving underbelly removal, cabinet disassembly, drying, floor replacement, or mold remediation can reach $500 to $3,000 or more, according to this RV plumbing repair cost guide. Those figures aren't a quote, but they explain why an early inspection matters.
Service availability also affects trip planning. One dataset covering more than 41,000 work orders across 288 U.S. dealerships reported an average RV stay of 34 days, with warranty repairs averaging 50 days and parts-related delays averaging 73 days. The same reporting identified 42% of in-progress work orders waiting on warranty resolution and 24% delayed by parts shortages, as detailed in this RV repair turnaround analysis. A pre-trip inspection can be a better use of time than discovering a hidden plumbing failure after arriving at the campground.
Call a technician when the ABS drain pipe is cracked under the floor, fittings won't seat, water damage is spreading, or electrical components are close to moisture. A good tech also knows when a repair isn't worth forcing. Motor Sportsland's service operation handles RV plumbing diagnostics, repairs, installations, and related parts work for owners who need a shop-level inspection.
Bring your RV in for plumbing diagnostics, warranty work, or a post-trip inspection before a small sink leak damages the cabinet or floor. Visit Motor Sportsland to explore service options and get help keeping your RV ready for Utah travel.
RV Sink Repair FAQs
Why does my RV sink leak only after driving?
Road vibration can loosen slip joints, compress washers, or shift a supply-line connection. Test the sink after travel, inspect the P-trap and braided hoses, and look for moisture that appears only when the pump or city water is pressurized.
Can I use a regular drain snake in an RV sink?
It's safer to avoid aggressive metal snakes. RV systems may include plastic tanks, rubber seals, plastic fixtures, or waterless P-traps that can be damaged. Remove debris at the drain, clean an accessible trap, and use a small RV-suitable hand snake only when necessary.
Should I repair or replace a cracked RV sink?
A small, stable hairline crack in a rigid basin may be repairable. Replace the basin when the crack spreads, the material flexes, the reinforcement is soft, or the countertop has water damage.
How do I protect the sink P-trap during winter?
Drain the plumbing, then add non-toxic RV antifreeze to the sink and shower drains so the traps contain antifreeze instead of water. Pump antifreeze through the faucet lines until it runs pink, and inspect the trap again during spring dewinterization.
When should I stop DIY RV sink repair?
Stop when the leak is beneath the floor, water has damaged the cabinet structure, a fitting won't seat, freeze damage affects a manifold or tank sensor, or moisture is near electrical wiring. Those problems need controlled diagnosis and safer access than most cabinets provide.
