
Camper Floor Replacement Guide for Utah Owners

Your shoe sinks slightly beside the camper entry after a wet weekend in the Wasatch Mountains. The vinyl still looks decent, so you're hoping a fresh covering will make the problem disappear before your next trip to Jordanelle. But that soft patch deserves a closer look before you buy flooring or keep loading the trailer.
Camper floor replacement is a moisture-control and structural-repair job first. The finished surface is only the layer you can see. Underneath it, water may have weakened the deck, loosened fasteners, or reached supports beyond the spot that feels soft. Covering that damage can turn an accessible repair into a much larger project.
At Motor Sportsland, we want Utah owners to make the repair decision before making the flooring purchase. That means identifying the leak, mapping the damage, and choosing materials that suit the camper's weight allowance, slide movement, and winter use. A family bunkhouse carrying snow-covered boots needs a different flooring decision than a dry living area in a highway-traveling fifth wheel.
The practical starting point is scope: what you're replacing, what the estimate includes, and whether the remaining structure is sound enough for a localized repair.
Camper Floor Replacement Costs by Scope
Say you're that Salt Lake City owner with a soft entry patch after a rainy mountain trip. A flooring installer might price the visible surface, while an RV repair shop needs to establish whether the deck underneath can still carry weight and hold screws. Those aren't equivalent jobs, even if both estimates say “floor replacement.”
Published prices are planning bands, not matching bids
The following 2026 camper floor replacement cost comparison combines published planning estimates with older repair examples. The dates and sources matter: these aren't Motor Sportsland quotes, and an older patch price shouldn't be treated as a current full-restoration price.
| Scope | Typical range | Who | What the figure covers |
|---|---|---|---|
| Small DIY repair | $100–$500 | Owner | Limited patch, fasteners, and sealant |
| DIY epoxy stabilization | Under $200 | Owner | Epoxy only when wood is not rotten |
| Professional epoxy injection | $200–$400 | Shop | Adhesive into delamination, not rot |
| Small professional patch | $500–$800 | Shop | Cut to sound wood, new panel, finish |
| Localized soft-spot subfloor | $585–$1,450 | Shop | One damaged area, with drying and sealing scope confirmed |
| Partial replacement | $800–$1,500 | Shop | Larger cut-back and matching panel |
| Living-area flooring | $1,950–$3,950 | Shop | Finish floor across the living area |
| Full-coach flooring | $4,500–$8,500 | Shop | Most of the interior floor |
| Full replacement with structure | $8,000–$15,000 | Shop | Subfloor or framing included |
| Slide-out floor | $5,000–$12,000 | Shop | Slide floor, removal, and finish |
| Documented 2022 floor portion | About $7,100 | Shop | Floor work in one water-damage repair |
For the owner-performed rows, HodgePodge Hippie gives $100–$500 for small DIY fixes and describes a documented epoxy repair costing under $200. The professional injection, small-patch, and partial-replacement figures are 2025 estimates from RV Showoff: $200–$400, $500–$800, and $800–$1,500, respectively.
For broader scopes, A1 RV Repair's 2026 planning figures list $585–$1,450 for localized soft-spot subfloor repair, $1,950–$3,950 for living-area flooring, and $4,500–$8,500 for full-coach flooring. RV Cost Calculator's 2026 guide places full replacement involving subfloor or structural work at $8,000–$15,000, while Design Transition Studio's 2026 estimate puts slide-out floor replacement at $5,000–$12,000.
The historical example illustrates why opening the floor changes the conversation. In a 2022 repair account, The Autopian reported approximately $7,100 for floor work versus $700 for affected walls.
What to confirm before approving an estimate
Don't assume a published flooring band includes every related repair. Ask for separate treatment of:
- Leak correction, including roof, window, plumbing, and slide-seal work.
- Hidden structure, especially joists, perimeter framing, and damaged insulation.
- Interior removal, including cabinets, appliances, and attached partitions.
- Slide components, including support, removal, adjustment, and finishing.
Structural and slide estimates may include some of those items, so they shouldn't automatically be added twice. Get the scope in writing.
Time also matters. FitlyFast's 2026 guide describes camper-floor replacement as commonly taking one to three weekends, depending on damage and DIY scope. Don't schedule a departure around the flooring installation alone; drying and hidden damage can control the project.
How to Map Soft Spots Before You Cut
Start with diagnosis, not a saw. A soft spot tells you where the deck has lost stiffness, but it doesn't show the full moisture boundary or identify where water entered.
Use this checklist to record the floor before disturbing it.
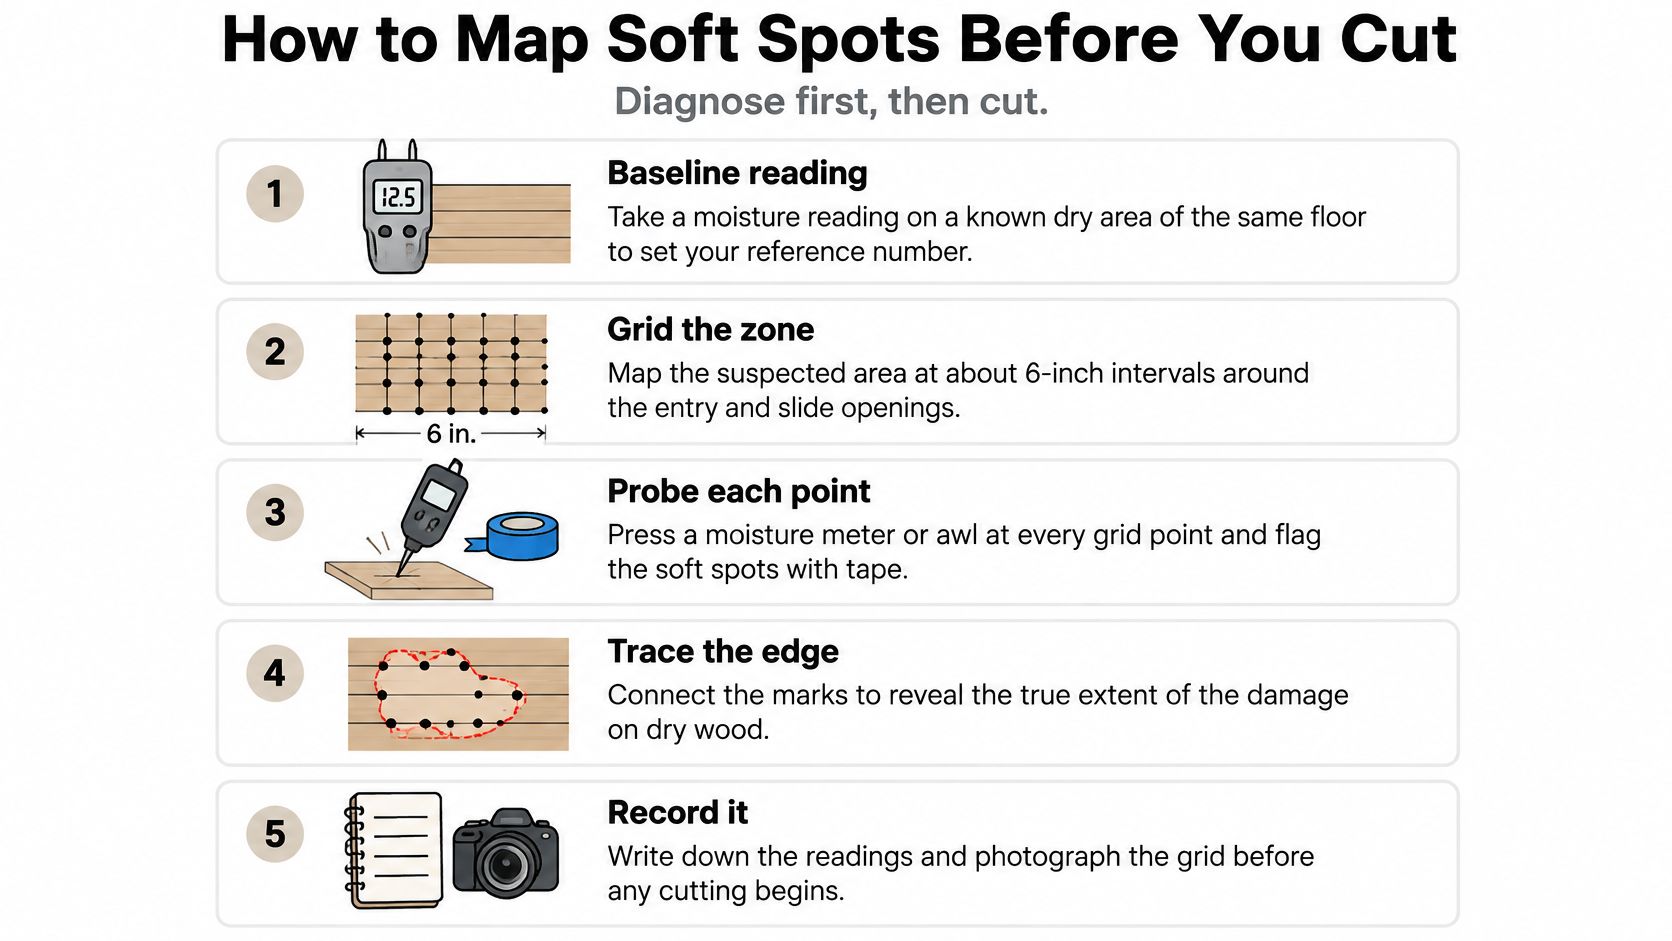
Establish a useful moisture map
- Set a baseline. Take readings on an unaffected section of the same floor using the same meter setting. Write down the location and result.
- Grid the suspected area. Include the entry, slide openings, toilet flange, shower, sinks, window areas, vents, and plumbing penetrations.
- Compare readings, not just colors. A meter's warning light isn't a structural assessment. Material, calibration, surface coverings, and nearby metal can affect interpretation.
- Expose and probe. Lift the covering where practical and press an awl into suspect plywood. Sound material resists; deteriorated fibers may crumble or allow the tool to sink.
- Inspect below and mark hazards. Locate framing, wiring, plumbing, tanks, and propane lines before choosing any cut.
Camp Addict's repair guidance uses below roughly 15% as a practical benchmark supporting drying and surface-level repair, and above approximately 20% as a warning that moisture may remain. Neither reading overrides visibly rotten wood or a failed probe test.
Coast to Coast RV Repair recommends mapping at 6-inch intervals, identifies plywood dry-service moisture as 19% or lower, and flags readings above 19% within the outer 12 inches of a slide as a possible slide-seal problem.
Moisture readings and what to do next
| Moisture reading | What it means | Action |
|---|---|---|
| Under about 15% | Drying and surface repair may be enough if wood is sound | Dry the area, seal it, and recheck |
| 15% to 19% | Borderline against the dry baseline; within the cited plywood dry-service ceiling | Keep drying and map edges at 6-inch spacing |
| Above 19% at outer 12 inches of a slide | Water may be entering through the seal | Inspect and correct the slide seal before rebuilding |
| Above about 20% | Moisture may remain in the assembly | Correct the leak source before rebuilding |
Find the path water followed
Look for rusted fasteners, wet insulation, soft supports, crumbling plywood, mold-like growth, and water tracks. Don't crawl beneath an unsupported camper or test a badly weakened floor by repeatedly standing on it.
If readings cluster around fixtures, our RV plumbing troubleshooting guide can help you organize the leak investigation. For a useful comparison with residential wood damage, J.R. Hardwood Floor Refinishing & Cleaning offers hardwood floor water damage help, though an RV also requires inspection of its mobile structure and underside.
Go/no-go rule: Make the cut only after you've identified the leak source, located hidden services, and established sound material beyond the damaged area.
Small adhesive failures may qualify for stabilization. Rotten fibers don't.
Flooring Materials for Payload and Winter Use
The most waterproof-looking box in the flooring aisle isn't automatically the right choice. Water resistance, structural suitability, and installation compatibility are separate questions. A durable face won't protect an unsealed edge or compensate for a deck that flexes underneath it.
Choose the subfloor to match the camper's approved construction. Choose the finish to suit the room, expected moisture, and movement.
Compare the whole assembly
RV Repair Cost's 2026 guide lists luxury vinyl plank at about $4.50–$5.00 per square foot and tile or LVT at roughly $6.50–$7.00 per square foot. Those are material-selection signals, not installed restoration prices.
Replacement floor choices for campers
| Material | Cost signal | Moisture behavior | Fit in a moving camper |
|---|---|---|---|
| Luxury vinyl plank | About $4.50–$5.00 per sq ft | Water-resistant, not a leak cure | Check product weight and movement requirements |
| Tile or LVT | About $6.50–$7.00 per sq ft | Durable face; joints and substrate still matter | Tile adds stiffness; compare each product's weight |
| Laminate | Potential replacement expense after a leak | Vulnerable to swelling | Poor choice for wet entries and baths |
| Sheet vinyl | Price by sheet size, grade, and usable coverage | Few seams when properly fitted and sealed | Harder to fit and patch later |
| Matching plywood subfloor | Match existing thickness and specification | Strong when dry; vulnerable at wet edges | Preserve support spacing and finished height |
| Waterproof composite subfloor | Price the approved panel system | Designed to resist water | Confirm span, fastening, and compatibility |
Don't treat tile and LVT as mechanically identical because a price guide groups them together. Ceramic tile is rigid; vinyl tile products have different backing, thickness, and installation requirements.
The room-by-room visual is a starting point, not approval to substitute a structural panel.
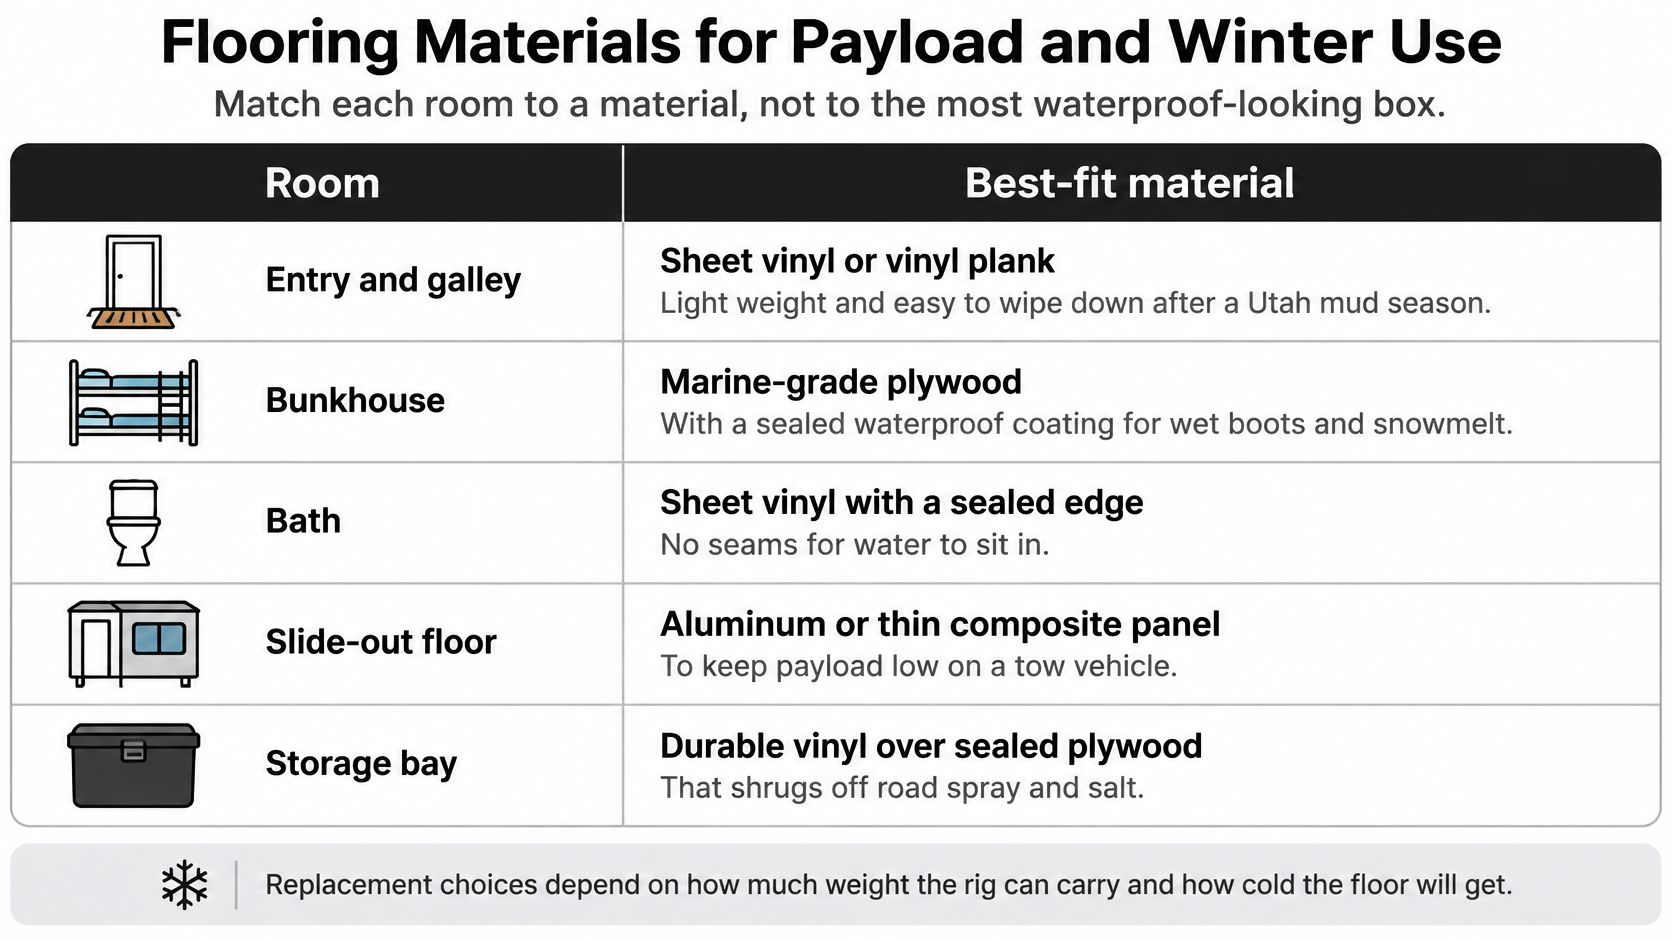
Match the material to Utah use
For a dry living area, compatible vinyl plank can be practical and repairable. At the bath and entry, sheet vinyl reduces seams, but its perimeter and penetrations still need attention. Marine-grade plywood isn't waterproof by itself, and a thin aluminum sheet isn't automatically an acceptable slide-floor replacement.
- Bunkhouse: Prioritize cleanability, doorway transitions, and protection from wet boots.
- Toy hauler: Confirm concentrated-load suitability and compatibility with existing tie-down attachments.
- Slide-out: Check clearance, roller contact, movement gaps, and the manufacturer's floor specification.
- Winter storage: Confirm the flooring's permitted installation and service temperatures.
Calculate added weight from the actual product weight per unit area, then subtract the removed assembly's weight. Compare the net change with remaining capacity after water, propane, passengers where applicable, and gear. Our tow-rating guide helps separate trailer capacity from tow-vehicle limits.
For Wasatch winters, use removable entry protection that can dry, wipe up snowmelt, and inspect the threshold each spring. Don't trap a damp mat against the new surface.
How to Replace the Damaged Camper Floor
Assume the damage boundary is marked and the leak has been located. The replacement panel must restore support, not cover the opening.
Camping World's RV flooring guide describes traditional construction using approximately ⅝-inch plywood decking over wood or aluminum framing. Measure your camper rather than treating that common thickness as a universal specification.
Use the process visual as an overview, with the leak-correction and drying checkpoints below controlling when work proceeds.
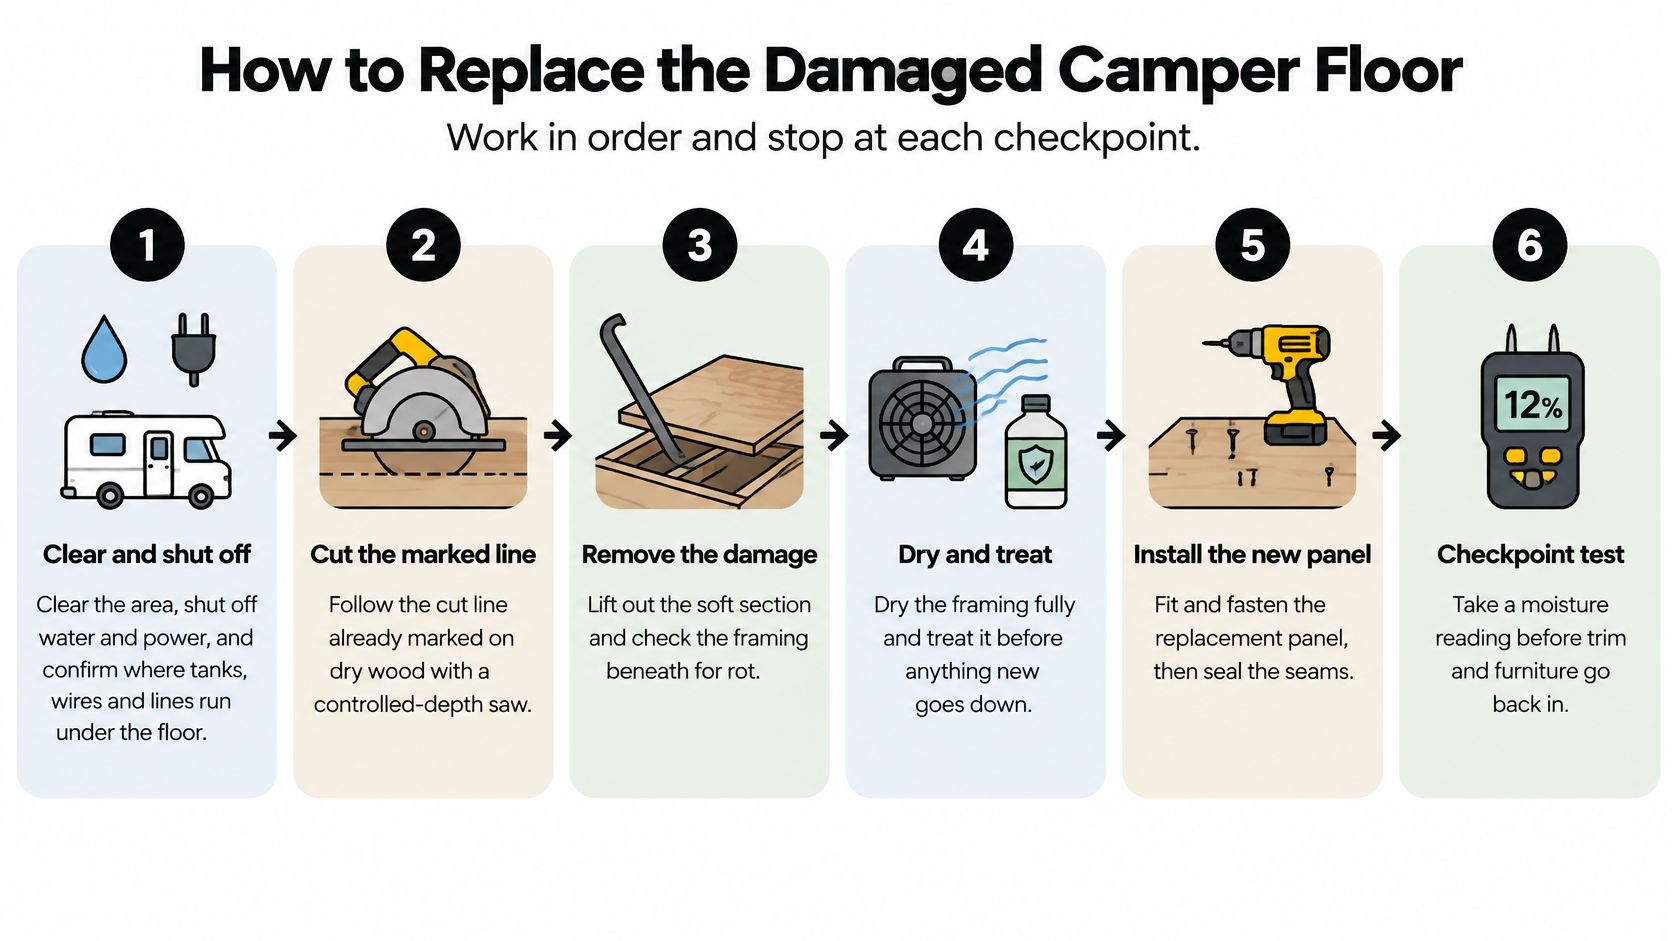
Prepare and expose without adding damage
Clear the work area and isolate services. Remove loose furniture and accessible trim. Shut off water, disconnect shore power, isolate battery power as appropriate, and confirm hidden line locations. Stop if you can't establish what's beneath the cut.
Correct the leak and dry the assembly. Repair the roof opening, window seal, plumbing connection, or slide seal responsible. Use controlled airflow and a dehumidifier, then compare readings with the dry baseline. If wet material must be removed to permit drying, treat that as controlled exposure, not permission to rebuild over moisture.
Cut back to sound material. Save an undamaged thickness sample and confirm the original specification. Set the saw depth to the deck only, and finish blind corners with a controlled hand tool rather than plunging deeper. Stop if deterioration continues beneath a wall or cabinet.
Install blocking or cleats. Support every otherwise unsupported panel edge. Attach the supports to sound material, not weakened plywood. A panel that fits neatly but lacks edge support will still move underfoot.
For general preparation principles, Flacks Flooring prep and removal advice offers useful context on exposing a substrate before installation. RV work also requires protecting concealed services and preserving the camper's structure.
Rebuild and verify
Fit and fasten the replacement panel. Dry-fit first, checking height at doors, fixtures, and transitions. Use fasteners suited to the support material and assembly, with spacing specified for the repair. Don't overdrive screw heads or use longer screws without verifying underside clearance.
Seal exposed edges and penetrations. Apply compatible edge protection and joint sealant. Keep sealant out of movement joints that the flooring system requires to remain functional.
Install the room-appropriate finish. Use the specified adhesive or floating installation method. Leave required movement allowances, and verify slide operation before reinstalling trim that could pinch the floor.
Operate and recheck. Run the water system, inspect accessible connections, and retest vulnerable floor areas. Check beneath the repair where accessible before putting furniture and stored gear back.
A solid-feeling panel isn't the final test. The assembly also needs dry supports, secure edges, working clearances, and no renewed leak.
Epoxy and solvents require ventilation, suitable gloves, eye protection, and respiratory protection matched to the product's safety information. Don't use a generic dust mask as solvent protection.
For an additional visual reference, review the repair video alongside your camper's construction requirements.
Stop and arrange professional assessment when framing is soft, a structural slide floor is involved, or cabinets and appliances must move. Those conditions change both the support problem and the removal sequence.
Mistakes That Soften a New Camper Floor
The most expensive cosmetic mistake is installing a pretty surface while leaving the water entry point open. New flooring may hide the evidence temporarily, but it doesn't change what happens when the next storm reaches the same opening.
A useful post-repair check includes the doorway, not just the center of the new panel.
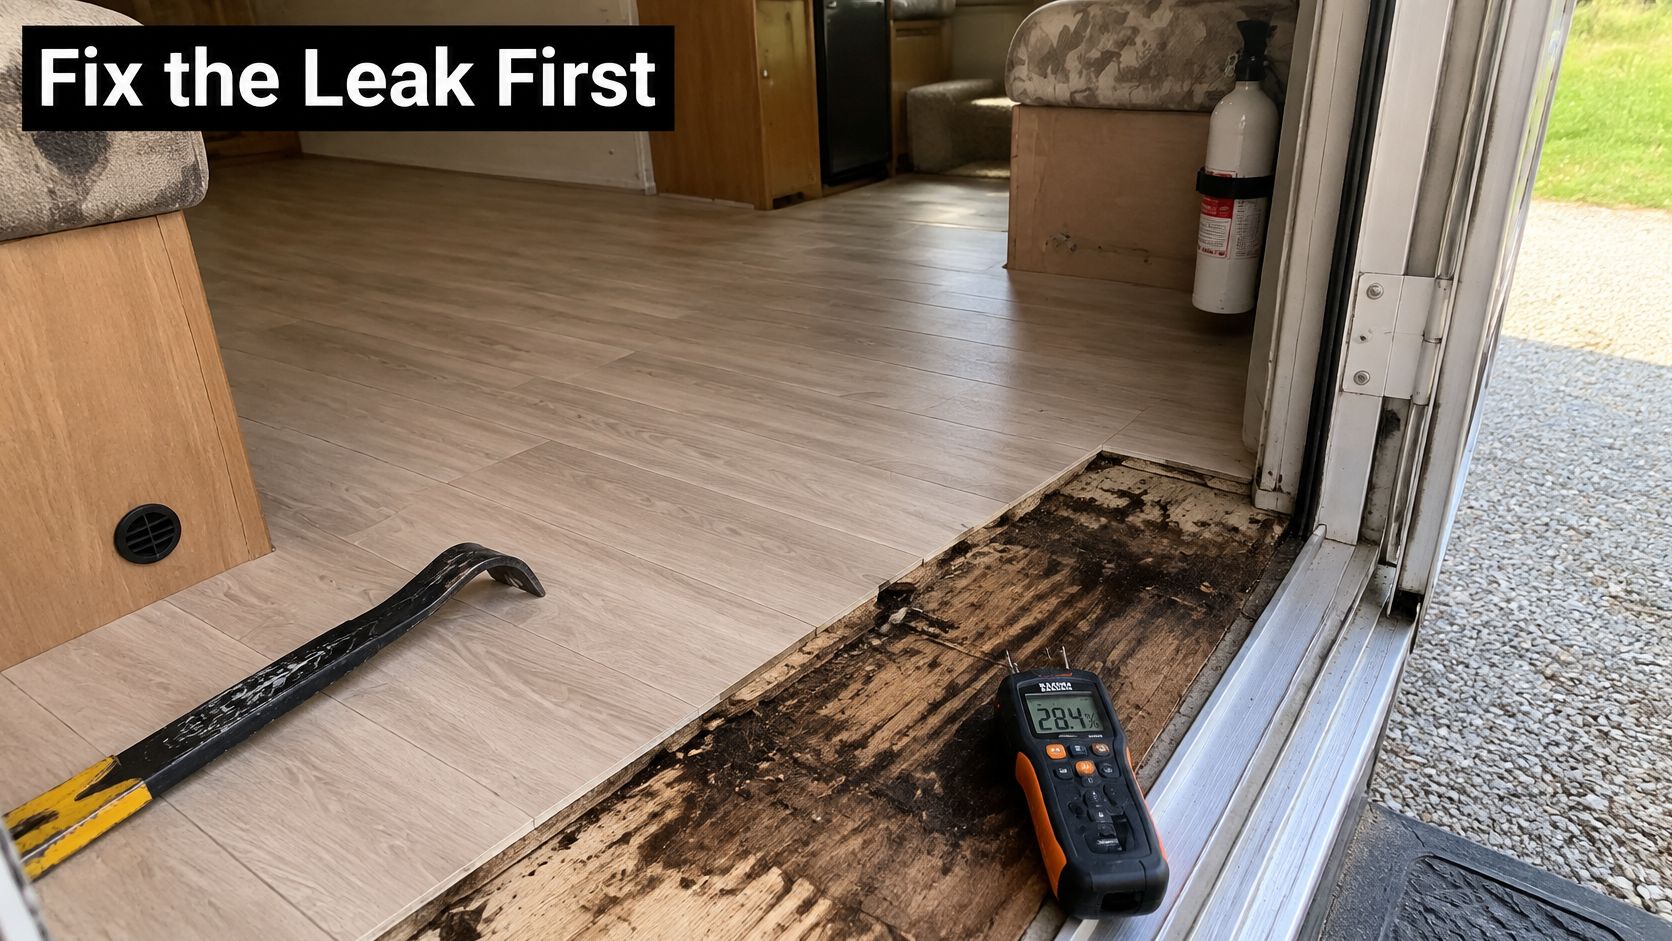
Five traps worth avoiding
Buying the discount before inspecting the deck. A used camper with fresh vinyl and a low asking price still needs a moisture map. Check slide perimeters and the entry threshold before assuming the seller completed a structural repair.
Confusing a waterproof face with a sound foundation. Vinyl can conceal plywood that no longer grips screws. For a family loading a bunkhouse for Bear Lake, the question is whether the deck supports people and cargo, not whether the pattern looks new.
Putting a damp camper into cold storage. A cold garage isn't a drying system. Before winter storage in the Salt Lake Valley, remove wet gear, investigate roof damage, and allow the assembly to dry rather than closing everything around it.
Skipping the first-trip inspection. After a spring trip around Jordanelle or a long I-15 haul, inspect fresh transitions, disturbed plumbing, and repaired exterior openings. Temperature changes and road movement make that first outing a useful verification opportunity.
Checking only the repaired center. Revisit slide outer edges and the entry threshold after the first wet weekend and again in spring. Look for renewed discoloration, displaced sealant, or a change in firmness beyond the patch.
Inspect the opening that caused the problem
If the leak began overhead, a floor-only inspection won't tell you whether the repair is complete. Our travel-trailer roof repair guide can help you identify roof details that need closer attention before the camper returns to storage.
Keep photographs of the exposed repair and finished transitions. They give you a useful reference when checking for movement or selling the camper later.
Don't respond to a new soft feeling by adding another layer. Reopen the diagnosis while the evidence is still accessible.
Choose a DIY Patch or Local Repair
A soft spot by the bathroom door looks small until the plywood comes up. If the deck crunches under a heel and the moisture meter still climbs after a week of drying, the repair is structural. Set scope from moisture readings and support condition first, then match material to payload, slide clearance, and cold-weather use. New vinyl over a damp deck can look finished for a season and fail at the fasteners.
DIY fits an accessible, localized repair with sound supports and a clearly understood construction. You should be able to reach the services below the opening, remove damaged material without disturbing structural attachments, and verify that the replacement will be supported.
Choose a shop when readings stay high after drying, supports feel weak, or the work reaches a slide, cabinet base, appliance, tank, or propane line. Deciding what can safely remain is harder than cutting plywood. Freeze-thaw cycles in the Mountain West can turn a small breach into a soft perimeter.
Use the leak source to choose the next action
A bathroom soft spot needs more than a flooring estimate. Check supply fittings, drain connections, the toilet attachment, shower enclosure joints, and the underlying waterproofing arrangement.
Melbourne Tiling Services P/L's explanation of fixing a leaking shower membrane helps distinguish surface-joint problems from failures beneath a shower finish. It is residential guidance, so an RV shower still needs assessment for its pan, wall, drain, and movement details.
Before requesting an inspection, gather:
- Location photographs, including nearby exterior openings.
- Moisture notes, with baseline comparisons and dates.
- Repair history, including overlays, sealants, or previous leak work.
- Travel constraints, such as a planned departure or an occupied camper.
Rick described scheduling while traveling: “Colton listened to our RV issues and immediately fit us into the repair schedule, which was important as we were on a road trip.” That is his experience, not a promise of immediate availability, so contact us before planning travel around a repair.
Make the inspection the first purchase
Our RV service department in Millcreek provides maintenance checks, repairs, installations, plumbing work, and electrical work. A damaged floor may start at a water connection or require safe access around electrical components.
Customers can send questions about sales, service, parts, or financing through our contact form. Include the camper's identifying information and inspection notes so our team can understand the concern before discussing next steps.
Let the moisture map set the repair scope. Arrange the inspection before buying flooring, and compare repair with replacement after you understand the structure.
Camper Floor Replacement FAQs
Can new vinyl hide rot?
It conceals rot but cannot repair it. A weak deck flexes and loses fastener grip, so the swap fails on cold, wet trips.
Is epoxy enough for a soft spot?
Epoxy stabilizes some delaminated areas. It cannot replace rotten wood or failed supports. Probe first; mush means the repair includes new structure.
How long does a DIY floor repair take?
Budget investigation, drying, material prep, and finishing, not just panel installation. A patch may take several weekends; concealed damage can extend the work.
Will winter storage in Utah stop a leak?
No. Storage does not close an opening or remove trapped moisture. Inspect before storage and again before the camper returns to use.
Should I buy flooring before the inspection?
Confirm boundary, structure, finished height, and installation method first. Otherwise, the product may not suit slide clearance or room. Payload matters: a heavier floor may exceed capacity.
Motor Sportsland offers RV maintenance, repairs, plumbing, and electrical work for the problems behind a soft floor. Visit Motor Sportsland to contact our team about an inspection before you buy replacement flooring, or stop by our Millcreek or Spanish Fork location.
