
Weight Distribution Hitch Guide for Safer RV Towing

You're packed for Jordanelle, the kids are buckled in, and your travel trailer is finally coupled. Then you step back and see it. Your truck's rear is squatting, its nose is pointed up, and the steering already feels light before you've left the driveway. Don't ignore that stance. A properly matched weight distribution hitch can restore control, but only if you size it to your trailer's actual loaded tongue weight, not a brochure number.
Why Utah RV Owners Should Care About Weight Distribution
A Salt Lake City family came to our service bay after their first run to Bear Lake. They'd loaded their new bunkhouse with water, bikes, coolers, and gear for four kids. On I-15 the steering felt vague. Climbing toward Parleys Summit, passing trucks pushed the trailer around and braking took more planning than it should have.
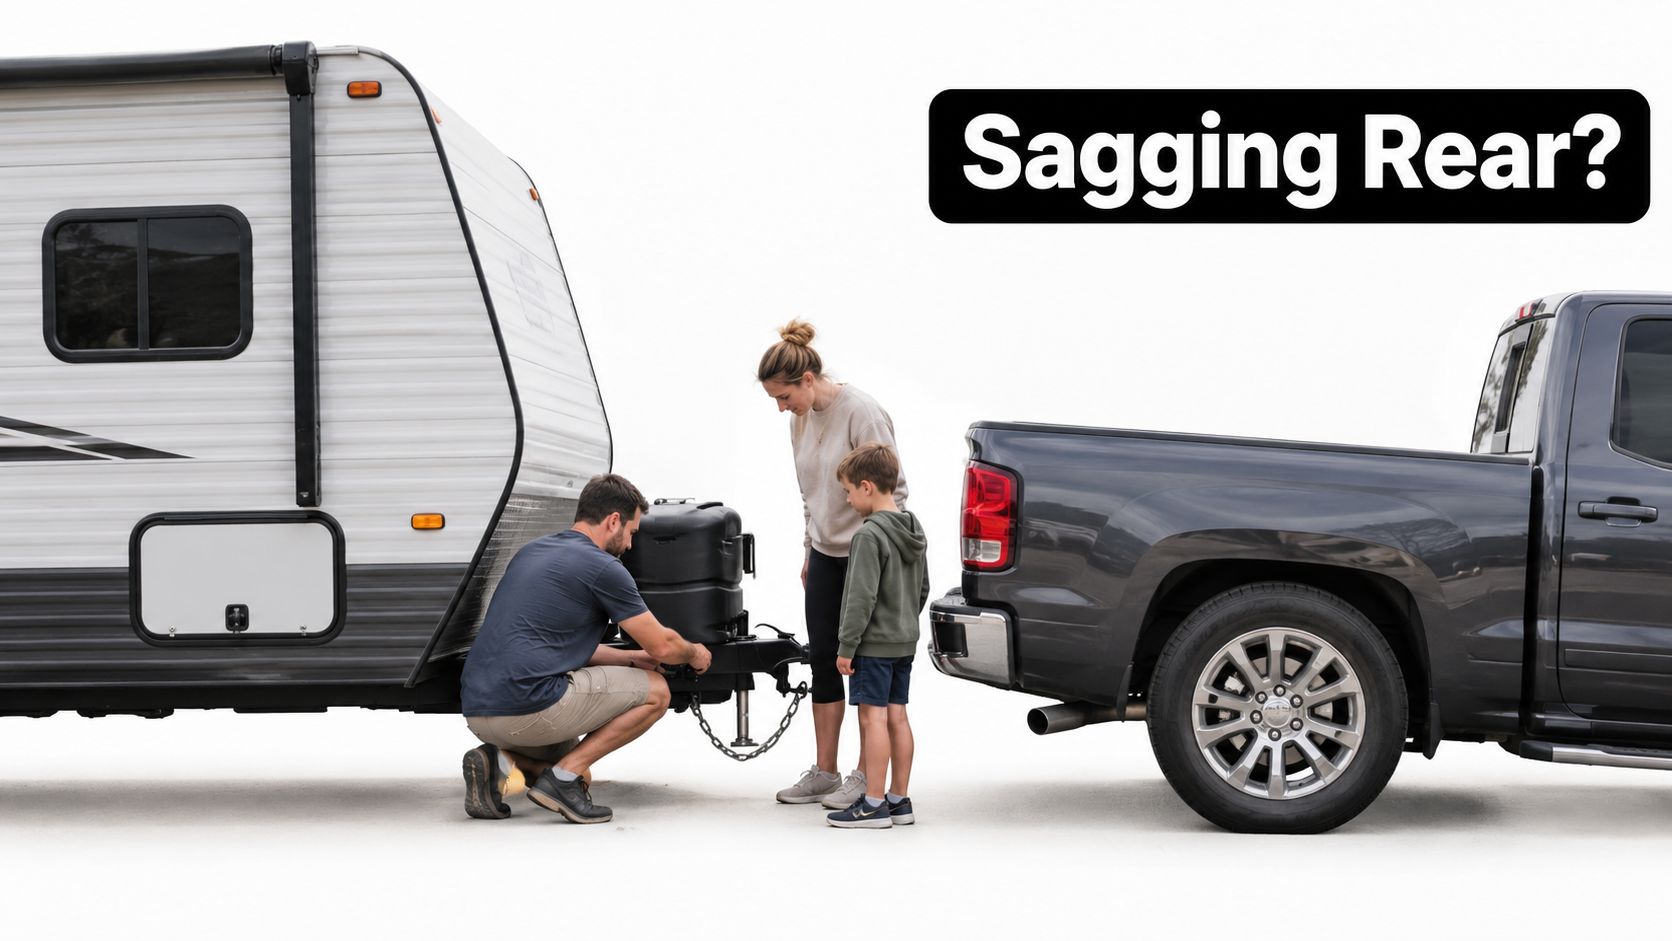
Their trailer wasn't defective. The tongue load was sitting behind the truck's rear axle, unloading the front tires. That's the core problem a weight distribution hitch addresses. It moves part of that vertical load forward and back through the trailer axles so your tow vehicle keeps a more level attitude.
What Goes Wrong Without It
- Light steering: Reduced front-tire load makes lane changes and emergency corrections less precise.
- Poor braking balance: A nose-high truck can't put its front brakes to work as effectively.
- Rear squat and porpoising: The combination pitches over dips, expansion joints, and rough canyon roads.
- More sway exposure: Wind in the Wasatch foothills and air wash from semis have more influence on an unsettled rig.
Utah towing magnifies small setup errors. Long grades, crosswinds, high summer loads, and mountain descents demand margin. Getting distribution right isn't about making the truck look level in a photo. It's about preserving steering authority and braking when a deer steps out near Heber or traffic stacks up on a downgrade.
Our advice is direct. If your front end rises noticeably when you couple up, stop guessing. Measure the loaded rig, check every rating, and set the hitch to the vehicle and trailer manufacturers' instructions. That's the difference between white-knuckle towing and a calm drive to camp.
What a Weight Distribution Hitch Does
Set a loaded trailer's tongue on a ball mounted behind the rear axle and the truck rotates. The rear drops, the front rises, and steering load goes with it. A weight distribution hitch counters that rotation with spring bars working as levers.
The visual below shows the mechanical advantage in action, with load moving forward to the steering axle and rearward to the trailer.
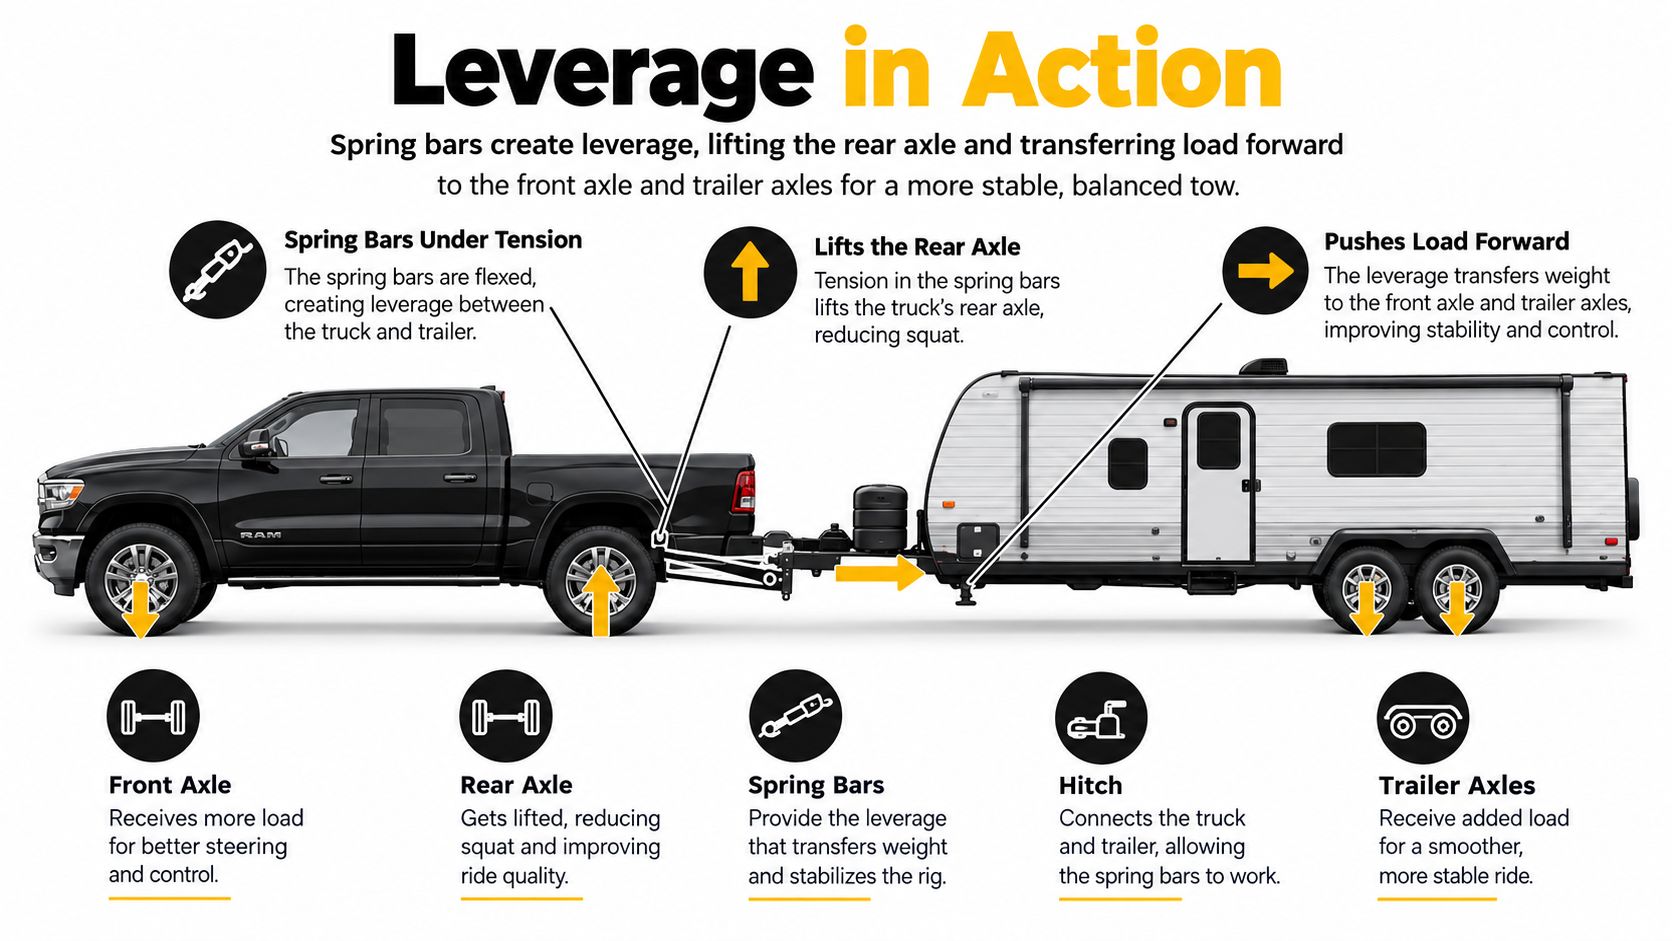
Tension the bars and they apply torque at the hitch head. That torque lifts at the receiver, pushes load onto the tow vehicle's front axle, and adds load through the trailer axle group. The USDA Forest Service guidance on load-leveling hitches describes the same transfer from the rear axle to the front axle and trailer axles using spring bars and chains.
The Parts You Are Adjusting
Walk the hardware from the truck outward. The shank slides into the receiver and sets drop or rise so the trailer can sit level. The hitch head holds the ball and spring bar sockets, and its tilt sets bar angle, which is where most of your distribution force comes from.
The spring bars flex under tension and create the redistributing force. Lift brackets and chains connect the bars to the trailer A-frame and set that tension on most designs we install. At the end of the line, the hitch ball and coupler carry the coupling load and must match in size and capacity.
None of this is new technology. The SAE J684 standard for trailer couplings, hitches, and safety chains was first issued in January 1938 and revised repeatedly through 2005, when it applied to automotive-type ball-and-socket equipment for trailers up to 10,000 pounds.
Know the limits before you buy. The hitch redistributes load. It does not raise your truck's payload, axle, receiver, tire, or tow ratings. You are managing where weight sits, not erasing it, so the whole combination, hitch, receiver, bars, truck, and trailer, must be rated for the measured loaded weight.
Understanding Tongue Weight and Why It Matters
The sizing number that matters most is loaded tongue weight, which is the downward force the coupler puts on the hitch ball. For conventional bumper-pull trailers, the NHTSA guidance placing tongue weight at 10% to 14% of gross trailer weight gives you the benchmark, with the remaining load carried by the trailer running gear.
This graphic puts that benchmark into a concrete example you can use at the scale.
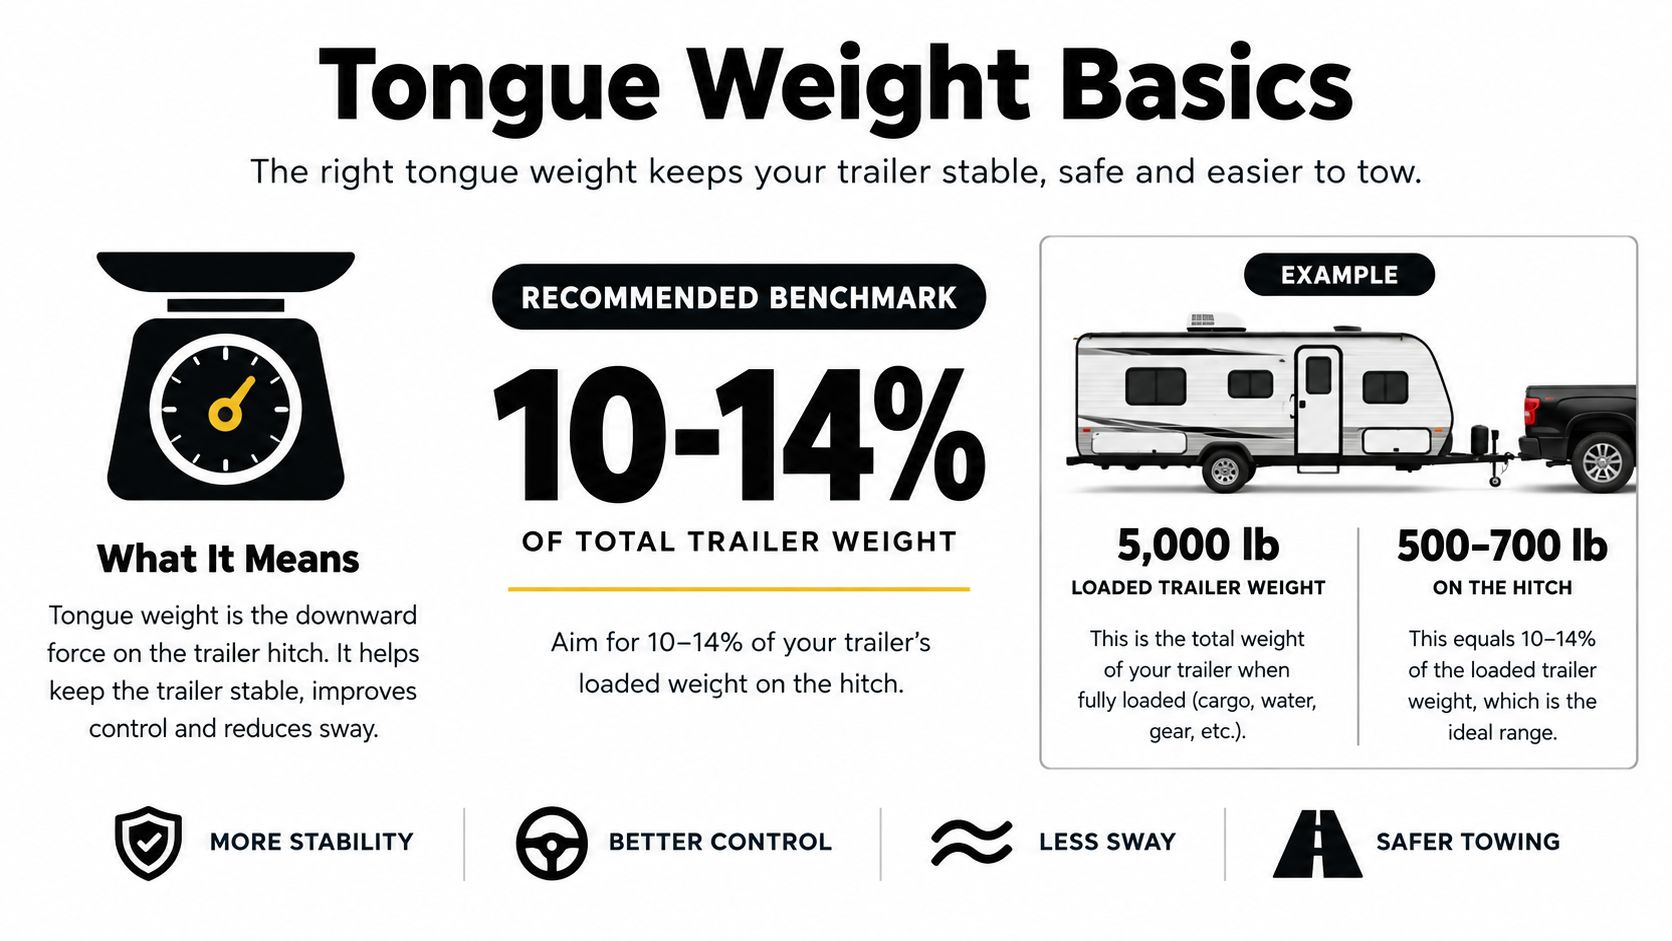
Run the math on a 5,000-pound loaded trailer. You should see roughly 500 to 700 pounds on the hitch, while the trailer axles, wheels, and tires support the rest. That range is not trivia. Too little tongue weight invites sway. Too much overloads the receiver and rear axle and steals front-axle load.
Measure loaded, not empty. Brochure dry weight leaves out the trip you are actually taking.
Water, propane, batteries, food, bedding, tools, and a generator change the number fast. A bunkhouse packed for kids or a toy hauler carrying a motorcycle behind the axles can shift balance in the wrong direction. Cargo placement matters as much as cargo weight, so load heavy items low, secure them, and avoid stacking weight at the very rear.
The video below is a useful visual check before you weigh your own combination.
If you're still sorting out terminology, read our detailed explanation of hitch weight for Utah RVers and then get a real measurement. Don't select spring bars from gross trailer weight alone. Select them from the tongue weight your loaded trailer produces.
Do You Need a Weight Distribution Hitch
A truck can be within its tow rating and still need a weight distribution hitch. The deciding factors are the loaded combination, the receiver's limits, and the vehicle maker's requirements. Start with the labels and manual, not a campground rule of thumb.
Check the setup in this order:
- Confirm the limits. Read the truck and receiver ratings for weight-carrying and weight-distributing use. Check payload, axle ratings, and tire limits too.
- Load for travel. Include passengers' gear, water, propane, bikes, and powersports cargo.
- Weigh the loaded combination. Measure tongue weight with a scale or public-scale procedure, then compare it with the hitch's spring-bar range.
- Assess how the truck sits and steers. Front-end rise, pronounced rear squat, light steering, porpoising, or headlights pointing high are signs to stop and reassess the setup.
Requirements differ by vehicle. Ford's F-150 towing guidance gives model-specific hitch requirements. Chevrolet also specifies weight distribution and sway control above 600 pounds of tongue weight for certain applications. Follow the instructions for your exact truck and receiver; a neighbor's setup is no substitute.
Hitch class alone won't settle the choice:
| Hitch Class | Typical GTW Range | Common RV Use Case |
|---|---|---|
| Lower classes | Lighter trailers | Small utility trailers and very light campers within the receiver label |
| Mid classes | Moderate trailers | Many single-axle and smaller travel trailers |
| Higher classes | Heavier trailers | Larger travel trailers and toy haulers, provided the truck also qualifies |
Some half-ton trucks can tow moderate trailers in weight-carrying mode when the vehicle and receiver labels allow it. If the manual requires weight distribution, use it. If the loaded setup lifts the truck's front axle, correct the setup before driving. A hitch cannot make an overloaded truck-and-trailer combination safe.
Weight Distribution vs Sway Control and How They Differ
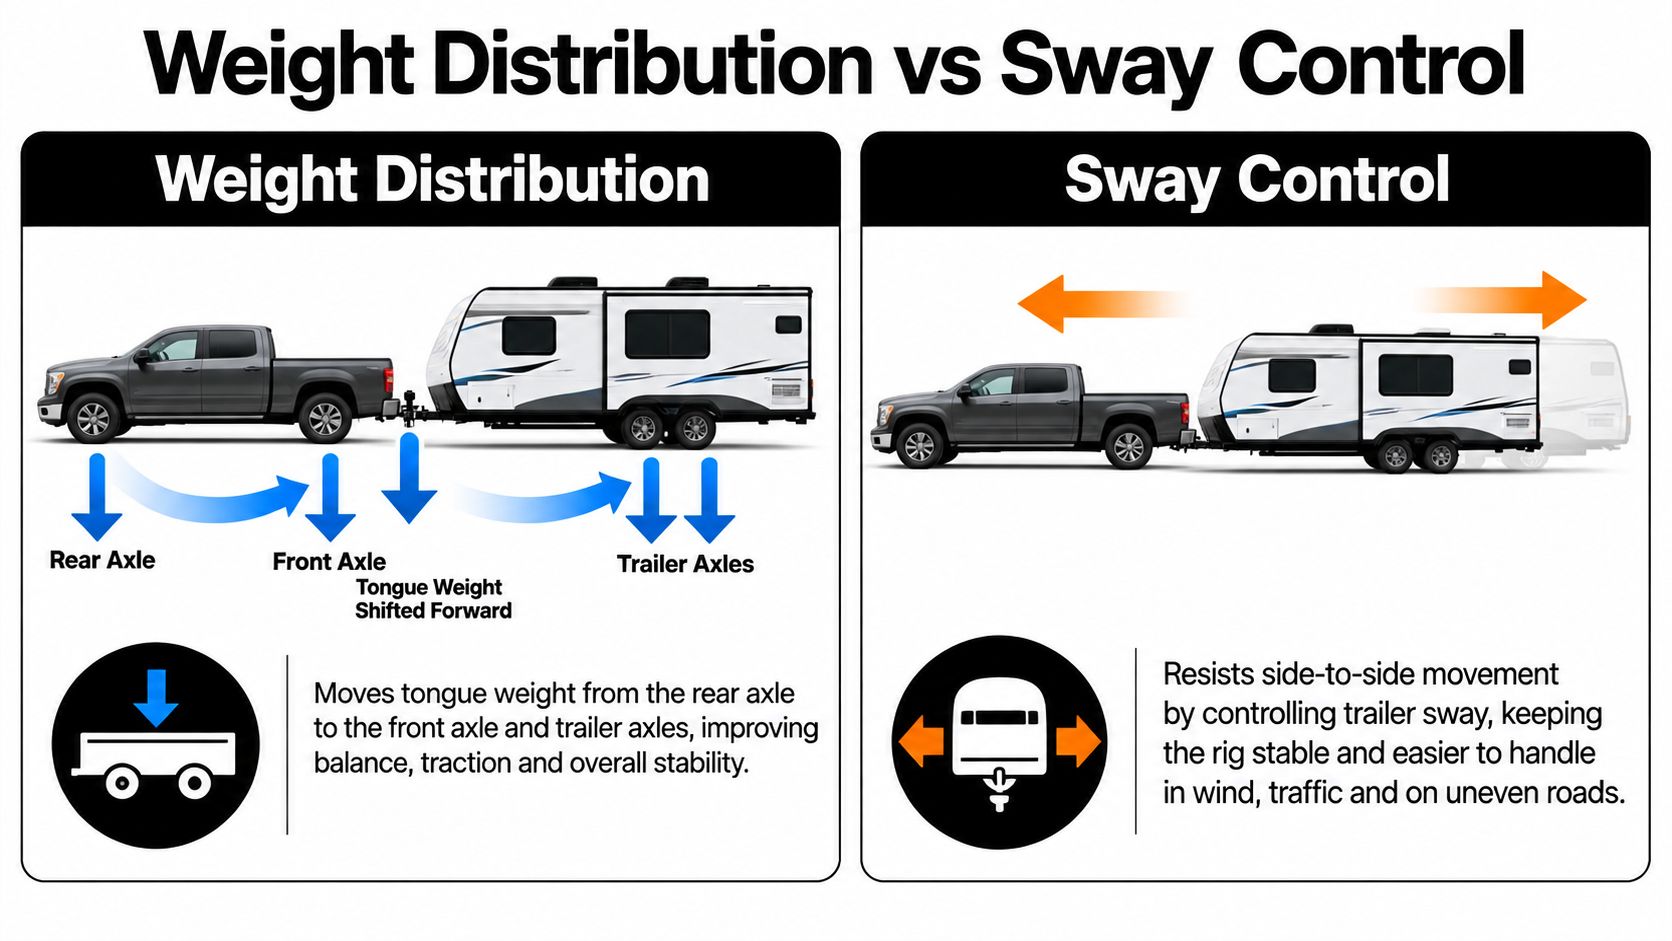
These terms aren't interchangeable, and treating them that way causes bad purchases. Weight distribution manages vertical load. Sway control resists yaw, which is the trailer rotating side to side behind the truck.
This comparison separates the vertical job from the lateral job.
| Function | Weight Distribution | Sway Control |
|---|---|---|
| Main problem | Rear squat and lost front-axle load | Side-to-side trailer movement |
| Force involved | Vertical tongue load | Wind, road inputs, passing vehicles, speed, poor loading |
| Hardware action | Spring bars transfer load between axles | Friction, cam action, or integrated resistance slows yaw |
| Fixes bad cargo loading | No | No |
Basic distribution hitches may do only the vertical job. Integrated systems combine distribution with built-in sway resistance. Add-on friction sway control uses a sliding friction pad, while dual-cam designs use cam geometry to help keep the trailer centered. Integrated systems cost more and simplify hookup, but compatibility with your coupler, frame, and surge brakes, if equipped, still matters.
Diagnostic rule: If sway continues after correct distribution, look for low tongue weight, rear-heavy cargo, tire problems, worn suspension, or excessive speed before blaming bar strength.
That's the candid answer to when a weight distribution hitch is the wrong fix for sway. It can't compensate for underinflated tires, poor alignment, loose cargo, or an incompatible receiver. Read our Utah-focused guide to RV sway control for the deeper diagnostic sequence, then fix causes in order. Verify weights first, inspect tires and bearings second, and choose sway hardware third.
Sizing and Rating Your Hitch the Right Way
A trailer's loaded weight alone cannot size a weight distribution hitch. Match the hitch's gross trailer weight rating to the trailer's actual loaded weight, then match the spring bars' rating to the measured tongue weight. Those are separate ratings, and both must fit your setup.
Start with the weight your rig carries on the road. Load the trailer as you travel, including water, gear, and recreational equipment, then weigh it and measure tongue weight. A bar rating that is too low may not transfer enough load. Bars that are too stiff can create a harsh ride and put needless stress on the receiver, coupler, brackets, and trailer frame.
The receiver has its own limits. Check its weight-distributing ratings along with the truck's payload, axle and tire ratings, and gross combined weight rating. Your truck's towing capacity and how to calculate it are part of the check, not a replacement for it. The hitch ball and shank must also be rated for the load.
Ford's 2025 Lincoln towing guide recommends about 50% front-axle load restoration with load bars. Follow the truck and hitch manufacturers' instructions for your specific combination; adding more bar tension is not automatically safer.
Before buying, write down four figures: loaded trailer weight, measured loaded tongue weight, the receiver's weight-distributing limit, and the truck's required front-axle restoration target. If any are unknown, weigh the rig before choosing a spring-bar rating.
Installation and Adjustment for a Level Ride
Don't judge setup by eyeballing the rig in a parking lot. Measure it. A tape measure, level ground, and the hitch, truck, and trailer manuals will tell you more than any guess about whether the stance looks right.
Set Up With Measurements
- Record the truck alone: Park on level ground, loaded as you'll travel, and measure front and rear wheel-well reference heights.
- Couple without bars: Latch the trailer, retract the jack, and measure again to see how much tongue load raised the front and dropped the rear.
- Engage the spring bars: Follow the hitch maker's chain link, bracket, or head-tilt procedure exactly, using the tongue jack to reduce bar load during connection.
- Measure a third time: Compare the final front height with the uncoupled reference and adjust only within the truck and hitch instructions.
- Confirm trailer attitude: Set ball height and shank position so the trailer sits level or as its manufacturer specifies, with safety chains, breakaway cable, lights, and brakes checked.
Manufacturer guidance summarized by CURT's weight distribution setup instructions targets final heights within approximately 1/2 inch of the original measurements. Treat that as an example of measurement-based setup, not a substitute for your specific manuals. Each truck and hitch combination can call for a different restoration target.
The three-measurement method also appears in the weight-distribution hitch manual describing uncoupled, coupled, and tensioned wheel-well readings. That sequence shows what the tongue did, what the bars corrected, and whether you've overshot. Average side-to-side readings if your instructions call for it, and always measure on level ground.
Read the Result Honestly
- Front still high: Too little load has returned to the front axle. Increase bar engagement or adjust head angle per the manual.
- Front pushed below reference: You've likely over-adjusted. Back off before you stress the receiver, frame, brackets, or coupler.
- Trailer nose high or low: Correct ball height and shank position. Don't use bar tension to fake trailer level.
- Bars or brackets bind: Stop and recheck bracket placement, bar clearance, coupler style, and frame compatibility.
Now for the assumption we push back on every week. The strongest hitch isn't automatically the safest hitch. Oversized bars can ride harshly and drive excessive force into the receiver and trailer frame. They can also mask the problem, such as a toy hauler loaded tail-heavy behind the axles, while giving you false confidence.
A customer once wanted heavier bars to cure sway on the way to the Great Salt Lake. The actual issue was cargo stacked in the rear garage, which reduced tongue weight. We moved weight forward, secured it, verified the tongue load, and kept correctly matched bars. The rig calmed down because the cause changed, not because the hardware got bigger.
Right-sized and properly adjusted beats biggest possible, every time.
Adjust with the trailer loaded as it will travel. Water is the sneaky variable for Utah trips. A setup dialed in empty at home can change after you fill tanks for dry camping, add a generator, or load dirt bikes. Recheck wheel-well heights whenever your cargo layout changes materially.
Take a short, cautious test drive after adjustment. Confirm steering feel, braking balance, trailer brake gain, and clearance over driveway aprons and fuel station entrances. Listen for abnormal binding, then recheck bracket hardware and coupler latch after the first stop. If the combination still feels unsettled at moderate speed, don't keep adding tension. Park it and diagnose weight, tires, alignment, and loading.
Maintenance, Common Problems, and Utah-Specific Tips
A weight distribution hitch lives in road grit, winter salt, and campsite dust. Treat it like safety equipment, because it is. A quick inspection before each trip beats discovering a cracked bar or loose bracket at a rest stop outside Nephi.
Pre-Trip Inspection Routine
- Spring bars and head: Look for cracks, deep rust, bent bars, worn sockets, and excess play in the head or shank.
- Ball and coupler: Verify size match, latch operation, visible wear, and ball tightness to the manufacturer's torque specification.
- Brackets and chains: Check for shifted brackets, stretched or damaged links, dragging chains, and missing clips or pins.
- Pivot points: Clean and lubricate only where your hitch manufacturer directs, since some sway surfaces must stay dry.
- Receiver and frame: Inspect for cracked welds, elongated pin holes, corrosion, and loose mounting hardware.
Rattling chains usually mean poor routing, worn components, or brackets that have moved. Binding in cold weather can point to contamination, damage, or the wrong lubricant in the wrong place. Don't silence a noise by overtightening bars. Find what's moving.
Utah adds its own wear. Repeated grades through the Wasatch Mountains work the coupler, bars, and trailer brakes harder than flat towing. Winter storage lets moisture and road salt attack chains and fasteners, so clean, dry, and protect hardware before you park the trailer for the season. High-altitude trips also tempt owners to carry extra water and gear, which changes tongue weight and deserves a fresh measurement.
Motor Sportsland is one local option for a hands-on hitch inspection and adjustment in Millcreek or Spanish Fork, alongside independent shops and do-it-yourself setup with a scale and the manuals. Whichever route you choose, bring the rig loaded. An empty trailer on the service lot can't prove how your family, water, and cargo will behave on I-15.
Bring your loaded truck and trailer to Motor Sportsland in Millcreek or Spanish Fork and our team will measure tongue weight, verify your receiver and spring-bar ratings, and dial in your weight distribution hitch for Utah grades and highways. Schedule a hitch inspection before your next Jordanelle, Bear Lake, or southern Utah trip so you leave with level geometry, restored steering load, and a setup you can trust.
